tldr;
JAMstack sites are great, due to their simplicity to develop and deploy. Static sites are also great for SEO, and load quickly providing a great user experience. But sometimes we need our sites to get data or do things. Until recently, I thought that once I crossed that threshold of needing to do something on the site, I needed to deploy an entire application. Then I learned about serverless functions; more specifically, I learned about Netlify’s option of serverless functions. And let me just tell you, they’re great. Netlify let’s you write a function (for example, in JavaScript) and upload it with your site. When your site is deployed, those functions are turned into serverless functions automatically that can be called from your site to get data or calculate data or send data somewhere. It’s a perfect setup, because there’s no real extra work in managing the serverless functions; they just work. In this article, we’ll look at how to create a Netlify Function, and then how to develop it locally and get it deployed.
Creating Your First Netlify Function
The first step in getting started is creating the function on your machine. You can do this by creating a new folder in the root of your project called .netlify. Inside that folder, create another folder called functions. This is the default location for adding your serverless functions. From here, you have two options:
- create a JavaScript file with the name you want for the function
a.
.netlify/functions/my-serverless-function.js - create a folder with the name you want for the function, and inside that folder create the JavaScript file with the name of the function
a.
.netlify/functions/my-serverless-function/my-serverless-function.js
I’m writing my functions using JavaScript, but there are other options like Go. Make sure to check the Netlify Docs for other serverless function languages if that’s what you’ll be using.
Either of these two ways will work, but in this post I’ll use the first option. I think the second option is really great if your serverless function is complicated or big, and you want to pull it out into smaller more manageable files. My functions are all pretty straight forward, though, so that’s why I’ll use that method in this post.
My function’s purpose is to use the Google Analytics API to get pageview statistics for my blog posts. When I go to a certain page on my site, the serverless function will be called and the data will be displayed on the page. So my function will be called
pageview-statistics-google.jsand will be located in the.netlify/functions/folder. I’m not going to go into the guts of the function in this post. That’s irrelevant here. Just know that the real function will call the API and return the data.
We now have the function created and ready to add content and functionality. Let’s go ahead and do that.
Adding the Functionality to Your Function
Each serverless function should export a method called handler, with the basic structure looking like this:
exports.handler = function(event, context, callback) {
  // Do stuff here

  callback(null, {
    body: "Hello world",
    statusCode: 200
  });
};
Another option for the structure is this:
exports.handler = async function(event, context) {
  // Do stuff here

  return {
    body: "Hello world",
    statusCode: 200
  };
};
The difference here is that we marked the function as async, so we don’t use the callback. Instead, we’ll return an object at the end of the function. Again, either of these methods are viable, but I’ll use the second one as I like to use async await with my functions. My serverless function looks like this:
// .netlify/functions/pageview-statistics-google.js

const { google } = require('googleapis');

const scopes = 'https://www.googleapis.com/auth/analytics.readonly';
const { GA_CLIENT_EMAIL, GA_VIEW_ID } = process.env;
const GA_PRIVATE_KEY = JSON.parse(`"${process.env.GA_PRIVATE_KEY}"`);
const jwt = new google.auth.JWT(GA_CLIENT_EMAIL, null, GA_PRIVATE_KEY, scopes);

const view_id = GA_VIEW_ID;

async function getData() {
    try {
        const response = await jwt.authorize();
        const result = await google.analytics('v3').data.ga.get({
            auth: jwt,
            ids: 'ga:' + view_id,
            'start-date': '2011-01-01',
            'end-date': 'today',
            metrics: 'ga:pageviews',
            dimensions: 'ga:pagePath',
        });

        const posts =
            result.data.rows
                .map(item => ({ path: item[0].split('?')[0], count: +item[1] }))
                .filter(post => post.path.includes('/blog/') && post.path.startsWith('/blog/'));

        return posts;
    } catch (error) {
        console.error(error);
        throw new Error(error);
    }
}

exports.handler = async function(event, context, callback) {
    if (event.httpMethod !== 'GET') {
        return { statusCode: 405, body: 'Method Not Allowed' };
    }

    try {
        const data = await getData();
        const stringified = JSON.stringify(data);
        const returnObj = { statusCode: 200, body: stringified };
        console.log('returnObj:', JSON.stringify(returnObj, null, 2));
        return returnObj;
    } catch (error) {
        console.error(error);
        return { statusCode: 500, body: `An error occurred: ${String(error)}` };
    }
};
Here’s a quick breakdown of the function. The following lines import the googleapis NPM package and set up the environment variables.
// .netlify/functions/pageview-statistics-google.js

const { google } = require('googleapis');

const scopes = 'https://www.googleapis.com/auth/analytics.readonly';
const { GA_CLIENT_EMAIL, GA_VIEW_ID } = process.env;
const GA_PRIVATE_KEY = JSON.parse(`"${process.env.GA_PRIVATE_KEY}"`);
const jwt = new google.auth.JWT(GA_CLIENT_EMAIL, null, GA_PRIVATE_KEY, scopes);

const view_id = GA_VIEW_ID;
This next part is where the Google Analytics API is actually called. It sets the metrics part of the query to pageviews and the dimensions to pagePath. This makes it so that the response will be an array of each page and the page views for that page.
// .netlify/functions/pageview-statistics-google.js

async function getData() {
    try {
        const authResponse = await jwt.authorize();
        const result = await google.analytics('v3').data.ga.get({
            auth: jwt,
            ids: 'ga:' + view_id,
            'start-date': '2011-01-01',
            'end-date': 'today',
            metrics: 'ga:pageviews',
            dimensions: 'ga:pagePath',
        });

        const posts =
            result.data.rows
                .map(item => ({ path: item[0].split('?')[0], count: +item[1] }))
                .filter(post => post.path.includes('/blog/') && post.path.startsWith('/blog/'));

        return posts;
    } catch (error) {
        console.error(error);
        throw new Error(error);
    }
}
The last part is the exported handler method, where the getData function is called and returned from the serverless function. At the beginning of the function, I check for the HTTP method of the call. I only want to accept GET requests, so if the HTTP method doesn’t match I return a 405. After that I call the getData function, JSON.stringify the array, and return the response.
// .netlify/functions/pageview-statistics-google.js

exports.handler = async function(event, context, callback) {
    if (event.httpMethod !== 'GET') {
        return { statusCode: 405, body: 'Method Not Allowed' };
    }

    try {
        const data = await getData();
        const stringified = JSON.stringify(data);
        const returnObj = { statusCode: 200, body: stringified };
        console.log('returnObj:', JSON.stringify(returnObj, null, 2));
        return returnObj;
    } catch (error) {
        console.error(error);
        return { statusCode: 500, body: `An error occurred: ${String(error)}` };
    }
};
That’s really all there is to it. The function itself is just a normal Node.js function. If you have any experience in Node, or even in just client side JavaScript, you’ll be able to create a serverless function. But we all know that we don’t write functions perfectly on the first try; we need a way to test the functions locally first. That’s where Netlify Dev comes in.
Netlify Dev
Netlify Dev is a tool that Netlify has created to help you develop and serve your application on your machine. It will automatically determine the build steps for your application and run it in an environment that closely mimics the real Netlify environment. You can read more about it here on their site. To get started, install the package globally on your machine:
npm install -g netlify-cli
When it’s done installing, you can run the netlify dev command to preview your site. The output will look something like this:

My site uses jekyll, so you can see that Netlify Dev recognizes that and runs the proper build command and serves the site locally on localhost:8080. This is great, and easy, but as it is we won’t be able to test the functions yet. We have to explicitly tell Netlify Dev to serve the functions. You can do that on the command line like this:
netlify dev -f .netlify/functions/
All we added was a flag, -f, and the path to the functions folder. The output will now look something like this:

There’s one part that’s different here, and that’s the part outlined in blue. It tells us that the Lambda server is listening on a port, in this case port 34567. This means that we can call the function by using the URL http://localhost:34567/path/to/function; in our case http://localhost:34567/.netlify/functions/pageview-statistics-google. The function will then be run and return the data just like it will when in production. I have found the best way to test the functions is to use Postman or Insomnia to call the function and test the output. There may be better ways, but this is how I’ve been doing it so far. Let me know if you’ve found a better way to do this!
Environment Variables
Many serverless functions require an environment variable of some sort, like an API key. The example we’ve been working on here needed an API key, and a couple other secrets. Obviously, you don’t want that information in your repo, even if it is a private repository. Netlify already has a build environment variable solution created and ready to use right now. You can add environment variables in the Build & Deploy settings of your site. Then, to access them in the function, you can get them from the process.env:
const { MY_API_KEY } = process.env;
You can do this for as many variables as you may need, and is a perfect solution for managing secrets in your serverless functions.
Deploying Your Functions
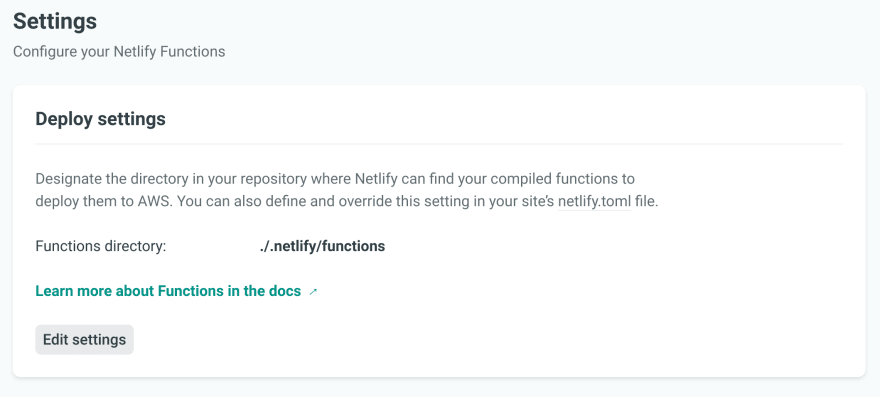
Once you’ve got your function working, it needs to be deployed. Luckily, this is just as simple as any other deployment method with Netlify. Before pushing to your master branch and kicking off a deploy though, we’ll need to tell Netlify where to find the functions. One way to do this is to go to your site’s settings on Netlify, and clicking on the Functions tab. There you can tell it where to find the functions:
Once this has been set, you can push your code to your repo and initiate a build and deploy with Netlify. Once your site is deployed, you are ready to call the function for real!
Conclusion
Netlify offers a simple, unified way to deploy your JAMstack site and any related serverless functions. It’s easy to get dynamic data and inject it into your site, or to handle form submissions, or anything else that you can think of. There’s no need to manage a separate account for your serverless functions; just do it all in Netlify. The great thing is, though, that if things ever change you could take the function with you somewhere else and it would still work. There’s nothing proprietary to Netlify here!
If you have any questions about serverless functions on Netlify, or about pricing, make sure to check out their product site here. The free plan is pretty generous, and you can start on that until you know you need more than it offers.
Good luck as you go off and build your functions for your awesome sites!
References
Here are some extra references for you to learn more about Netlify Functions:

Top comments (0)