

Signed in as @priyankanandula
Hey, you! Are you a programmer❓

If yes, this blog is for you 😃
This blog series is intended to demonstrate how to code Kafka producers and consumers.
Library will be the application that we will create. The Library Inventory Application, to be more specific.
Let's see the flow of our application👇 ...

We have a librarian and library inventory
- When a new book arrives at the library, the librarian scans it before placing it on the shelf.
Simplistic view of application architecture
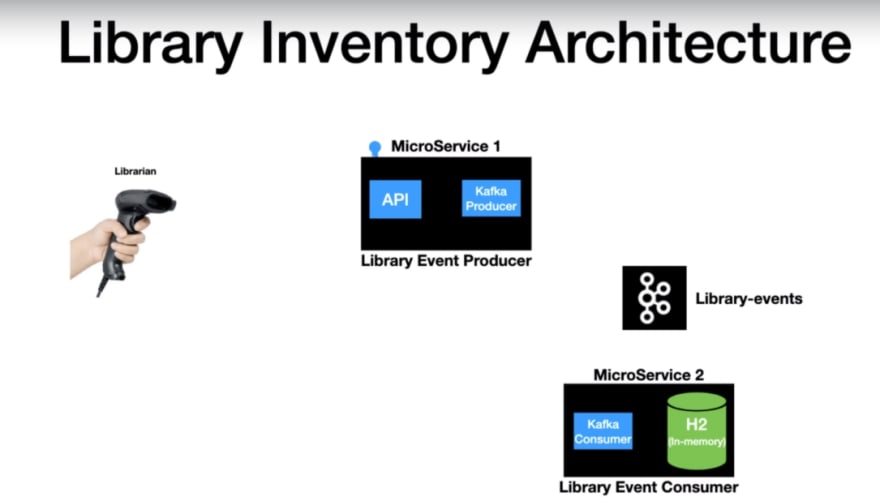
Librarian scans can be categorized as events. For that purpose, we are going to have a Kafka topic
library events.As the librarian scans the new books, which are treated as events get publishes into a library events topic.
-
We have two microservices here...
- Library event producer : When a librarian scans a book, the library event producer exposes an API that is called as soon as the book is scanned. From there, the record is passed on to the next layer, which is the *Kafka producer*, and then it is published into the *Kafka topic*.
-
- Library event Consumer :
- - The library event consumer is the second application, and it is constantly pulling new records from the topic.
- - The consumer will read these events and begin processing as soon as new records on the topic are available. .
- - The processing logic in this case is to read the message and scan the library into the in-memory database.
4.This is the end of the library scan event..
In this first part, we'll develop Kafka Producer only, which will send book details to Kafka Topic.
NOTE
- Please see my previous blog for instructions on how to install Kafka and Zookeeper.You must have this.
- Because I'll be using Gradle in this blog series, it's helpful if you have some basic knowledge of it.
- You will also learn,how to write Integration testing and Unit testing in this entire series
Let's get started with the implementation.
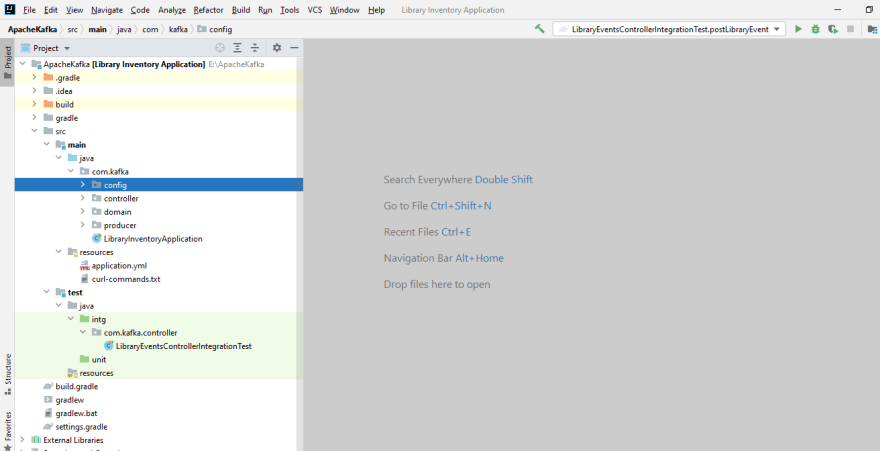
Project Structure
Implementation Steps
1.Adding Dependencies and required properties in build.gradle file :
After creating new gradle project, add the following properties in
build.gradle file...
plugins {
    id 'org.springframework.boot' version '2.2.2.RELEASE'
    id 'io.spring.dependency-management' version '1.0.8.RELEASE'
    id 'java'
}

group = 'com.learnkafka'
version = '0.0.1-SNAPSHOT'
sourceCompatibility = '8'

configurations {
    compileOnly {
        extendsFrom annotationProcessor
    }
}

repositories {
    mavenCentral()
}

dependencies {
    implementation 'org.springframework.boot:spring-boot-starter-web'
    implementation 'org.springframework.kafka:spring-kafka'
    compileOnly 'org.projectlombok:lombok'
    annotationProcessor 'org.projectlombok:lombok'
    testImplementation('org.springframework.boot:spring-boot-starter-test') {
        exclude group: 'org.junit.vintage', module: 'junit-vintage-engine'
    }
    testImplementation 'org.springframework.kafka:spring-kafka-test'
}


sourceSets{
    test {
        java.srcDirs = ['src/test/java/unit', 'src/test/java/intg']
    }
}

test {
    useJUnitPlatform()
}
2. Create application.yml file inside resources folder as below :
spring:
  profiles:
    active: local
---
spring:
  profiles: local
  kafka:
    template:
      default-topic: library-events
    producer:
      bootstrap-servers: localhost:9092
      key-serializer: org.apache.kafka.common.serialization.IntegerSerializer
      value-serializer: org.apache.kafka.common.serialization.StringSerializer
    admin:
      properties:
        bootstrap.servers: localhost:9092
---
spring:
  profiles: dev
  kafka:
    producer:
      bootstrap-servers: dev:9092
      key-serializer: org.apache.kafka.common.serialization.IntegerSerializer
      value-serializer: org.apache.kafka.common.serialization.StringSerializer

---
spring:
  profiles: prod
  kafka:
    producer:
      bootstrap-servers: prod:9092
      key-serializer: org.apache.kafka.common.serialization.IntegerSerializer
      value-serializer: org.apache.kafka.common.serialization.StringSerializer

3.Give Gradle build again :
After adding the above files give Gradle build again.
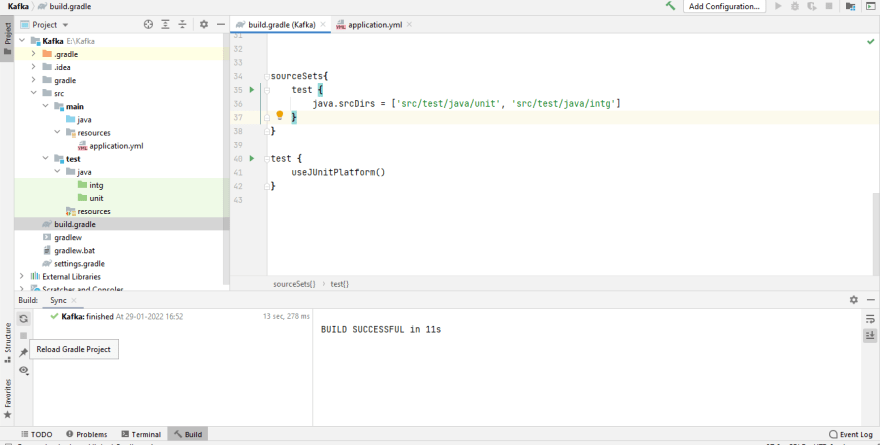
NOTE: It will automatically creates two new intg & unit folders inside test/java folder.
4. Creating packages inside src/main/java folder :
Create the following packages in java folder
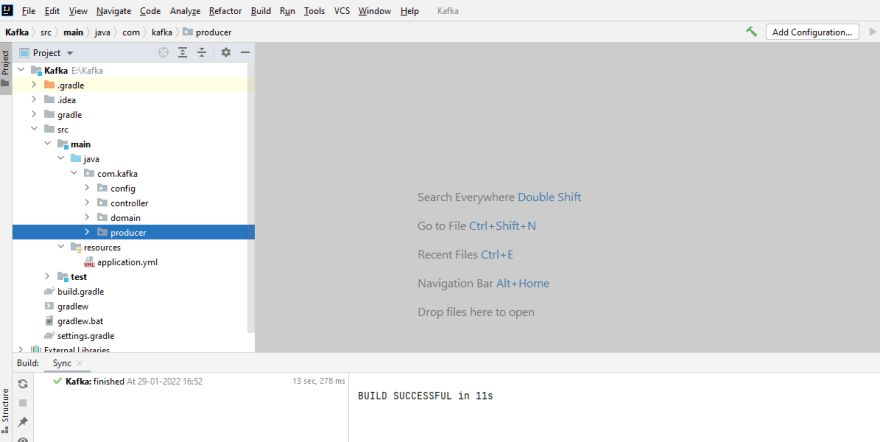
Here com.kafka is root package remaining are sub packages in this root.
5. Create Application class inside root package :
Here I am giving springboot application class name as LibraryInventoryApplication.java.
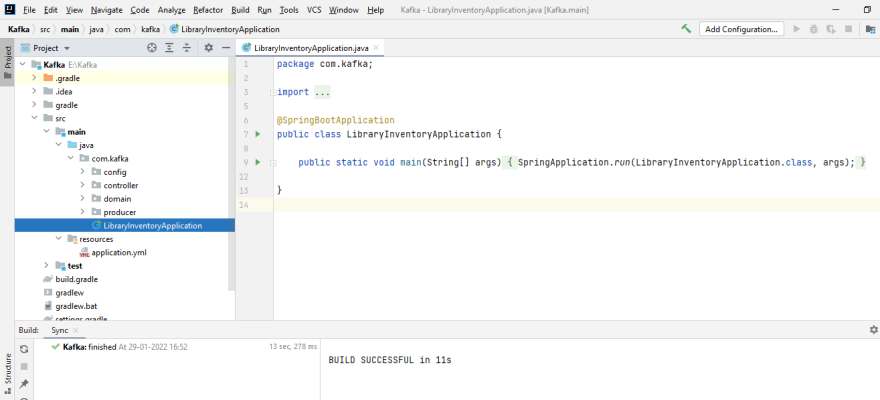
package com.kafka;

import org.springframework.boot.SpringApplication;
import org.springframework.boot.autoconfigure.SpringBootApplication;

@SpringBootApplication
public class LibraryInventoryApplication {

    public static void main(String[] args) {
        SpringApplication.run(LibraryInventoryApplication.class, args);
    }

}
6. Create configuration class inside config package :
Create the following class inside config package.I am using class name as AutoCreateConfig.
We are creating this class to create a topic in Kafka by code.

package com.kafka.config;

import org.apache.kafka.clients.admin.NewTopic;
import org.springframework.context.annotation.Bean;
import org.springframework.context.annotation.Configuration;
import org.springframework.context.annotation.Profile;
import org.springframework.kafka.config.TopicBuilder;

@Configuration
@Profile("local")
public class AutoCreateConfig {

    @Bean
    public NewTopic libraryEvents(){
        return TopicBuilder.name("library-events")
                .partitions(3)
                .replicas(1)
                .build();
    }

}
This will create library-events topic in Kafka whenever we run the application.
7. Create Models classes inside domain package :
Let's create POJO classes for Libraryevent and Book.
Create the following three classes inside domain package.

Book.java
package com.kafka.domain;


import lombok.AllArgsConstructor;
import lombok.Builder;
import lombok.Data;
import lombok.NoArgsConstructor;

@AllArgsConstructor
@NoArgsConstructor
@Data
@Builder
public class Book {

    private Integer bookId;
    private String bookName;
    private String bookAuthor;
}
LibraryEvent.java
package com.kafka.domain;


import lombok.AllArgsConstructor;
import lombok.Builder;
import lombok.Data;
import lombok.NoArgsConstructor;

@AllArgsConstructor
@NoArgsConstructor
@Data
@Builder
public class LibraryEvent {

    private Integer libraryEventId;
    private LibraryEventType libraryEventType;
    private Book book;

}
LibraryEventType.class
package com.kafka.domain;

public enum LibraryEventType {
    NEW,
    UPDATE
}
8. Create KafkaProducer class inside producer package :
Here I gave the class name as LibraryEventProducer.You can use any name.
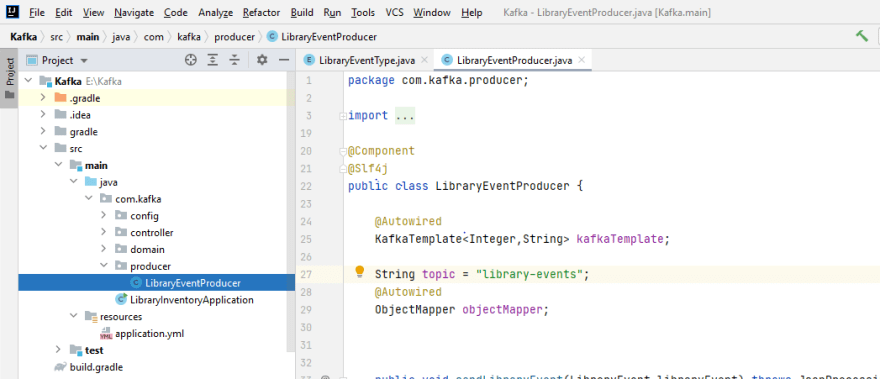
LibraryEventProducer.java
package com.kafka.producer;

import com.fasterxml.jackson.core.JsonProcessingException;
import com.fasterxml.jackson.databind.ObjectMapper;
import com.kafka.domain.LibraryEvent;
import lombok.extern.slf4j.Slf4j;
import org.apache.kafka.clients.producer.ProducerRecord;
import org.apache.kafka.common.header.Header;
import org.apache.kafka.common.header.internals.RecordHeader;
import org.springframework.beans.factory.annotation.Autowired;
import org.springframework.kafka.core.KafkaTemplate;
import org.springframework.kafka.support.SendResult;
import org.springframework.stereotype.Component;
import org.springframework.util.concurrent.ListenableFuture;
import org.springframework.util.concurrent.ListenableFutureCallback;

import java.util.Arrays;
import java.util.List;

@Component
@Slf4j
public class LibraryEventProducer {

    @Autowired
    KafkaTemplate<Integer,String> kafkaTemplate;

    String topic = "library-events";
    @Autowired
    ObjectMapper objectMapper;


    public void sendLibraryEvent(LibraryEvent libraryEvent) throws JsonProcessingException {

        Integer key = libraryEvent.getLibraryEventId();
        String value = objectMapper.writeValueAsString(libraryEvent);

        ProducerRecord<Integer,String> producerRecord = buildProducerRecord(key, value, topic);

        ListenableFuture<SendResult<Integer,String>> listenableFuture =  kafkaTemplate.send(producerRecord);

        listenableFuture.addCallback(new ListenableFutureCallback<SendResult<Integer, String>>() {
            @Override
            public void onFailure(Throwable ex) {
                handleFailure(key, value, ex);
            }

            @Override
            public void onSuccess(SendResult<Integer, String> result) {
                handleSuccess(key, value, result);

            }
        });
    }


    private ProducerRecord<Integer, String> buildProducerRecord(Integer key, String value, String topic) {


        List<Header> recordHeaders = Arrays.asList(new RecordHeader("event-source", "scanner".getBytes()));

        return new ProducerRecord<>(topic, null, key, value, recordHeaders);
    }


    private void handleFailure(Integer key, String value, Throwable ex) {
        log.error("Error Sending the Message and the exception is {}", ex.getMessage());
        try {
            throw ex;
        } catch (Throwable throwable) {
            log.error("Error in OnFailure: {}", throwable.getMessage());
        }


    }

    private void handleSuccess(Integer key, String value, SendResult<Integer, String> result) {
        log.info("Message Sent SuccessFully for the key : {} and the value is {} , partition is {}", key, value, result.getRecordMetadata().partition());
    }
}
KafkaTemplate:Kafkatemplate class is provided by the spring framework.By using this class only we can perform Kafka operations like sending data to topics and retrieving the data from topic.
ObjectMapper:Here objectmapper will convert our library event java object to JSON and then to String.(POJO-JSON-String)
ProducerRecord: A key/value pair to be sent to Kafka.This consists of a topic name to which the record is being sent, an optional partition number, and an optional key and value.
Read More about ProducerRecord - link
Send: This send method of kafka will Send the provided ProducerRecord.
ListenableFuture<SendResult<Integer,String>> is the return type of kafkatemplate.send method.
addCallback: The send API returns a ListenableFuture object. If we want to block the sending thread and get the result about the sent message, we can call the get API of the ListenableFuture object. The thread will wait for the result, but it will slow down the producer.
Kafka is a fast stream processing platform. Therefore, it's better to handle the results asynchronously so that the subsequent messages do not wait for the result of the previous message.
We can do this through a callback:
9. Create Controller class inside Controller package :
Here I am creating a rest controller class for sending Book data.

LibraryEventsController.java
package com.kafka.controller;

import com.fasterxml.jackson.core.JsonProcessingException;
import com.kafka.domain.LibraryEvent;
import com.kafka.domain.LibraryEventType;
import com.kafka.producer.LibraryEventProducer;
import lombok.extern.slf4j.Slf4j;
import org.springframework.beans.factory.annotation.Autowired;
import org.springframework.http.HttpStatus;
import org.springframework.http.ResponseEntity;
import org.springframework.web.bind.annotation.PostMapping;
import org.springframework.web.bind.annotation.RequestBody;
import org.springframework.web.bind.annotation.RestController;

import java.util.concurrent.ExecutionException;

@RestController
@Slf4j
public class LibraryEventsController {
    @Autowired
    LibraryEventProducer libraryEventProducer;

    @PostMapping("/v1/libraryevent")
    public ResponseEntity<LibraryEvent> postLibraryEvent(@RequestBody LibraryEvent libraryEvent) throws JsonProcessingException, ExecutionException, InterruptedException {

        //invoke kafka producer
        libraryEvent.setLibraryEventType(LibraryEventType.NEW);

        libraryEventProducer.sendLibraryEvent(libraryEvent);
        return ResponseEntity.status(HttpStatus.CREATED).body(libraryEvent);
    }
}
10. Create test class inside srs/test/java package :
NOTE: Package should be same as in src/java

LibraryEventsControllerIntegrationTest.java
package com.kafka.controller;


import com.kafka.domain.Book;
import com.kafka.domain.LibraryEvent;
import org.junit.jupiter.api.Test;
import org.springframework.beans.factory.annotation.Autowired;
import org.springframework.boot.test.context.SpringBootTest;
import org.springframework.boot.test.web.client.TestRestTemplate;
import org.springframework.http.*;

import static org.junit.jupiter.api.Assertions.assertEquals;

@SpringBootTest(webEnvironment = SpringBootTest.WebEnvironment.RANDOM_PORT)
public class LibraryEventsControllerIntegrationTest {

    @Autowired
    TestRestTemplate restTemplate;


    @Test
    void postLibraryEvent() {
        //given
        Book book = Book.builder()
                .bookId(127)
                .bookAuthor("Priyanka")
                .bookName("Kafka using Spring Boot part2")
                .build();

        LibraryEvent libraryEvent = LibraryEvent.builder()
                .libraryEventId(null)
                .book(book)
                .build();
        HttpHeaders headers = new HttpHeaders();
        headers.set("content-type", MediaType.APPLICATION_JSON.toString());
        HttpEntity<LibraryEvent> request = new HttpEntity<>(libraryEvent,headers);

        //when
        ResponseEntity<LibraryEvent> responseEntity = restTemplate.exchange("/v1/libraryevent", HttpMethod.POST,request, LibraryEvent.class);

        //then
        assertEquals(HttpStatus.CREATED,responseEntity.getStatusCode());
    }
}
11. Starting up the Zookeeper & Kafka Serves:
For installing softwares please refer this blog - link
1. First we must start the zookeeper Instance by using the below command.
NOTE: Please make sure you're in the kafka folder in CMD before proceeding.
zookeeper-server-start.bat config\zookeeper.properties
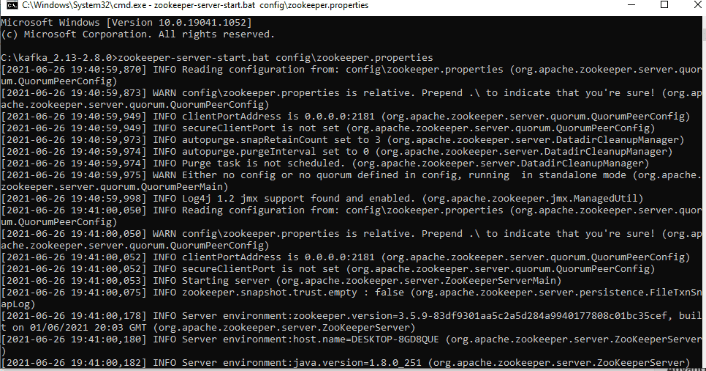
If you can see these logs, it signifies that the Zookeeper instance was running successfully in Port No - 2181.
2.Start up the kafka server using the below command.
kafka-server-start config\server.properties
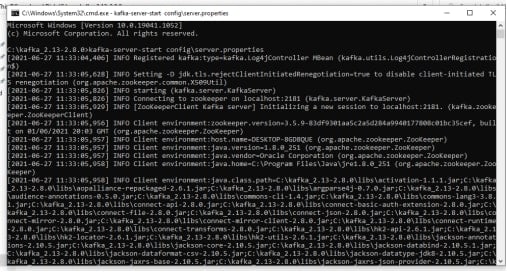
If you can see these logs, it signifies that the Kafka instance was running successfully in Port No - 9092.
kafka id started with id zero and might have noticed some logs ran in the zookeeper instance so thats a signal that broker registered itself with the zookeeper.
12. Running the test class :
Now we will run the test class to see whether the controller send the data to kafka topic or not.

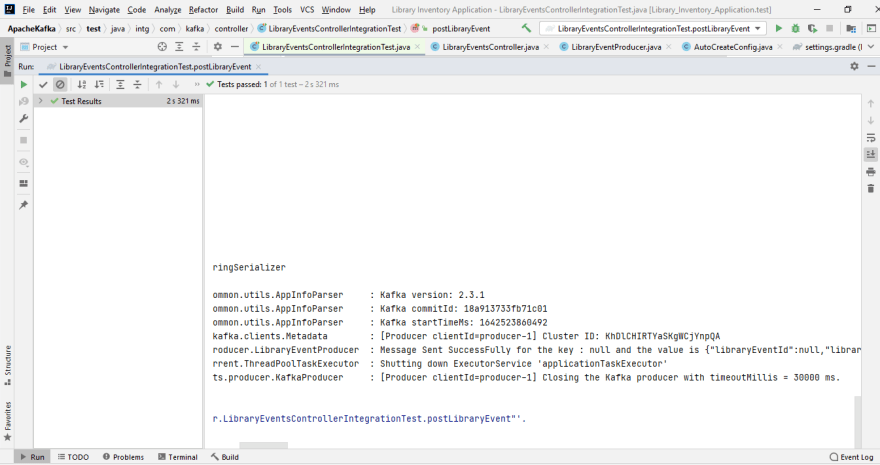
Here finally, if you see in logs it was showing successfully sent message.
Before we create consumer in code,you can check it out in CMD whether it was produced to library-events topic or not using below command in CMD.
kafka-console-consumer.bat --bootstrap-server localhost:9092 --topic library-events --from-beginning
OUTPUT

That's it guys!Hope you learned something new....
Git Repo for Project: https://github.com/priyankanandula/LibraryInventory

In my next blog we will create consumer in code.
Happy Coding......
This is priyanka nandula signing off...

Top comments (0)