
Photo by Ant Rozetsky on Unsplash
概要
現在開発中のアプリケーションでは、以下の様にブランチを分けています。
- master(開発)
- staging(動作確認)
- production(本番環境)
開発が進むに従いアプリケーションのバージョンアップの頻度が上がっていきましたが、毎回のリリース作業が手動だったため面倒でした。
今回はリリースフローを自動化して作業の手間を減らしたお話をします。
記事の対象者
手動でバージョンアップやリリース作業を行っている方。

そう、あなたです。毎回のリリース作業、お疲れ様です。
TL;DR
結論を先に言うと、GitHub Actionsを活用することで作業の手間を1/3以下に、作業時間は10分程度(ほぼCI待ち)に短縮できました。
以下は今回の検証用のリポジトリです。
https://github.com/puku0x/github-pr-experimental/
新旧フローの比較は以下の通りです。
- 旧リリースフロー
 1. masterブランチをプル
 2. ローカルでバージョンアップ用のブランチを作成
 3. ローカルでバージョンアップコマンド実行
 4. 手動でコミット
 5. リモートにプッシュ
 6. 手動でmasterブランチにPull Request作成
 7. マージ
 8. 手動でRelease作成
 9. masterブランチをプル
10. タグから手動でstaging更新用のブランチ作成
11. リモートにプッシュ
12. 手動でstagingブランチにPull Request作成
13. マージ
    (自動でデプロイ)
14. 必要に応じてリリースノート追記
途中で読み飛ばしましたね? 大丈夫、私もです。
一度のバージョンアップにかかる時間は20〜30分程度です。この例ではstagingブランチが対象ですが、productionブランチを含めるとさらに時間がかかります。
デプロイは自動化されていたものの、手順が多く作業に時間がかかることと、ローカル操作が多いためミスが発生し易いことが課題でした。
- 新リリースフロー
1. 手動トリガーでバージョンアップ実行
   (自動でmasterブランチにPull Request作成)
2. マージ
   (自動でRelease作成)
   (自動でstagingブランチにPull Request作成)
3. マージ
   (自動でデプロイ)
4. 必要に応じてリリースノート追記
ブランチ、Pull Request、Releaseの作成を自動化し、手動での作業を最小限にした結果、旧フローと比較して大幅に省力化しただけでなく、手作業によるミスを抑えることもできました。
新リリースフロー用のWorkflow
新リリースフローは下図の通りです。今回は青色で示された部分のWorkflowを作成します。

自動バージョンアップ
最初の課題はバージョンアップ作業の自動化です。幸い、コミットメッセージはConventional Commitsに準拠していたため、standard-versionで新しいバージョンの自動採番ができました。
未導入の場合は、まずここから始めましょう。
npm i -D cz-conventional-changelog
package.jsonにスクリプトと設定を追加します。
{
  "scripts": {
    "commit": "npx git-cz",
    "release": "npx standard-version --releaseCommitMessageFormat 'chore(*): bump v{{currentTag}}'"
  },
  "config": {
    "commitizen": {
      "path": "cz-conventional-changelog"
    }
  },
  "standard-version": {
    "skip": {
      "tag": true
    },
    // lint-staged等を使用している場合は追加で設定
    // "scripts": {
    //   "postchangelog": "prettier --write"
    // }
  }
}
さらに、今年7月から使えるようになったWorkflow dispatchをトリガーとしてバージョンアップコマンドを実行するWorkflowを作ります。
# .github/workflows/bump.yml
name: Bump version

on: [workflow_dispatch]

jobs:
  bump:
    runs-on: ubuntu-latest
    strategy:
      matrix:
        node: ['12']
    steps:
      - uses: actions/checkout@v2
        with:
          fetch-depth: 0
      - uses: actions/cache@v2
        id: cache
        with:
          path: node_modules
          key: ${{ runner.os }}-npm-${{ hashFiles('**/package-lock.json') }}
          restore-keys: |
            ${{ runner.os }}-npm-
      - name: Get branch
        id: get_branch
        run: echo ::set-output name=BRANCH::${GITHUB_REF/refs\/heads\//}
      - name: Switch branch
        run: git switch -c tmp
      - name: Git config
        run: |
          git config --local user.email "41898282+github-actions[bot]@users.noreply.github.com"
          git config --local user.name "github-actions[bot]"
      - name: Setup Node.js ${{ matrix.node }}
        uses: actions/setup-node@v1
        with:
          node-version: ${{ matrix.node }}
      - name: Install dependencies
        if: steps.cache.outputs.cache-hit != 'true'
        run: npm ci
      - name: Bump version
        id: bump_version
        run: |
          npm run release
          echo ::set-output name=VERSION::$(node -p "require('./package.json').version")
      - name: Push branch
        env:
          VERSION: ${{ steps.bump_version.outputs.VERSION }}
        run: |
          git branch -m bump-v${VERSION}
          git push -u origin bump-v${VERSION}
      - name: Create pull request
        uses: actions/github-script@v2
        env:
          BRANCH: ${{ steps.get_branch.outputs.BRANCH }}
          VERSION: ${{ steps.bump_version.outputs.VERSION }}
        with:
          #github-token: ${{ secrets.GITHUB_TOKEN }}
          github-token: ${{ secrets.PERSONAL_ACCESS_TOKEN }}
          script: |
            github.pulls.create({
              owner: context.repo.owner,
              repo: context.repo.repo,
              title: `chore(*): bump v${process.env.VERSION}`,
              body: `Bump v${process.env.VERSION}`,
              head: `${context.repo.owner}:bump-v${process.env.VERSION}`,
              base: process.env.BRANCH
            })
上記のWorkflowは、旧リリースフローの1〜6までに相当するもので、以下の処理を行っています。
1. tmpブランチを作成
2. npm run release実行(ユーザーはgithub-actionsに設定)
3. package.jsonから新しいバージョンを取得
4. 取得したバージョンを元にブランチをリネーム(bump-v1.0.0など)
5. リモートにプッシュ
6. Pull Request作成
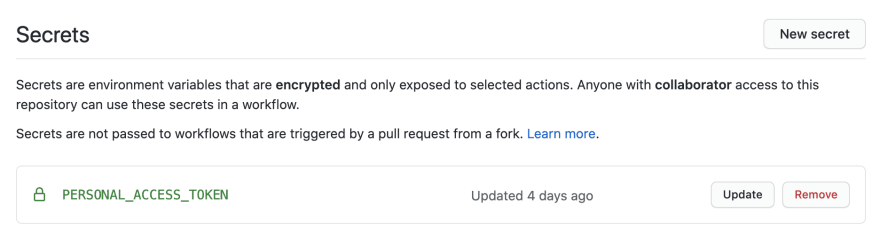
なお、WorkflowによるPull Request作成をトリガーとして、他のWorkflowを起動するにはPersonal Access Tokenが必要になります。GitHub ActionsでCIを組んでいる場合は忘れずSecretsに設定しましょう。
自動Release作成
次はPull Requestマージ後にReleaseを自動作成するWorkflowを作ります。
バージョンアップ用のWorkflowで作成したブランチ名がbump-v.*.*.*となっていることを利用し、ジョブ実行の条件とRelease名、タグ名を設定していきます。
# .github/workflows/release.yml
name: Release

on:
  pull_request:
    branches:
      - master
    types: [closed]

jobs:
  release:
    if: github.event.pull_request.merged == true && startsWith(github.event.pull_request.head.ref, 'bump-v')
    runs-on: ubuntu-latest
    steps:
      - uses: actions/checkout@v2
      - name: Get version
        id: get_version
        env:
          HEAD_REF: ${{ github.event.pull_request.head.ref }}
        run: echo ::set-output name=VERSION::${HEAD_REF#bump-v}
      - name: Create Release
        id: create_release
        uses: actions/create-release@v1
        env:
          # GITHUB_TOKEN: ${{ secrets.GITHUB_TOKEN }}
          GITHUB_TOKEN: ${{ secrets.PERSONAL_ACCESS_TOKEN }}
        with:
          tag_name: v${{ steps.get_version.outputs.VERSION }}
          release_name: v${{ steps.get_version.outputs.VERSION }}
          body: |+
            ## Bug fixes
            -

            ## Features
            -

            ## BREAKING CHANGES
            -
          draft: false
          prerelease: false
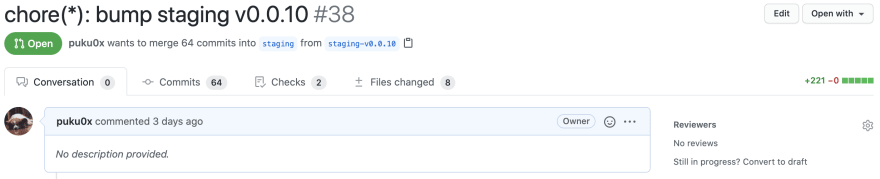
実行するとReleaseが作成されます。

Pull Request作成と比較すると簡単ですね。リリースノートの内容もよく使うものはあらかじめ載せておくと良いでしょう。
ところでReleaseのテンプレ機能はまだですか?
staging/production用Pull Request自動作成
いよいよ最後です。リリースの作成(=タグの作成)をトリガーとし、Pull Requestを作成するWorkflowを設定します。
# .github/workflows/bump-branches.yml
name: Bump branches

on:
  push:
    tags:
      - 'v*.*.*'

jobs:
  bump:
    runs-on: ubuntu-latest
    strategy:
      matrix:
        branch: ['staging', 'production']
    steps:
      - name: Get version
        id: get_version
        run: echo ::set-output name=VERSION::${GITHUB_REF/refs\/tags\/v/}
      - uses: actions/checkout@v2
        with:
          fetch-depth: 0
      - name: Push branch
        env:
          BRANCH: ${{ matrix.branch }}
          VERSION: ${{ steps.get_version.outputs.VERSION }}
        run: |
          git switch -c ${BRANCH}-v${VERSION} v${VERSION}
          git push -u origin ${BRANCH}-v${VERSION}
      - name: Create pull request
        uses: actions/github-script@v2
        env:
          BRANCH: ${{ matrix.branch }}
          VERSION: ${{ steps.get_version.outputs.VERSION }}
        with:
          #github-token: ${{ secrets.GITHUB_TOKEN }}
          github-token: ${{ secrets.PERSONAL_ACCESS_TOKEN }}
          script: |
            github.pulls.create({
              owner: context.repo.owner,
              repo: context.repo.repo,
              title: `chore(*): bump ${process.env.BRANCH} v${process.env.VERSION}`,
              body: `Bump ${process.env.BRANCH} v${process.env.VERSION}`,
              head: `${context.repo.owner}:${process.env.BRANCH}-v${process.env.VERSION}`,
              base: process.env.BRANCH
            })
実行すると、タグの命名規則(v.*.*.*)からstaging-v1.0.0のようなブランチを作成し、Pull Requestを作成します。
これで旧フローの9〜12まで自動化できました。あとはこのPull Requestをマージすればデプロイされます。
おわりに
GitHub Actionsを活用することで作業の手間を1/3以下に削減できました。また、作業時間については従来の20〜30分かかっていたものが10分程度までに短縮できました(ほぼCI待ち時間です)。
自動化により人間の仕事はバージョンアップのトリガーとマージだけとなりました。なんと楽なのでしょう。

みなさんも是非GitHub Actionsで快適な開発環境を手に入れましょう。
今回はWebフロントエンドアプリケーション開発用のWorkflowとして組みましたが、他の開発環境にも応用できるかと思います。
以下は今回の検証用のリポジトリです。ご参考までにどうぞ。
https://github.com/puku0x/github-pr-experimental/

Top comments (0)