Introduction
I am working as a backend-developer, and sometimes I am tired of work routine. Deeping into some opensource helps me and I really keen on Jetbrains' product and IDEA. IDEA can be customized with plugins, which you can write yourself.
The most part of IDEA's code is open-source. Developers from Jetbrains always help you to make pull request and improve your main tool.
I already have the article about how to write a small plugin with one inspection. But if you want to understand how IDEA works, you should try to write a language plugin.
Let's do this.
As a "guinea pig" we will take the simple language - Monkey, the interpreter and compiler for it is described in the books on Golang. Since my goal was not to cover everything, the plugin covers some limited subset of this language. The interpreter can be found here.
Example of calculating the Fibonacci number on Monkey:
let fibonacci = fn(x){
                    if (x == 0){
                        0;
                    }
                    else{
                        if (x == 1){
                            return 1;
                        }
                        else{
                            fibonacci(x - 1) + fibonacci(x - 2);
                        };
                    };
};
We will write this plugin with Java and Kotlin (JVM)
Prerequisites
The easiest way to create a new plugin is using the template. It is being actively developing and had already included most needed features.
Also we need DevKit plugin, which you can enable in IDEA

Grammar-Kit plugin will be used to generate a lexer and parser
Examples of other plugins:
- Java (in the code of IDEA)
- go-plugin (now this plugin is known as Goland)
- Haskell
- Erlang
- Frege
- Monkey plugin (in this article)
Creating the basis of a language plugin
The first stages of creating a language plugin are well described in the documentation.
Example for Monkey:
import com.intellij.lang.Language

class MonkeyLanguage : Language("Monkey") {
    companion object {
        @JvmStatic
        val INSTANCE = MonkeyLanguage()
    }
}
Example for Monkey
import com.intellij.openapi.fileTypes.LanguageFileType
import javax.swing.Icon

class MonkeyFileType : LanguageFileType(MonkeyLanguage.INSTANCE) {
    override fun getName(): String {
        return "Monkey File"
    }

    override fun getDescription(): String {
        return "Monkey language file"
    }

    override fun getDefaultExtension(): String {
        return "monkey"
    }

    override fun getIcon(): Icon {
        return MonkeyIcons.FILE
    }

    companion object {
        @JvmStatic
        val INSTANCE = MonkeyFileType()
    }
}
After that, you need to enable a new file type via the extension point. All the features that plugins provide are enabled through one or more extension points. They must be declared in the file plugin.xml (example for go-plugin, frege). Other examples of using extension points will be given below or can be checked in the documentation.
Example for Monkey (resources/META-INF/plugin.xml)
<extensions defaultExtensionNs="com.intellij">
  <fileType name="Monkey File"
            implementationClass="com.github.pyltsin.monkeyplugin.MonkeyFileType"
            fieldName="INSTANCE"
            language="Monkey"
            extensions="monkey"/>
</extensions>
Creation PSI-tree
Unfortunately, it is impossible to describe the whole theory that is required to parse the code in one article. Fundamental knowledge for this topic can be found in the "Dragon Book"

According to this book, the process of the compiler working with the code consists of the following steps:
- Lexical Analyzer
- Syntax Analyzer
- Semantic Analyzer
- Intermediate Code Generator
- Machine-Independent Code Optimizer
- Code Generator
- Machine-Dependent Code Optimizer
For any IDE to work successfully, it is required to implement the first 3 analyzers:
- Lexical analyzer (to read a stream of characters and to group them into tokens)
- Parser (to receive a stream of tokens and to build a syntax tree from them - AST)
- Semantic analyzer (to use a tree to verify the source code according to some rules).
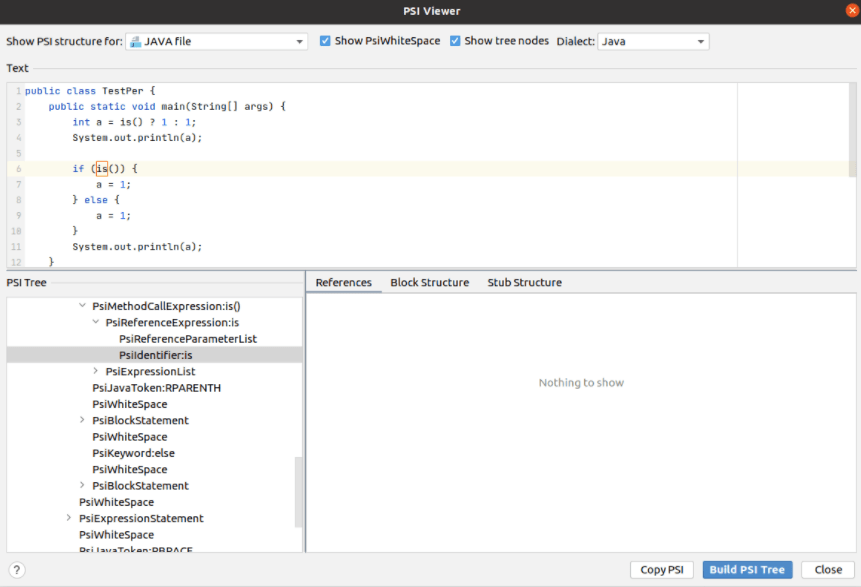
In IDEA, instead of an AST tree, an analog is used - a PSI tree (Program structure Interface).
The process of creating a PSI tree is well shown in the illustration from the documentation:

In order to see PSI-tree, you can use the PSI Viewer (Tools->View PSI structure)
In IDEA, the abstract TreeElement class is mainly used to implement the PSI tree
public abstract class TreeElement extends ElementBase implements ASTNode, Cloneable {
  private TreeElement myNextSibling;
  private TreeElement myPrevSibling;
  private CompositeElement myParent;
...
}
In IDEA, you can use the GrammarKit plugin to create a lexer and a parser.
Lexer
Perhaps, the easiest way to create a lexer for IDEA is to use JFlex. The GrammarKit plugin already contains an implementation and allows you to generate a lexer from .bnf file or from .flex file (with more customization options). An example for the Monkey language can be viewed here, a more complex one for Frege - here.
To generate Lexer, you need to configure the Gradle plugin or use the context menu in .flex file - "Run JFlex Generator".
After that, you need to declare a class that implements com.intellij.lexer.Lexer. There is already an adapter for the generated JFlex lexer - com.intellij.lexer.FlexAdapter
Parser
In IDEA, code generation by the GrammarKit plugin is mainly used to create a parser. Unfortunately, there is not much documentation about it and it is only presented in Tutorial and HOWTO.
The grammar of the language is described in BNF. The only difference that is used is ::= as "is".
Example grammar for expressions you can find here
As you can see, the bnf file consists of 2 parts:
- the first part describes the meta information (and the description of tokens, if flex files are not used)
- the second part describes the grammar itself.
Let's consider some part of the meta-information:
parserClass - name and location of the generated parser class
parserUtilClass - a reference to a class containing a set of additional methods for the parser (usually the com.intellij.lang.parser.GeneratedParserUtilBase class or its inheritors)
extends = <some class> - a reference to the base class from which all PSI elements (tree nodes) will be inherited. Usually com.intellij.extapi.psi.ASTWrapperPsiElement or its inheritors.
extends(<regexp for tree nodes>) = <psi-element> (for example: extends(".*expr")=expr) - all psi elements will be inherited from the specified psi element.
psiClassPrefix, psiImplClassSuffix - respectively the prefix for classes and interfaces (usually by the name of the language) and the suffix for implementing interfaces (usually - Impl)
psiPackage and psiImplPackage are respectively a package for interfaces and their implementations.
implements - similar to extends, but for interfaces
elementTypeHolderClass - a generated storage for all types of elements
elementTypeClass - a class for types of elemets (not generated, inheritors to com.intellij.psi.tree.IElementType)
elementTypeFactory - creating a factory for generating element types (used for Stub - about them below)
psiImplUtilClass - a class with a set of static methods that are used as an implementation of the required methods for psi elements.
Let's suppose we have such lines (from go-plugin)
ImportSpec ::= [ '.' | identifier ] ImportString {
  stubClass="com.goide.stubs.GoImportSpecStub"
  methods=[getAlias getLocalPackageName shouldGoDeeper isForSideEffects isDot getPath getName isCImport]
}
For that, we need declare and implement static method with the same name in psiImplUtilClass:
public static String getAlias(@NotNull GoImportSpec importSpec)
After that getAlias will be generated as:
  public String getAlias() {
    return GoPsiImplUtil.getAlias(this);
  }
Now let's move on to the bnf rules themselves. Modifiers can be used for each rule (for example, private, fake, and so on). Their description is given here. So for example private in
private boolean_group ::= xor_expr | between_expr | is_not_expr
indicates that the PSI element for boolean_group will not be generated.
If it is not possible to correctly describe the grammar in a bnf file, then it will be useful to describe it in code using external rules.
One of the important parts of grammar is the rules for dealing with errors. Two keywords are used for this: pin and recoverWhile.
pin - indicates the token number, as soon as we get to which, the parser starts waiting only for the current declaration. For example, declaring a structure in Golang
Struct Type ::= struct '{' Fields? '}' {pin=1}
recoverWhile - specifies which tokens can be consumed after matching with all rules is completed. Recommendations for the use of this attribute are described here.
You should also pay attention to the recommendations for parsing expressions based on priority.
It seems to me that creating a correct and convenient grammar rules for future work is one of the most difficult parts of implementing a plugin for a language. To get started, you can use examples: go-plugin, Frege, Monkey (for Monkey, only a subset of this language is implemented for simplification).
After creating a bnf and generating a parser from it, you need to define the class for File (heir from com.intellij.extapi.psi.PsiFileBase) (examples from go-plugin, Frege, Monkey) and the definition class for your parser (heir from com.intellij.lang.ParserDefinition) (example from go-plugin, Frege, Monkey), and then enable it via the extension point.
<lang.parserDefinition language="Monkey"
implementationClass="com.github.pyltsin.monkeyplugin.parser.MonkeyParserDefinition"/>
Annotators
In the previous parts, we looked at how a lexer and a parser are created. Now let's move on to the third part - semantic analysis. Studying the code of IDEA and its plugins, I found two ways to implement it (excluding inspections).
The first way is used in a plugin for the Java language. Consider the following invalid code:
![]()
IDEA, of course, highlighted it and said Operator'-'cannot be applied to 'java.lang.String', 'java.lang.String'. It works thanks to the following extension point:
<highlightVisitor implementation=
"com.intellij.codeInsight.daemon.impl.analysis.HighlightVisitorImpl"/>
The class must implement com.intellij.codeInsight.daemon.impl.HighlightVisitor
public interface HighlightVisitor {

  boolean suitableForFile(@NotNull PsiFile file);

  void visit(@NotNull PsiElement element);

  boolean analyze(@NotNull PsiFile file,
                  boolean updateWholeFile,
                  @NotNull HighlightInfoHolder holder,
                  @NotNull Runnable action);
}
We use the method analyze to configure, launch (action.run()) and close resources
//From HighlightVisitorImpl
    @Override
  public void visit(@NotNull PsiElement element) {
  // some code
      element.accept(this);
  // some code
  }

//Example for ClsJavaModuleImpl
  @Override
  public void accept(@NotNull PsiElementVisitor visitor) {
    if (visitor instanceof JavaElementVisitor) {
      ((JavaElementVisitor)visitor).visitModule(this);
    }
    else {
      visitor.visitElement(this);
    }
  }
There is used the visitor pattern.
HighlightVisitorImpl extends JavaElementVisitor
public abstract class JavaElementVisitor extends PsiElementVisitor {
  public void visitAnonymousClass(PsiAnonymousClass aClass) {
    visitClass(aClass);
  }

  public void visitArrayAccessExpression(PsiArrayAccessExpression expression) {
    visitExpression(expression);
  }

  public void visitArrayInitializerExpression(PsiArrayInitializerExpression expression) {
    visitExpression(expression);
  }
...
The second way is applied in go-plugin and Frege.
In the Monkey plugin, I used it too. It uses annotator extension point.
<annotator language="Monkey"
implementationClass="com.github.pyltsin.monkeyplugin.annotator.MonkeyWarningAnnotator"/>
Your class must implement the next interface:
public interface Annotator {
  void annotate(@NotNull PsiElement element,
                @NotNull AnnotationHolder holder);
}
An error message can be registered with next way:
holder.newAnnotation(HighlightSeverity.ERROR, errorMsg)
.range(element)
.create()
Examples for Frege, go-plugin, Monkey.
For the Monkey language, I have currently implemented 2 rules - the inability to resolve links (resolve references - about them below) and a simple type check (via DSL).
Highlighting brackets
In this part, we'll look at a couple more extension points.
The first point of extension: lang.braceMatcher.
<lang.braceMatcher language="Monkey"
implementationClass="com.github.pyltsin.monkeyplugin.editor.MonkeyBraceMatcher"/>
This extension point enable highlighting a pair of brackets and adding a closing bracket

The class must implement com.intellij.lang interface.PairedBraceMatcher
The implementation that I made for the Monkey language can be viewed here, for the go-plugin here, for Java - here and here.
The second point of extension: highlightVisitor. I have already mentioned it when we were creating a semantic analyzer. I didn't use it in my plugin, but it is used in the popular Rainbow Brackets plugin, which colors pairs of brackets in unique colors.

If you look in his plugin.xml, then you can find this line
<highlightVisitor implementation="com.github.izhangzhihao.rainbow.brackets.visitor.DefaultRainbowVisitor"/>
The class implements the interface - com.intellij.CodeInsight.daemon.impl.HighlightVisitor. The implementation can be viewed here. The coloring takes place in the com.github.izhangzhihao.rainbow.brackets method.visitor.RainbowHighlightVisitor#setHighlightInfo
holder.add(HighlightInfo
    .newHighlightInfo(rainbowElement)
    .textAttributes(attr)
    .range(element)
    .create())
Continuation here.

Top comments (0)