
From past ten days, I have spent my time on the latest open source solution to run performance tests on Kubernetes cluster using Kangal. In this blog post, we are going to deep-dive into how you can spin up Kubernetes cluster and run Locusts and JMeter tests using Kangal. Let us get started.
What is Kangal?
The full form of Kangal is Kubernetes and Go Automatic Loader. But the actual meaning of Kangal is a breed of Shepherd dog. In Tamil language, Kangal means eyes.
Kangal is an open source project from Hello Fresh to run performance tests on Kubernetes cluster using multiple load generators.
It supports Apache JMeter and Locust at this time of writing.
<!-- /wp:button -->
<!-- /wp:button -->
Prerequisites
It is time to get our hands dirty. We need the following as prerequisites before you begin spinning up the pods.
- JMeter test plan or Locust Script and its dependencies
- Kubernetes cluster
- Helm installation
- S3 bucket to store the result (optional)
Kangal Setup
First, let us add the repository to Helm using the below command.
helm repo add kangal https://hellofresh.github.io/kangalThis will add the repo to your Helm. Next, we are going to install Kangal using the below command. Below command configures multiple environment variables such as S3 bucket, S3 URL, AWS Secrets and Kangal Proxy.
helm install \
  --set environment=dev \
  --set secrets.AWS_ACCESS_KEY_ID="XXXXXXXXXXXXXXXXXX" \
  --set secrets.AWS_SECRET_ACCESS_KEY="XXXXXXXXXXXXXXXX" \
  --set controller.env.KANGAL_PROXY_URL="http://kangal-proxy-k8s.default.svc.cluster.local" \
  --set configMap.AWS_BUCKET_NAME="kangal-report" \
  --set configMap.AWS_ENDPOINT_URL="s3.us-east-2.amazonaws.com" \
  --set configMap.AWS_DEFAULT_REGION="us-east-2" \
  kangal kangal/kangal
You will have to replace the masked values with your secrets and hit enter. This will install relevant Kubernetes resources and below will be the output.
NAME: kangal
LAST DEPLOYED: Wed Apr 21 22:22:17 2021
NAMESPACE: default
STATUS: deployed
REVISION: 1
TEST SUITE: None
To view the helm releases, send helm list command which will list the releases.
To check the Kangal pods, issue the below command which will list the resources from the default namespace.
kubectl get po
To view the service list, issue kubectl get svc.

Kangal uses Custom Resources which extends the Kubernetes API. To view the custom resource definitions, issue kubectl get crd.

Before starting the load test, you have to make sure that the ingress controller are working fine.
In my case, I do not have proper Ingress Controller set up. I am going to port forward the deployment using the below command.
kubectl port-forward deployment/kangal-proxy 8081:8080Now we are good to start our first load test in Kangal.
Locust Load Test
Open a new terminal session and issue the curl command to make sure the localhost is working fine.
curl localhost:8081Output
<a href="https://kangal-openapi-ui.local">Found</a>You can use the below Locust file for your testing purpose. Save below Python code as hello.py in the current directory. Replace https://example.com with your application under test URL.
import glob
import os
import requests
import tarfile
from locust import HttpUser, task, between
from locust import events
from locust.runners import MasterRunner


class QuickstartUser(HttpUser):
    wait_time = between(1, 2.5)
    host = "https://example.com"

    @task
    def hello_world(self):
        self.client.get("/")

    @events.quitting.add_listener
    def hook_quit(environment):
        presigned_url = os.environ.get('REPORT_PRESIGNED_URL')
        if None == presigned_url:
            return
        if False == isinstance(environment.runner, MasterRunner):
            return
        report = '/home/locust/report.tar.gz'
        tar = tarfile.open(report, 'w:gz')

        for item in glob.glob('/tmp/*.csv'):
            print('Adding %s...' % item)
            tar.add(item, arcname=os.path.basename(item))
        tar.close()
        request_headers = {'content-type': 'application/gzip'}
        r = requests.put(presigned_url, data=open(report, 'rb'), headers=request_headers)
To begin the load test, we have to send the below POST request to the Kangal Proxy. Below test spins up two pods for Locust (one for master and one for worker) and run the test for 1 minute hitting example.com. After the test is done, results will be stored in S3.
curl -X POST http://localhost:8081/load-test \
  -H 'Content-Type: multipart/form-data' \
  -F distributedPods=1 \
  -F testFile=@hello.py \
  -F type=Locust \
  -F duration=1m \
  -F targetURL=http://example.com
Output of the above command will provide the unique load test name. This test name is loadtest-guiding-mouse
{
    "type": "Locust",
    "distributedPods": 1,
    "loadtestName": "loadtest-guiding-mouse",
    "phase": "creating",
    "tags": {},
    "hasEnvVars": false,
    "hasTestData": false
}
To monitor the status, you can issue the below command.
curl localhost:8081/load-test/loadtest-guiding-mouse/logsFor every test, Kangal creates a namespace. To view all the namespaces, issue the below command.
kubectl get namespaces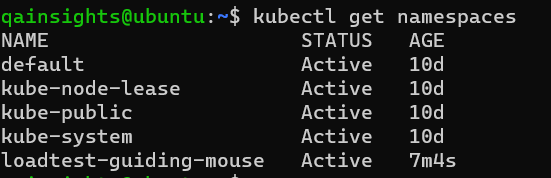
To change the context in Kubernetes, you can use the below command.
kubectl config set-context --current --namespace=loadtest-guiding-mouseThen issue kubectl get po to view the Locust pods. As you see, there are two pods, one is for master and another one is worker.

You can view the logs of these pods by issuing the pod name.
kubectl logs loadtest-guiding-mouse-master-v47gskubectl logs loadtest-guiding-mouse-worker-qkgs7S3 Locust Report
If the S3 properly configured, all the reports will be stored in the S3 bucket. Below is the screenshot from my S3 bucket.
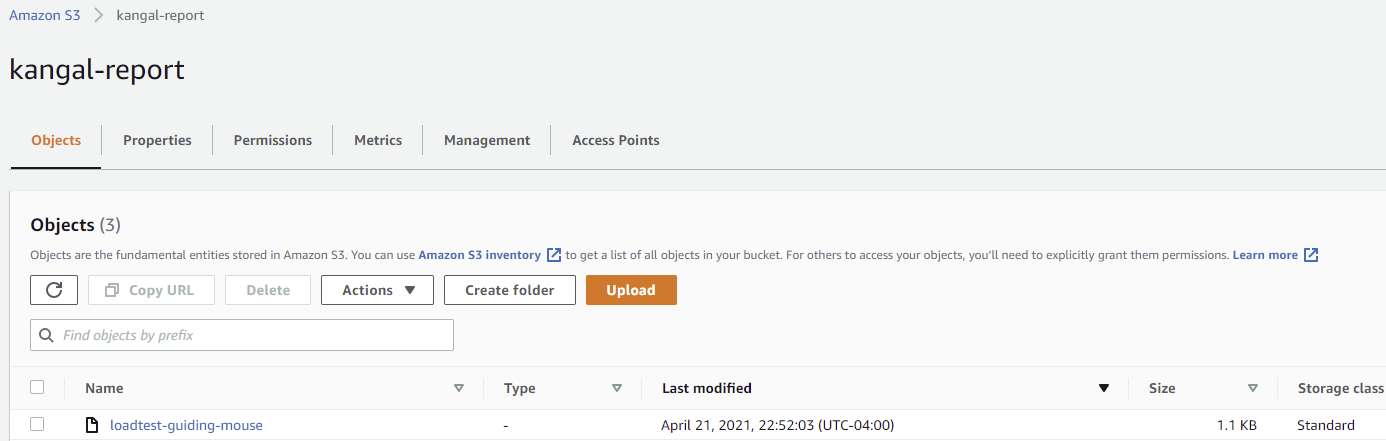
Below is the output stored in S3.

JMeter Test
To run JMeter test, you can issue the below command.
curl -X POST http://localhost:8081/load-test \
-F "distributedPods=1" \
-F "testFile=@T00_Example.jmx" \
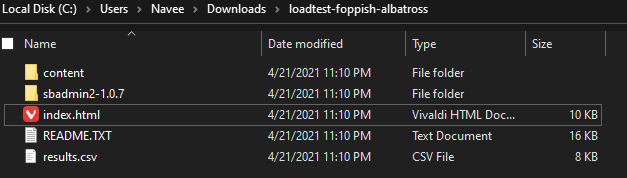
-F "type=JMeter"HTML report will be stored in S3.
To view all the tests, you can issue the below command.
curl localhost:8081/load-test{
"limit": 50,
"continue": "",
"remain": null,
"items": [
{
"type": "JMeter",
"distributedPods": 1,
"loadtestName": "loadtest-foppish-albatross",
"phase": "finished",
"tags": {},
"hasEnvVars": false,
"hasTestData": false
},
{
"type": "Locust",
"distributedPods": 1,
"loadtestName": "loadtest-guiding-mouse",
"phase": "finished",
"tags": {},
"hasEnvVars": false,
"hasTestData": false
}
]
}Housekeeping
After the test is done, you can delete the namespaces by issuing kubectl delete ns <namespace_name>.
To delete Kangal, you can issue the below command.
helm delete kangalkubectl delete crd loadtests.kangal.hellofresh.comImportant Links
- For the detailed configuration, please check this page.
- Artifact Hub
- Kangal Docs
Kangal Features
- Supports two major open source load testing tools (JMeter and Locust)
- Supports distributed load testing by default
- Persistent storage using AWS S3
- Grafana integration for live monitoring
- Easy housekeeping
Kangal Architecture

Conclusion
If you are looking to run your load tests in Kubernetes Cluster, here is the free and reliable infrastructure setup. All you need is to know about Kubernetes and Helm to steer this. I have tested this from past 10 days and raised an issue which got fixed immediately. Thanks to Diego Marangoni. Go for it. If you face any issues, please let me know.

Latest comments (0)