
By James Olaogun
With the increase of digital payment transactions across the globe, payment gateways are becoming a familiar feature of every online shop. Used by clients to accept digital payment methods, payment gateways can usually accommodate local and international credit or debit cards, eWallets, bank transfers, and even sometimes cash.
In this article, I’ll walk you through a step-by-step tutorial for integrating a payment gateway called Rapyd Collect into any of your Node.js applications.
But before I go into the tutorial, let me tell you a bit about Rapyd Collect.
What is Rapyd Collect?
Rapyd Collect is a payment gateway platform that enables businesses and individuals (clients) to accept payment fast, easily, securely, globally, and via multiple channels. Its security while managing sensitive information is assured with a Level 1 service provider certification.
While Rapyd supports a variety of payment options, including checkout, invoicing, and subscription, the main emphasis of this tutorial will be Rapyd checkout. It’s the easiest way to accept payments via your website or mobile app, and you can incorporate it as hosted or as a toolkit.
The toolkit integration is embedded in your website as an iframe, and the hosted integration sends your clients to a page hosted on Rapyd servers. I'll be using the hosted technique in this tutorial.
What You Need to Start
Before we dive into the process of building a Node.js payment gateway, there are a few requirements you must meet:
- Basic knowledge of Node.js
- Node installed on your local machine
- Basic knowledge of Express.js
- Basic knowledge of a database (this tutorial uses PostgreSQL, but feel free to use any database of your choice. Just make sure it’s installed on your local machine)
- Knowledge of HTML/CSS/JS
- A Rapyd Collect Account
How to Set Up Node.js
Having met all these requirements, let’s get started.
Set up Node.js by creating a new directory called rapyd-nodejs in your desired folder.
1. Initialize a New Node Application
Open your terminal or CLI and run the following command to create and enter the new directory:
mkdir rapyd-nodejs && cd rapyd-nodejs
Initialize a new node application from the rapyd-nodejs directory.
Note that for the purpose of this tutorial, I’m using node version 16.13.0 and npm version 8.1.0. You can make use of Node Version Manager (NVM) to manage and use this exact version of node and npm. Follow this guide for a step-by-step tutorial on how to use NVM.
Run the following command to initialize a new node application:
npm init
The command will also walk you through creating a package.json file. It will ask you for the package name, version, description, entry point, test command, git repository, keywords, author, and license.
Some of these requests come with a default adoption in brackets. Click Enter to go with the default option; the others are blank, but you can add a value or just press Enter to leave it blank. You can always edit the package.json file.
2. Install Required Node Packages
The required dependencies for this tutorial include express, dotenv, pg, body-parser, and ejs. Run the following command from the root directory of the application to install the modules:
npm install express dotenv pg body-parser ejs
Set up the application directory structure. Create the following directories and files in the root the rapyd-nodejs directory:
/Model/Controller/Config/Views/Routes/index.jsPublic/cssPublic/js/Helpers
Also, create .env and index.js files (the index.js file will be the entry point of the application; it can also be named app.js or main.js) in the root folder of the application from which the application would be served. Your application directories should now look like the following screenshot:

Add the application PORT and NODE_ENV variable to your .env file, as in this example:
NODE_ENV=development
PORT={{Any_port_number _of_your_choice}}
Go to /Config and create a server.js file. Add the block of code below to the server.js file:
const express = require('express');
const app = express();


module.exports = app;
Add the following block of code to the index.js file (at the root of your project):
const app = require('./Config/server');
const dotEnv = require('dotenv')

dotEnv.config()

const port = process.env.PORT || {{YOUR_PORT_NUMBER}}; // replace `{{YOUR_PORT_NUMBER}}` with the port number you used in the `.env` file.
app.listen(port, () => {console.log(`App listening on port ${port}`)})
3. Set Up the Development Server
Next, install nodemon to help monitor, reload, and serve the application when it notices any changes. Run the following command to install nodemon as a dev dependency into the application:
npm install --save-dev nodemon
To run the application, open the package.json file and add the code block below to the "scripts": {} section (that should be line number 6):
"start": "node index.js",
"dev": "nodemon index.js",
Open your CLI or terminal, change directory to the root folder of the application, and run npm run dev to start the application in dev mode. You should see something like the following screenshot:

How to Set Up the Database
Now it’s time to set up the database connection. As stated in the introduction, I’ll be making use of PostgreSQL. Follow this guide to install PostgreSQL if you plan to use it, too.
1. Create the Database Config File
To connect the database to the application, create a new file called db-config.js in the /Config folder. Then add the following code to the db-config.js file:
const dotEnv = require('dotenv');
const postgres = require('pg');
const { Pool } = postgres;

dotEnv.config()

const dbConfig = {
    user: process.env.DB_USER,
    host: process.env.DB_HOST,
    database: process.env.DB_NAME,
    password: process.env.DB_PASSWORD,
    port: process.env.DB_PORT
}

const pool = new Pool(dbConfig)
module.exports = pool;
2. Create a New Database in PostgreSQL
Create a new database called rapyd_node, set its user and password, and create a table named checkout_details with the following column and constraints:
CREATE TABLE checkout_details(
    id                                  SERIAL PRIMARY KEY,
    full_name                     varchar(255) NOT NULL,
    email                            varchar(255) NOT NULL,
    full_address                  TEXT NOT NULL,
    amount                         DOUBLE PRECISION NOT NULL,
    reference                      varchar(255) NOT NULL,
    product_details            varchar(225) NOT NULL,
    meta_data                    TEXT NULL,
    status           varchar(11) NOT NULL,
    created_at                    TIMESTAMP NOT NULL
);
Head back to the .env and add the database variable. See the following code:
DB_USER='postgres'
DB_HOST='localhost'
DB_NAME={{database_name}}
DB_PASSWORD={{db_password}}
DB_PORT={{postgres_db_port}}
Where {{database_name}} is rapyd_node, {{db_password}} is the password set for the database user (the default password is most often an empty string), and {{postgres_db_port}} is the database port (the default port number is 5432).
3. Test the Database Connection
To test the database connection, add the following code to the index.js:
const pool = require('./Config/db-config');
var sql = `SELECT * FROM checkout_details`
pool.query(sql, (error, response) => {
        if (error) return console.log(error);
        console.log(response.rows);
      }
    )
Save the file, and if you’ve deactivated the nodemon server, run npm run dev. It should output an empty array to the terminal.
How to Develop the Application Interface
Congrats! By now, you’ve set up the node application and database. Next up, add the application interface.
1. Create the Interface File
Go to the /Views folder and create a new file called checkout.ejs. Add the following code to the file:
<!DOCTYPE html>
<html>
    <head>
        <meta charset="utf-8">
        <meta name="viewport" content="width=device-width, initial-scale=1.0">
        <title>Product Checkout</title>
        <link rel="stylesheet" href="https://codepen.io/gymratpacks/pen/VKzBEp#0">
        <link href='https://fonts.googleapis.com/css?family=Nunito:400,300' rel='stylesheet' type='text/css'>
        <link rel="stylesheet" href="public/css/style.css">
    </head>
    <body>
      <div class="row">
    <div class="col-md-12">
      <form id="checkoutForm">
        <h1> Product Checkout </h1>
        <h3>
          Item: <%= product_name %>
          <br>
          <span class="price"> Price: <%= price %> </span>
         </h3>

        <fieldset>

          <label for="name">Full Name:</label>
          <input type="text" required id="u_full_name" name="user_full_name">

          <label for="email">Email:</label>
          <input type="email" required id="user_email" name="user_email">

          <label for="name">Full Address:</label>
          <textarea id="user_full_address" required name="user_full_address"></textarea>

        </fieldset>

        <button type="submit" id="notloading">Checkout</button>
        <button type="button" style="display: none;" id="loading">Loading......</button>

       </form>
      </div>
      </div>

    </body>
    <script src="https://cdnjs.cloudflare.com/ajax/libs/jquery/3.3.1/jquery.min.js"></script>
    <script src="public/js/ajax-script.js"></script>
</html>
Create a /Public folder in the root directory of the application. In the /Public folder, create /css and /js folders.
Go to /Config/server.js and add app.use('/Public', express.static('public')); above the module.exports = app;.
In the /Public/css folder, create a new stylesheet called style.css. Paste the following code into the file:
*, *:before, *:after {
    -moz-box-sizing: border-box;
    -webkit-box-sizing: border-box;
    box-sizing: border-box;
  }

  body {
    font-family: 'Nunito', sans-serif;
    color: #384047;
  }

  form {
    max-width: 300px;
    margin: 30px auto;
    padding: 10px 20px;
    background: #f4f7f8;
    border-radius: 8px;
  }

  h1, h2, h3 {
    margin: 0 0 30px 0;
    text-align: center;
  }

  input[type="text"],
  input[type="email"],
  input[type="number"],
  textarea,
  select {
    background: rgba(255,255,255,0.1);
    border: none;
    font-size: 16px;
    height: auto;
    margin: 0;
    outline: 0;
    padding: 15px;
    width: 100%;
    background-color: #e8eeef;
    color: #8a97a0;
    box-shadow: 0 1px 0 rgba(0,0,0,0.03) inset;
    margin-bottom: 30px;
  }

  input[type="radio"],
  input[type="checkbox"] {
    margin: 0 4px 8px 0;
  }

  select {
    padding: 6px;
    height: 32px;
    border-radius: 2px;
  }

  .price{
    color: #4bc970;
  }

  button {
    padding: 19px 39px 18px 39px;
    color: #FFF;
    background-color: #4bc970;
    font-size: 18px;
    text-align: center;
    font-style: normal;
    border-radius: 5px;
    width: 100%;
    border: 1px solid #3ac162;
    border-width: 1px 1px 3px;
    box-shadow: 0 -1px 0 rgba(255,255,255,0.1) inset;
    margin-bottom: 10px;
    cursor: pointer;
  }

  fieldset {
    margin-bottom: 30px;
    border: none;
  }

  legend {
    font-size: 1.4em;
    margin-bottom: 10px;
  }

  label {
    display: block;
    margin-bottom: 8px;
  }

  label.light {
    font-weight: 300;
    display: inline;
  }


  @media screen and (min-width: 480px) {

    form {
      max-width: 480px;
    }

  }
In the /Public/js folder, create a new JavaScript file called ajax-script.js. Paste the following code into the file:
$(document).ready(function() {

    $("#checkoutForm").submit(function(e){
        e.preventDefault()
        $("#notloading").hide()
        $("#loading").show()

        $.ajax('/create-checkout', {
            type: 'POST',
            data: {
                'u_full_name': $("#u_full_name").val(),
                'user_email': $("#user_email").val(),
                'user_full_address': $("#user_full_address").val(),
            },
            success: function (data, status, xhr) {
                window.location.href = data.data.redirect_url;
            },
            error: function (jqXhr, textStatus, errorMessage) {
                $("#notloading").show()
                $("#loading").hide()
                console.log('Error' + errorMessage);
            }
        });
    });
})
2. Set Up the Route
First, import the route script into the index.js file by adding require('./Routes/index') to the index.file.
Add the following code to the /Routes/index.js file:
const app = require('../Config/server')
const path = require('path');
const dotEnv = require('dotenv');

dotEnv.config()

app.set('views', path.join(__dirname, '../Views'))
app.set('view engine', 'ejs')

app.get('/', function(req, res){
    var price = 3000 / 100
    res.render('Checkout', {
        product_name: 'Gold Digger',
        price: '$'+price.toFixed(2)
    })
})
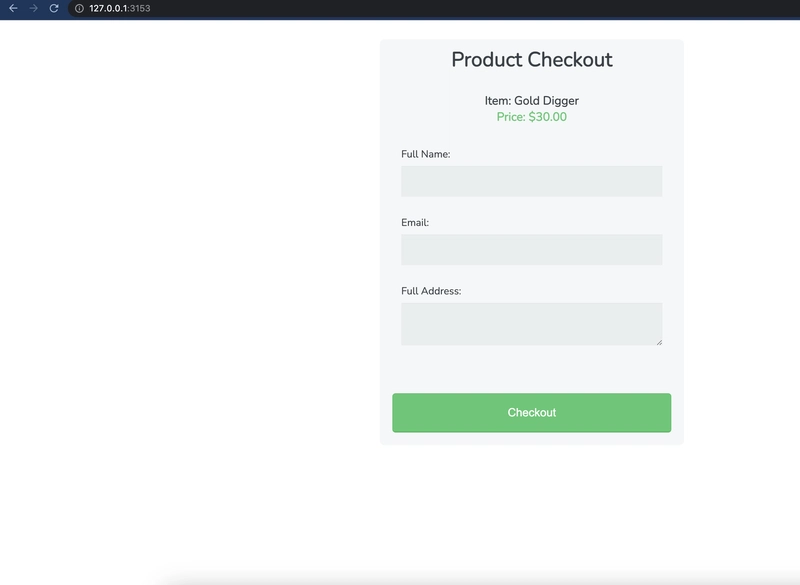
Save all files, and if you’ve deactivated the nodemon server, run npm run dev. Proceed to your browser and load the application via http://127.0.0.1:{{your_port_number}}. It should look like this:
Kudos to you if you’ve gotten to this stage! I’d recommend that you initiate git and commit your changes so far. Ensure that you git ignore the .env file and the /node_modules folder.
How to Develop the Payment Module
This is the final and most important process of the development of the application. We’ll integrate the Rapyd Collect API into the application, enabling it to accept payment from all over the world.
1. Set Up a Rapyd Account
Log in to your Rapyd account.
There are two environments in Rapyd, namely production and sandbox. The sandbox environment is not used to process real transactions; it’s mainly for testing purposes. Go to the top right of your Rapyd dashboard to activate the sandbox environment.

2. Customize the Checkout Page
Go to the sidebar and click Settings > Branding. Here, customize your hosted Rapyd checkout page to fit your requirements.
You can change the logo, color, and text to reflect your brand. Specify the redirect URL that the checkout page directs your user to after a successful transaction is completed. Decide which payment method to utilize.
In this tutorial, we’ll only use and test the card payment method.

Please note that Rapyd will not allow you to use a fallback URL containing or similar to localhost. You’ll have to create a new test domain and attach the port number. In my case, I used http://rapyd-demo.test:3153/.
Visit this guide to learn how to add a new test domain to the virtual host on your local computer.
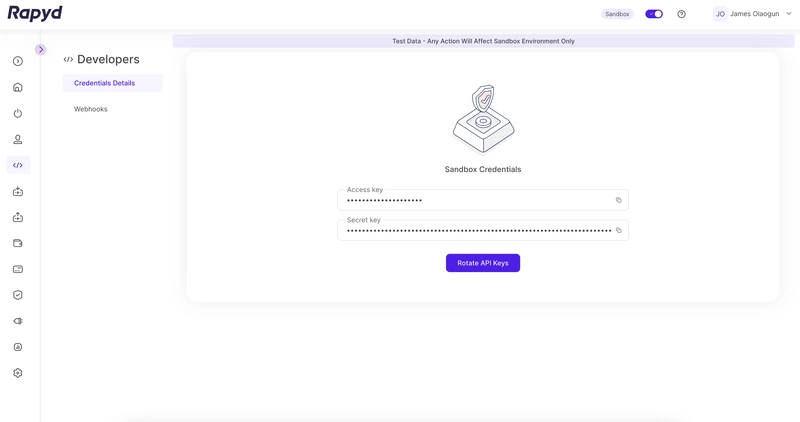
4. Grab Your API Keys
Go to the sidebar and click Developers > Credentials Details to see your access and secret key.
5. Connect Your Node Application to the Rapyd Server
To connect the Rapyd server to your application, install https by running npm install https in the root directory of your application.
Go to the /Model folder and create a new file called DBQueries.js. Paste the code below into the file. The code block exports a class that has a generic function for the creation of new checkout records in the database.
const pool = require('../Config/db-config');

const  DEFAULT_PROPERTIES = {
    status: 'In Progress',
    created_at: new Date(Date.now()),
}


class DBQueries {
    constructor(){

    }

    static create(entry){
        const {full_name, email, full_address, amount, reference, product_details, meta_data} = entry;

        return new Promise((resolve, reject) => {
            pool.query(
                `INSERT INTO checkout_details(full_name, email, full_address, amount, reference, product_details, meta_data, status, created_at)
                VALUES($1, $2, $3, $4, $5, $6, $7, $8, $9)`,
                [full_name, email, full_address, amount, reference, product_details, meta_data, DEFAULT_PROPERTIES.status, DEFAULT_PROPERTIES.created_at],
                (error, response) => {

                if (error) return reject(error);

                resolve(response)
            });
        })
    }

}

module.exports = DBQueries;
Go to the /Controller folder and create a new file called checkoutController.js. Paste the code block below into the file; it receives the checkout form request from the route and sends a payment request to the Rapyd API using the makeRequest function from rapydUtilities.js. It also uses the generic function from DBQueries.js to create a record in the database. Finally, it sends the response from Rapyd API back to the frontend interface.
const {makeRequest} = require('../Helpers/rapydUtilities')
const DBQueries = require('../Model/DBQueries')

class checkoutController{
    constructor(){

    }

    static createCheckout(request, response, next){

        const {u_full_name, user_email, user_full_address} = request.body

        var price = 3000 / 100
        price = price.toFixed(2)

            const body = {
            amount: 30.00,
            country: 'US',
            currency: 'USD',
            language: 'en',
            metadata: {
                u_full_name: u_full_name,
                user_email: user_email,
                user_full_address: user_full_address,
            },
            };
            makeRequest('POST', '/v1/checkout', body).then((data)=>{

                const entry = {
                    full_name: u_full_name,
                    email: user_email,
                    full_address: user_full_address,
                    amount: price * 100,
                    reference: data.body.data.id,
                    product_details: 'Gold Digger',
                    meta_data: data.body.data
                };

                DBQueries.create(entry)
                    .then((entry) => {

                        return response.json({status: 200, message: 'checkout created', data: data.body.data});

                    }).catch((error)=>{
                        console.log('error: ',error);
                    });
            })
            .catch((error)=>{
                console.log('error: ',error);
            });

    }

}

module.exports = checkoutController;
Go to the /Helpers folder and create a new file called rapydUtilities.js. Paste the following code into the file; it contains all the core functions used to integrate (make requests to) the Rapyd Collect API:
const https = require('https');
const crypto = require('crypto');
const dotEnv = require('dotenv');
dotEnv.config()

const secretKey = process.env.SECRETE_KEY;
const accessKey = process.env.ACCESS_KEY;
const log = false;

async function makeRequest(method, urlPath, body = null) {

    try {
        httpMethod = method;
        httpBaseURL = "sandboxapi.rapyd.net";
        httpURLPath = urlPath;
        salt = generateRandomString(8);
        idempotency = new Date().getTime().toString();
        timestamp = Math.round(new Date().getTime() / 1000);
        signature = sign(httpMethod, httpURLPath, salt, timestamp, body)

        const options = {
            hostname: httpBaseURL,
            port: 443,
            path: httpURLPath,
            method: httpMethod,
            headers: {
                'Content-Type': 'application/json',
                salt: salt,
                timestamp: timestamp,
                signature: signature,
                access_key: accessKey,
                idempotency: idempotency
            }
        }

        return await httpRequest(options, body, log);
    }
    catch (error) {
        console.error("Error generating request options");
        throw error;
    }
}

function sign(method, urlPath, salt, timestamp, body) {

    try {
        let bodyString = "";
        if (body) {
            bodyString = JSON.stringify(body);
            bodyString = bodyString == "{}" ? "" : bodyString;
        }

        let toSign = method.toLowerCase() + urlPath + salt + timestamp + accessKey + secretKey + bodyString;
        log && console.log(`toSign: ${toSign}`);

        let hash = crypto.createHmac('sha256', secretKey);
        hash.update(toSign);
        const signature = Buffer.from(hash.digest("hex")).toString("base64")
        log && console.log(`signature: ${signature}`);

        return signature;
    }
    catch (error) {
        console.error("Error generating signature");
        throw error;
    }
}

function generateRandomString(size) {
    try {
        return crypto.randomBytes(size).toString('hex');
    }
    catch (error) {
        console.error("Error generating salt");
        throw error;
    }
}

async function httpRequest(options, body) {

    return new Promise((resolve, reject) => {

        try {

            let bodyString = "";
            if (body) {
                bodyString = JSON.stringify(body);
                bodyString = bodyString == "{}" ? "" : bodyString;
            }

            log && console.log(`httpRequest options: ${JSON.stringify(options)}`);
            const req = https.request(options, (res) => {
                let response = {
                    statusCode: res.statusCode,
                    headers: res.headers,
                    body: ''
                };

                res.on('data', (data) => {
                    response.body += data;
                });

                res.on('end', () => {

                    response.body = response.body ? JSON.parse(response.body) : {}
                    log && console.log(`httpRequest response: ${JSON.stringify(response)}`);

                    if (response.statusCode !== 200) {
                        return reject(response);
                    }

                    return resolve(response);
                });
            })

            req.on('error', (error) => {
                return reject(error);
            })

            req.write(bodyString)
            req.end();
        }
        catch(err) {
            return reject(err);
        }
    })

}

exports.makeRequest = makeRequest;
After adding all these files, import the Body parser and the checkoutController to the route file (/Routes/index.js) and also configure express to use body-parser.
const bodyParser = require('body-parser');
const checkoutController = require('../Controller/checkoutController')

app.use(bodyParser.urlencoded({extended: true}));
app.use(bodyParser.json());
Create a new post route to accept the form request. The post route will send the form data to the checkoutController.
app.post('/create-checkout', (req, res, next) => {checkoutController.createCheckout(req, res, next)})
Finally, go back to your .env file and add your Rapyd secret and access key, like so:
SECRETE_KEY={{YOUR_SECRET_KEY}}
ACCESS_KEY={{YOUR_ACCESS_KEY}}
Save all the files and run the npm run dev to start the nodemon server.
How to Demonstrate the Application
Congratulations for getting to this stage! Now go to your browser and load the application via http://127.0.0.1:{{YOUR_PORT_NUMBER}}.
Fill out the checkout form.
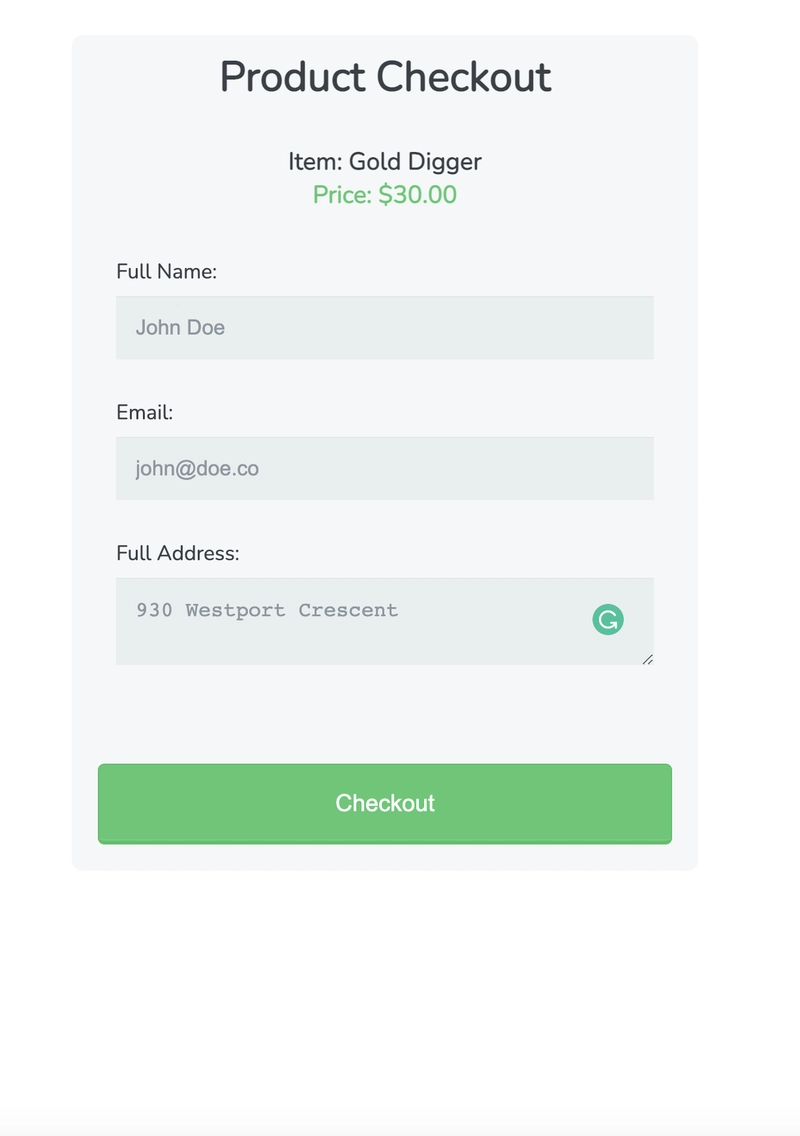
Click Checkout. It should send the request to Rapyd and redirect you to the payment page.
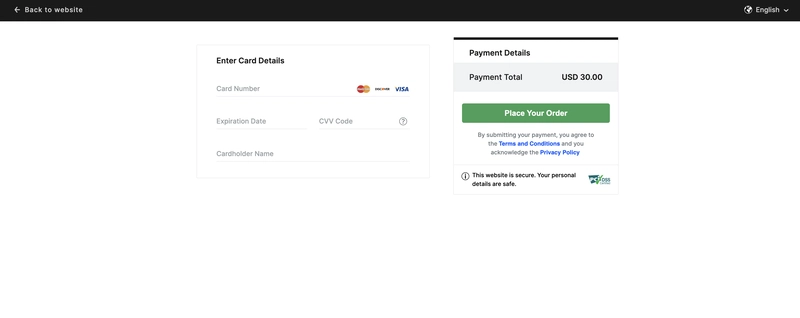
Use the following test card info to make a payment:
- Card number: 4111 1111 1111 1111 (Mastercard)
- Expiration date: Any date in the future.
- CVV: Any three-digit number. (e.g. 123)
- Cardholder name: Any name
Click Place your Order. You should see a success page like this:

Click Finish. You should be redirected to the {{redirection_url}} you added when you were customizing the checkout page.
To see the payment you just made and other previous payments, navigate back to your Raypd Client Portal. Go to the sidebar and click Collect > Payments, as shown in the screenshot below.
Remember to toggle to the sandbox environment.

To get back the details about the accepted payment, you have to set up a webhook that will receive all the notifications about payment status from Rapyd and update your record accordingly. Learn more about webhook and payment status in the official documentation.
Get Support
This article provided a quick overview of Rapyd and its capabilities, as well as a step-by-step tutorial for implementing the Rapyd Collect API checkout page in a Node.js application. You can see payment history, edit the checkout page, and switch between production and sandbox environments. You can access the complete code for this tutorial on GitHub.
Rapyd provides a fast, secure, and reliable payment gateway solution that can power both local and international business transactions. It supports more than 900 payment methods, and more than 65 currencies in hundreds of countries. If you’re looking to start your integration, you can get started by signing up the Client Portal, and follow the get started guide.

Top comments (0)