By Marshall Chikari
The Rapyd Collect API is a comprehensive solution that empowers businesses to handle payments efficiently. It has a wide range of supported payment methods and a global payment network. Whether you're selling products online, offering subscription services, or running an e-commerce platform, the Rapyd Collect API can help you manage your payment flows effectively. For your customers, it provides a simplified checkout process that ensures their purchases are as smooth as possible.
This article provides step-by-step instructions for using Rapyd Collect API to integrate a payment gateway in a Ruby on Rails application. Ruby runs some of the world’s most popular applications including Github, AirBnB, Shopify, Hulu, Dribble, Fiverr, Soundcloud, Kickstarter, and Basecamp. By the end of this tutorial, you'll have a solid understanding of how to use the Rapyd Collect API to elevate the payment experience within your application.
What Is the Rapyd Collect API?
The Rapyd Collect API is a powerful tool that allows developers to accept various payment methods, facilitate checkout processes, and manage subscription billing and invoicing. It enables businesses to streamline their payment processes and offer a wide range of payment options to their customers. Some key use cases for the Rapyd Collect API include the following:
- Diverse payment methods: Beyond traditional credit and debit cards, the API enables you to accept payments through bank transfers, e-wallets, and localized payment methods, meeting the unique preferences of your global user base.
- Simplifying the checkout process: By seamlessly integrating the Rapyd Collect API into your application, you can significantly reduce the steps required for users to complete their payments. This is achieved by harnessing its capabilities to prefill payment information, securely storing user data, and eliminating the need for redundant information entry. This not only enhances the speed of transactions but also reduces user frustration, leading to higher conversion rates.
- Subscription management and invoicing: For subscription-based services, the API enables automated billing and invoicing. This streamlines the process for both businesses and customers as recurring payments are seamlessly processed and invoices are generated and delivered at specified intervals.
Ruby on Rails Payment Gateway Integration with Rapyd API
Following this tutorial, you'll learn the practical steps of integrating the Rapyd Collect API into a Ruby on Rails application. You'll create a sample application that showcases a product details page with a "Buy Now" button, allowing customers to initiate payments seamlessly.
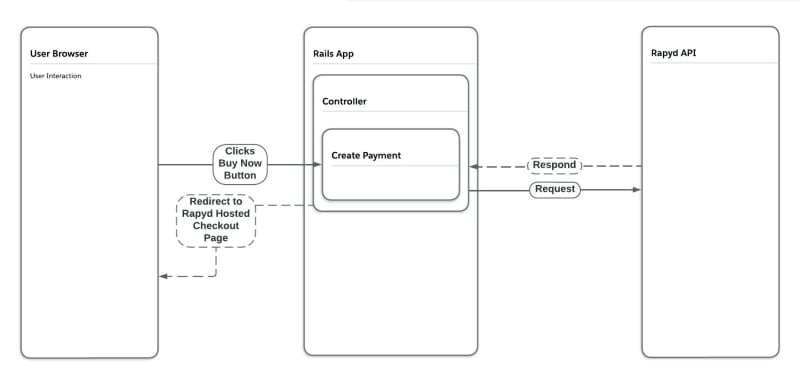
Here's a rough architecture diagram of the application you'll build:
This application comprises the following:
-
Client Interaction:
- Users interact with your Ruby on Rails web application through their web browsers.
- They access the product details page, which displays a "Buy Now" button to initiate the payment process.
-
Controller Handling:
- When the user clicks the "Buy Now" button, the Rails controller
ProductsControllerreceives the request. - The
create_paymentaction is triggered, which extracts the necessary parameters (amount, product ID) from the request.
- When the user clicks the "Buy Now" button, the Rails controller
-
Rapyd API Integration:
- The
create_rapyd_paymentmethod is called within theProductsController. - Inside this method, the application generates a payment request payload following Rapyd API specifications.
- The
RapydSignature.make_rapyd_requestmethod is used to send a POST request to the Rapyd Collect API's/v1/checkoutendpoint. - The request includes headers, a signature, and the payment request payload.
- The
-
API Communication:
- The Rails application communicates with the Rapyd API using HTTPS.
- The Rapyd Collect API processes the payment request and validates the provided information.
-
Rapyd API Response:
- The Rapyd API responds to the Rails application with a JSON response containing information about the payment status and a redirect URL.
- If the payment is successful, the response will include a SUCCESS status and a
redirect_url.
-
Rails Handling of Response:
- Back in the
create_paymentaction, the Rails application checks the status of the Rapyd API response. - If the payment is successful (status is SUCCESS), it redirects the user to the provided
redirect_url. - If the payment fails, it redirects the user back to the product details page with an error message.
- Back in the
-
User Experience:
- The user's browser is redirected to the Rapyd checkout page if the payment is successful.
- The user completes the payment process on the Rapyd-hosted checkout page.
- After the payment process is completed, the user is redirected back to the Rails application's
complete_payment_url.
Prerequisites
Before you begin, ensure you have the following prerequisites in place:
- Basic knowledge of Ruby on Rails framework. This tutorial uses Rails 7.
- A Rapyd account to access the Collect API
- ngrok
Create a Rapyd Account
To get started, create a Rapyd Client Portal account by visiting their official website and signing up. This account will grant you access to the Rapyd Client Portal and API credentials required for integration.
Set Up Your Ruby on Rails Application
Begin by creating a new Ruby on Rails application using the following command:
rails new ruby-on-rails-with-rapyd-api
Once the application is generated, your project folder's structure will resemble the following:
Navigate to the newly created application directory:
cd ruby-on-rails-with-rapyd-api
Next, set up a model for products. Note that, to avoid adding unnecessary code, you won't be using rails g scaffold. Run the following command to generate the model:
rails g model Product title description:text amount:decimal
Navigate to the migration file generated by Rails. Locate the file within the db/migrate directory and update the amount column definition to include precision, scale, and default values:
  def change
    create_table :products do |t|
      t.string :title
      t.text :description
      t.decimal :amount, precision: 8, scale: 2, default: 0.0

      t.timestamps
    end
  end
After updating the migration, execute the following commands in your terminal to create your database and the products table:
rails db:create
rails db:migrate
Product Details Page
Run the following command to generate a controller and views to display product details:
rails generate controller Products index show
This command generates a ProductsController with index and show actions. Update the app/controllers/products_controller.rb file as follows:
class ProductsController < ApplicationController
  before_action :set_product, only: [:show]

  def index
    @products = Product.all
  end

  def show
  end

  private

  def set_product
    @product = Product.find(params[:id])
  end
end
The index action serves as your root path, displaying all available products and allowing users to click on a product to access its description. Update the products/index.html.erb file:
# index.html.erb

<ul>
<% @products.each do |product| %>
    <li><%= link_to product.title, product %></li>
<% end %>
</ul>
Customer Details Input Form
Create a form for customers to input their details within the products/show.html.erb view. This form will collect essential information such as product ID and amount. Update the show.html.erb file as shown below:
# show.html.erb

<% if flash[:alert] %>
  <div class="alert alert-danger">
    <%= flash[:alert] %>
  </div>
<% end %>

<h1><%= @product.title %></h1>
<p><%= @product.description %></p>
<p>$<%= @product.amount %></p>

<%= form_with url: create_payment_product_path, method: :post, local: true do |form| %>
  <%= form.hidden_field :product_id, value: @product.id %>
  <%= form.hidden_field :amount, value: @product.amount %>
  <div class="actions">
    <%= form.submit 'Buy Now' %>
  </div>
<% end %>
You are now ready to integrate Rapyd. Before proceeding with the integration, you need to insert some sample product data into the database and update the routes to ensure proper functionality. The routes file routes.rb should be updated as follows:
Rails.application.routes.draw do
  resources :products, only: [:show] do
      post 'create_payment', on: :member
  end

  root "products#index"
end
After updating the routes, run the following command in your terminal to open the Rails console:
rails console
Inside the console, enter the following commands to add two sample products:
product1 = Product.create!(title: "iphone 14 pro", description: "Apple iPhone 14 Pro ; CPU, Hexa-core (2x3.46 GHz Everest + 4x2.02 GHz Sawtooth) ; GPU, Apple GPU (5-core graphics) ; Internal, 128GB 6GB RAM, 256GB 6GB RAM", amount: 1500.99)

product2 = Product.create!(title: "samsung galaxy s21 ultra", description: "Samsung Galaxy S21 Ultra 5G ; Size, 6.8 inches, 112.1 cm2 (~89.8% screen-to-body ratio) ; Resolution, 1440 x 3200 pixels, 20:9 ratio (~515 ppi density).", amount: 899.99)
Once the products are saved successfully, you should see a similar output in the console:
Exit the console by typing exit, then start the Rails server with the command rails server. Open your web browser and access http://localhost:3000. You should see the list of products displayed as shown below:
Integration with Rapyd Collect API
You can now integrate the Rapyd Collect API by sending payment requests from your Rails application. You'll use the API documentation to construct the necessary endpoints and payload.
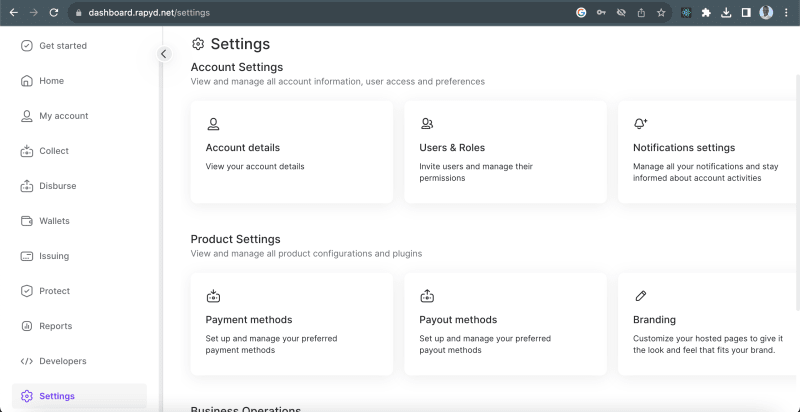
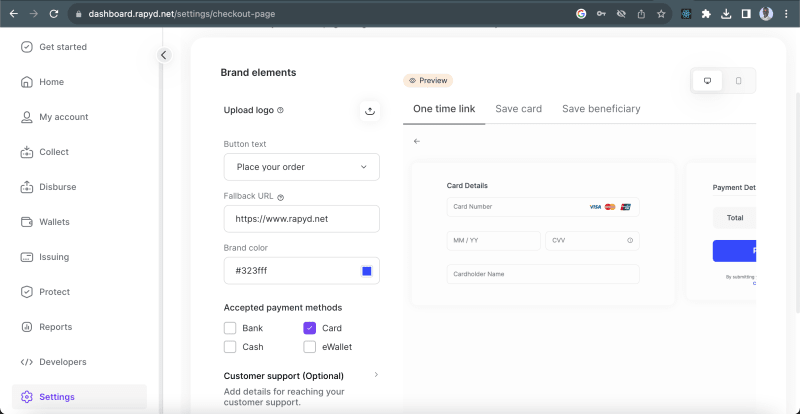
To begin, you need to customize your checkout page settings and branding within the Rapyd dashboard:
Customize your checkout page according to your preferences. For this tutorial, you'll focus on card payments only for testing purposes. Additionally, you can add your brand's logo, which customers will see on the checkout page:
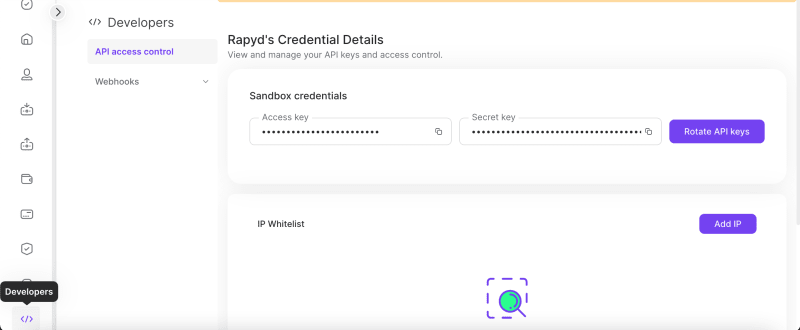
Next, obtain your access keys by navigating to the Developers section:
Now, let's integrate the necessary logic into your Rails application. Inside your Rails application directory, update the app/helpers/application_helper.rb file. The aim is to separate the logic from the controller, keeping it clean and organized. The following code outlines how to create a signature required by Rapyd for each request:
module ApplicationHelper
  require 'digest'
  require 'base64'
  require 'json'
  require 'uri'
  require 'net/http'
  require 'openssl'

  class RapydSignature
    SALT = (0...8).map { ('a'..'z').to_a[rand(26)] }.join
    SECRET_KEY = ' '
    ACCESS_KEY = ' '

    def self.generate_signature(http_method, path, body)
      to_sign = "#{http_method}#{path}#{SALT}#{Time.now.to_i}#{ACCESS_KEY}#{SECRET_KEY}#{body}"
      mac = OpenSSL::HMAC.hexdigest("SHA256", SECRET_KEY, to_sign)
      temp_BS64 = Base64.urlsafe_encode64(mac)
      temp_BS64
    end

    def self.set_headers(request, http_method, path, body)
      request['content-type'] = 'application/json'
      request['signature'] = generate_signature(http_method, path, body)
      request['salt'] = SALT
      request['timestamp'] = Time.now.to_i.to_s
      request['access_key'] = ACCESS_KEY
      request
    end

    def self.make_rapyd_request(http_method, path, body)
      uri = URI("https://sandboxapi.rapyd.net#{path}")
      res = Net::HTTP.start(uri.host, uri.port, use_ssl: true) do |http|
        request = http_method == 'post' ? Net::HTTP::Post.new(uri) : Net::HTTP::Get.new(uri)
        set_headers(request, http_method, path, body.to_json)
        request.body = body.to_json if http_method == 'post'
        http.request(request)
      end

      JSON.parse(res.body)
    end
  end
end
The generate_signature method constructs a string to be signed, concatenating HTTP method, path, salt, timestamp, access key, secret key, and request body. It then generates the signature using HMAC-SHA256 and encodes it in Base64. The set_headers method sets up the required headers for the HTTP request, including the signature, salt, timestamp, and access key. The make_rapyd_request method performs the actual API request, including all necessary headers and, if applicable, the JSON-formatted request body. Refer to the Rapyd Collect API for more on authentication. Do not forget to add the SECRET_KEY and ACCESS_KEY credentials from the Rapyd dashboard, and to use the Rapyd API in production, you will have to use the production API instead of the sandbox API.
To utilize this logic, include it in the application_controller.rb file:
class ApplicationController < ActionController::Base
    include ApplicationHelper
end
Handling API Responses
You'll now implement the logic to handle responses from the Rapyd API. Navigate to the products_controller.rb file and update it as outlined below:
class ProductsController < ApplicationController
  before_action :set_product, only: [:show]

  def index
    @products = Product.all
  end

  def show
  end

  def create_payment
    @product = Product.find(params[:product_id])
    amount = params[:amount]
    merchant_id = params[:product_id]

    response = create_rapyd_payment(amount, merchant_id)

    if response['status']['status'] == 'SUCCESS'
      puts response
      redirect_to response['data']['redirect_url'], allow_other_host: true
    else
      puts response['status']['message']
      flash[:alert] = 'Payment Failed'
      redirect_to product_path(@product)
    end
  end

  private

  def set_product
    @product = Product.find(params[:id])
  end

  def create_rapyd_payment(amount, merchant_id)
    payment_data = {
      "amount": amount,
      "complete_payment_url": "http://example.com/complete",
      "country": "US",
      "currency": "USD",
      "error_payment_url": "http://example.com/error",
      "language": "en",
      "merchant_reference_id": "product_#{merchant_id}"
    }

    RapydSignature.make_rapyd_request('post', '/v1/checkout', payment_data)
  end
end
In the products_controller.rb file, the create_payment method handles the form submission triggered by the Buy Now button on the show.html.erb page. It extracts the required parameters, then utilizes the create_rapyd_payment method to generate the payment request and communicate with the Rapyd API. If the response indicates a successful payment, the user is redirected to the Rapyd checkout URL using the response['data']['redirect_url'] from the response we get from Rapyd. Otherwise, an error message is displayed, and the user is redirected back to the product page.
The create_rapyd_payment method constructs the payment request body according to Rapyd's API requirements. It uses the make_rapyd_request method to send the API request. If you want to test this on localhost, make sure to use tools like ngrok, which generates a temporary web address and redirects traffic to a specified port on your local machine. This allows you to securely test and experience Rapyd's features within your development environment. When the request is successful, the response will resemble the following:
Application Showcase: From Product Selection to Successful Payment
The image below demonstrates the completed application, showcasing the payment flow from product selection to successful payment. You can find the full source code of the application in this GitHub repo.
Upon making a payment using one of the test cards from the Rapyd Collect API, you can navigate to your Rapyd dashboard under Collect then Payments. There, you will find the recorded payments, as depicted in the following image:
Furthermore, Rapyd offers a multitude of API endpoints in the Collect API, such as the /v1/payments endpoint. This allows developers to implement payments directly without the need for redirection, granting even more flexibility in crafting tailored payment experiences for users.
Conclusion
In this tutorial, you explored the capabilities of the Rapyd Collect API and learned how to integrate it into a Ruby on Rails application to create a seamless payment experience. By following the steps outlined in this article, you have learned how to set up a Rapyd account, create a Ruby on Rails application, implement payment gateway integration, and handle API responses effectively.
Rapyd's global network of local payments sets it apart as a valuable tool for businesses seeking to offer diverse payment options and streamline their payment processes. As you continue to develop your fintech, e-commerce, or payments projects, consider leveraging the Rapyd Collect API to enhance your payment flows and provide a superior user experience.
For more information and to explore Rapyd's offerings, visit the official Rapyd website.


Top comments (0)