NestJs is a Node.js framework for building efficient and scalable server-side applications and the best thing is that it fully supports Typescript.
And we will be using Mikro-orm for data mapping and PostgreSQL, a relational database.
We are going to create a movie-review app wherein users can rate and write review about the movies/shows they have watched.
This will a series, so please follow each blog and at the end of the series hopefully we will have a working back-end application and in doing so we will get better understanding of NestJs.
Part I
So, in the first part of this series, we are going to setup our NestJs project, create a PostgreSQL database and connect our application with the database using Mikro-Orm.
Let's start...
Installation
Install Nest CLI globally in your machine and then using the Nest CLI create a new project.
$ npm i -g @nestjs/cli
$ nest new project-name
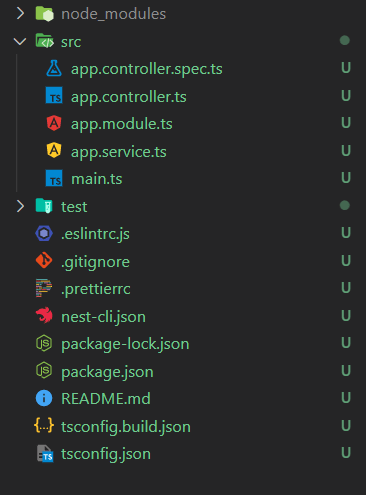
This will create a new project which already has boilerplate files installed in it. To know what these files are please refer NestJs Documentation they have explained it perfectly.
Your project structure should look something like this 
Database Configuration
We will be using PostgreSQL for database. So, install PostgreSQL and pgAdmin(Database management tool). After installing both, open pgAdmin and create new database.
Now, we need to install an ORM to work with the database we created. Let's install Mikro-Orm.
$ npm i -s @mikro-orm/cli @mikro-orm/core @mikro-orm/postgresql
$ npm i -s @mikro-orm/nestjs @mikro-orm/reflection @mikro-orm/sql-highlighter
After installing Mikro-Orm, we need to add configuration file in which we will connect to our database. Create mikro-orm.config.ts file in src folder.
We can directly configure this in app.module.ts file. But it is better to separate the dbConfig file so that we can write the database and migration details in a clean way. Please Refer Mikro-Orm documentation for other methods of configuring ORM.
After writing the config file we need to add this file to app.module.ts. Just call forRoot() method without any arguments as we have already mentioned everything in our config file.
Now, the EntityManager will be available to inject across entire project (without importing any module elsewhere).
Also make sure mikro-orm is added in package.json file.
"mikro-orm": {
    "useTsNode": true,
    "configPaths": [
      "./src/mikro-orm.config.ts",
      "./dist/src/mikro-orm.config.js"
    ]
  }
Also make sure the configPaths are given correct. You can verify this by checking your dist folder. Otherwise, you might get some error stating "cannot find mikro-orm.config.js".
Before moving forward, let's look at our main.ts file as well. Here, we have to mention the port number our app will be running on. And we have also added a global prefix 'api' to our app. This prefix will be used in all the APIs. Example: http://localhost:3000/api/user, http://localhost:3000/api/movie/.
We are ready to create entities and start writing APIs. I think this is enough for Part I. Let's meet in the Part II of this series.
Github Repository - https://github.com/rskhan167/movie-review
Please like and share if you found it helpful.
Thanks for reading.


Top comments (0)