This site is built using AWS S3 for static website hosting, behind an AWS CloudFront distribution. To get the site to be served on the domain we want, we have to setup CloudFront to use a custom CNAME, and enable HTTPS traffic by provisioning an SSL certificate through AWS ACM. In this post, I'll explain how you can setup an existing CloudFront distribution with a custom domain name.
Getting our SSL Certificate
For this post I'll assume you already have an S3 site with a CloudFront distribution. If not, take a look at the documentation here and here.
In order for us to safely server traffic on our website using TLS, we need to get a certificate from Amazon Certificate Manager. The default CloudFront distribution domain has it's own TLS certificates that it uses. If we want to serve the site on our own domain, AWS will need to validate that we own the domain. To do this, search for ACM in the AWS console and click on Certificate Manager.
Next, click Request a Public Certificate and enter the domain name you want to use. For this site, I used "mikemather.cintsa-cms.com". Once that's done, you should see the fields that you'll need to add to your DNS records to validate the domain.
Now we can go into our DNS provider (I use NameCheap) and create a new DNS record. You'll use CNAME as the record type and use the name (or host in my name) and value fields provided by AWS. AWS uses this to validate that you own the domain you're requesting the certificate for.
When that's completed, you'll see that your certificate is pending validation. Depending on your DNS provider this could take anywhere from a few minutes to a few hours. You'll just have to sit back and wait while they work their magic.
Note: This is specifically for subdomains, not root domains. For root domains you'll need to add a hosted zone in AWS Route53 and add an A record with the CloudFront distribution as the alias. See here for more details.
For me, it took about 5 minutes to validate.
Nice! Now we can apply the domain to our CloudFront distribution.
Applying the Domain to CloudFront
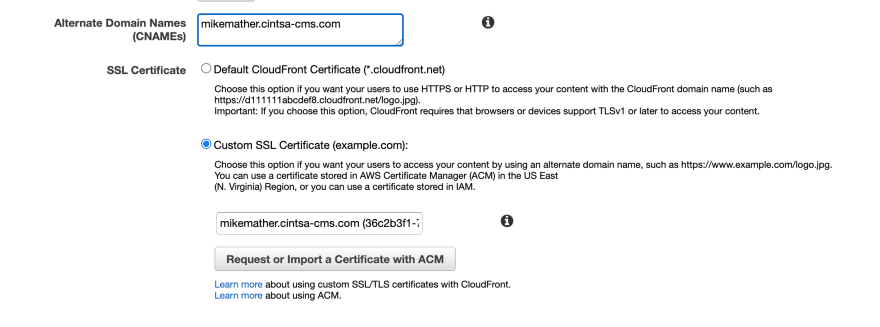
To apply our domain to the distribution, all we need to do is tell CloudFront which domain to use and which certificate to use to serve HTTPS traffic. To do this, go to the CloudFront console in AWS. You should see your distribution listed. Select your distribution and click Distribution Settings and then Edit.
In the "Alternate domain names" field enter the domain name that you created the certificate for. You can use any number of domain names here as long as they match the domain names you used when you created your SSL certificate. Then in the SSL certificate field, select "Custom SSL Certificate". When you click into the input field, you should see the certificate that you created listed, so you can just select it there. Now all you have to do is save your changes and you're good to go. You should see your changes reflected relatively quickly.
Updating your DNS records
There are two ways that you may need to update your DNS records. If you're using a subdomain instead of a root domain, you can just create a CNAME record in your DNS registrar that points to your CloudFront distribution domain. E.g. if you want to host a site on myapp.example.com then you set the Name of the DNS record to myapp, the value to your CloudFront domain (xxxxx.cloudfront.net) and the record type to CNAME.
If you're intending to host the site on a root domain (e.g. example.com) then you'll have to use a Route53 hosted zone. You can still use a Route53 hosted zone if you have your domain registered with another registrar (see here). In short, you can create a hosted zone and set the NS records in you DNS registrar to point to your hosted zone. Then in Route53 you can go into your domain and create an A record, and select the CloudFront distribution from the "Alias" field. If your domain is already registered through Route53, then you'll just need to create an A record with the CloudFront distribution as the alias.
Conclusion
In this post I used CloudFront in front of an S3 website, but you can use CloudFront for serving just about any static content. For example, you could host an app on Heroku with a CloudFront distribution to speed-up content delivery. Whatever you use CloudFront for, the process for adding custom domains is still the same.


Top comments (0)