
When I first started using Unity as a game developer, it took me forever to grasp the whole scripting system and whatever situation was going on in the Inspector. I considered myself more of a 2D pen-and-pencil artist at the time, so I had to overcome a massive learning curve to get through the basic tutorials. Once I got sick of transform.positioning a flat sprite from point A to point B, I decided to take a stab at animating.
Oh my god, it was hard. It took me a long time to figure out with the help of my professors, which is why I'd like to share my experience with others to help them get started.
In order to keep this post brief, I'll break up the work cycle into chunks by difficulty. Each chunk will lead you to a workable
Part 1: Getting things to animate with sprites
Scope: Prepare your assets and workstation to get a simple looping animation going. There will be no coding in part 1.
Step 1: Preparing your assets
In this article, I'll be using 2D sprites in a sprite sheet to create a few separate animations that represent different states. You can achieve the same results with a series of PNG files, but I prefer working in sprite sheets because it's easier to keep organized. If you'd like to convert your loose PNGs into a sprite sheet, there are online resources like Free Spritesheet Packer to generate sprite sheets.
Once your file(s) is in the Assets folder, click on your file(s) and look at the Inspector. We only care about the following settings:
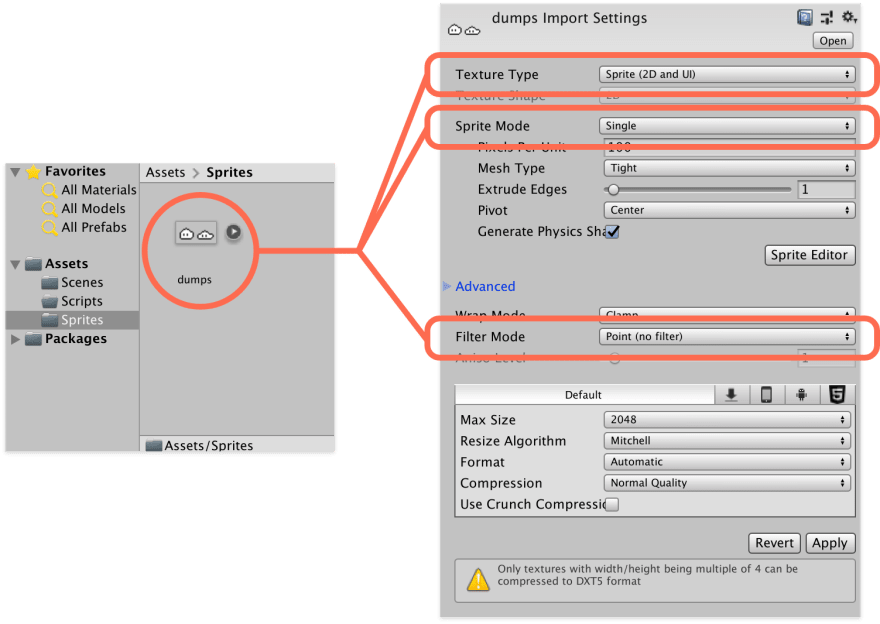
Texture Type: Make sure it's Sprite (2D and UI)
Sprite Mode: Single for those using loose PNGs and Multiple for those with sprite sheets
Filter Mode: For those working with pixel art, set your pixel mode to Point (no filter). This will ensure you get those crispy edges that other art styles would rather avoid.
With that done, hit apply!
For those using sprite sheets, you'll need to take an extra step and slice those bad boys up. Don't worry, it takes 3 seconds to do and only involves clicking buttons.
Step 1.5: Preparing your spritesheet
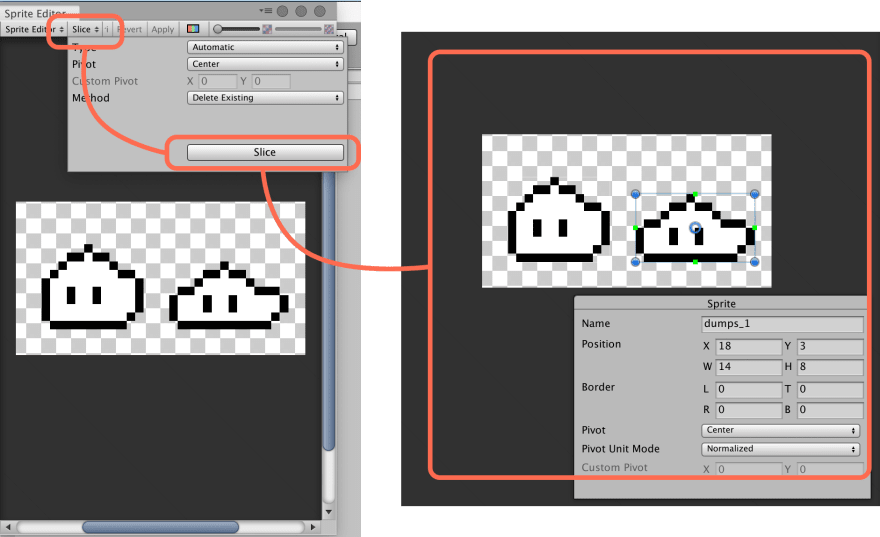
Once you've applied your changes, click Sprite Editor in the Inspector. It will bring up a window with your sprite sheet. Assuming you've created your files properly and each frame is separated by blank space, you can simply hit the Slice drop-down menu on the top left corner and use the automatic slicer to get those bad boys cut.
If your sprites have a lot of irregular blank spaces but is otherwise laid out evenly, you can hit the drop-down menu and slice by cell count or grid size, depending on how much mental math you want to do.
If your sprites still don't meet my criteria, delete that sprite sheet and make a new one.
After you hit slice, you should see a blue rectangle outlining each sprite. Cool! Hit apply!
Step 2: Making the animation
This is the easiest step, but can potentially trip up new Unity users later on. If you're working with loose PNGs, select all your PNGs. If you're working with sprite sheets, click the little arrow next to your sliced sprite sheet to reveal all your freshly sliced sprites and select them normally.
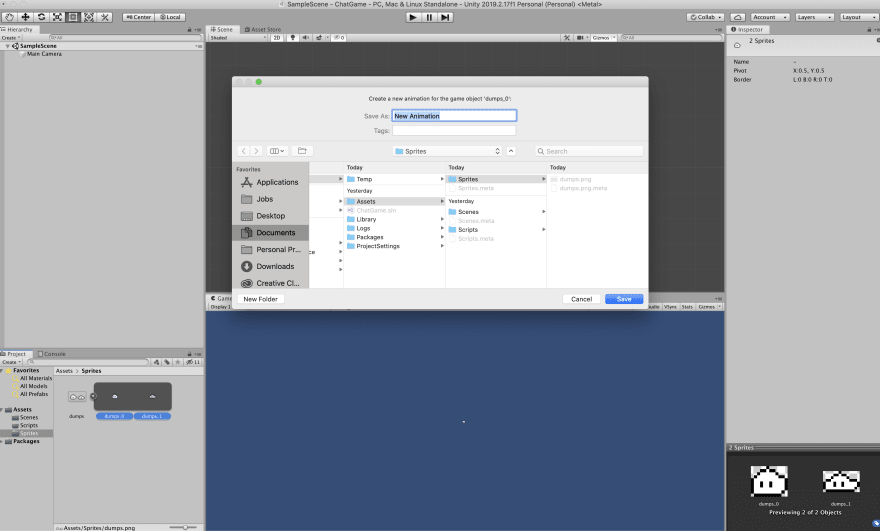
Then, you click those bad boys and drag them into the Scene window. You'll then be prompted to save your animation. I like to save them in an Animations folder, but you can just pop that bad boy anywhere if you don't care.
Now you'll have a nice new GameObject with a Sprite Renderer and Animator attached to it. Hit play and watch your bad boy go!
If you go into your Assets folder, you'll notice that Unity has actually generated two items, an Animation and an Animator. There is a major difference between the file types.
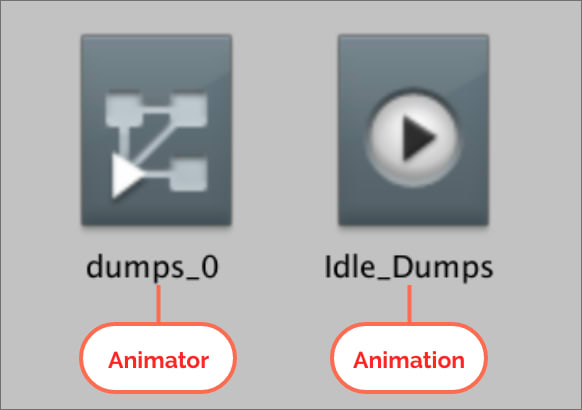
The Animation is simply the animation file that contains the series of PNGs you've just imported. Delete that and you'll need to repeat Step 2 to get the animation back.
The Animator is the puppeteer that helps your animations play during runtime. It keeps track of all your animations for the GameObject that it's attached to and can help you switch between animations depending on the state. It is a state machine and is incredibly powerful. However, you only need one Animator per GameObject for this tutorial, so if you create new animations using my method, you can delete all the other Animators that end up getting created.
Step 3: Adjusting the animation (intro to the Animator and Animation windows)
Uh oh, is your animation going way faster than you thought? No worries, we'll get right to fixing that!
First, select the GameObject with the Animator attached to it.
If your animation is already timed well, your animation may only be a little too fast or slow for your liking. In order to fix that, go to Window > Animation > Animator. That will bring up an Animator window with a green, blue, and orange box.

Select the orange box, which represents the active animation, and refer to the Inspector. Change the speed to something like 0.5 and see how the animation looks. Adjust to whatever suits your project.

If your animation is very short, the above technique may not work well for you. When Unity creates an animation, it automatically spreads each animation out by one frame. Since my animation is only two frames long, it'll loop between the two sprites at a constant speed. Not very pretty. To fix that, I need to adjust the Animation itself.
With your GameObject selected, go to Window > Animation > Animation.
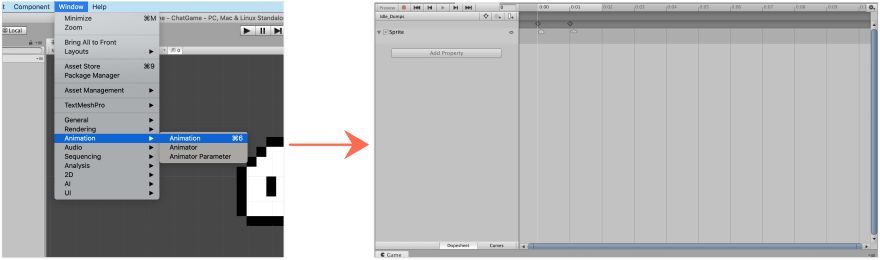
This will bring up the Animation window that looks like a typical animation timeline. You'll find your sprites spread out in keyframes on the timeline, as marked by a diamond shape. I want my animation to stay longer in the upright position and squish quickly, so I will move the squish keyframe out to frame 6. This way, my standing sprite will play for 6 frames and squish only for one.
Hit play and see how your animation looks! If you only adjusted your Animation, you may still want to change the playback speed using the Animator. Simply follow the instructions above and adjust everything to your liking.
Bonus Round: Pivot

Uh oh, my dumpling looks like it's crimping. That's because its animation is anchored to the center of its body, rather than its feet. No worries, easy fix!
This time, navigate to the sprite sheet document and open it in the slicer window. You'll notice that when you click on a sprite, a blue bounding box with a blue circle in the center will appear. Simply drag the blue circle to where your character's feet appendage is touching the ground. Repeat for each sprite.
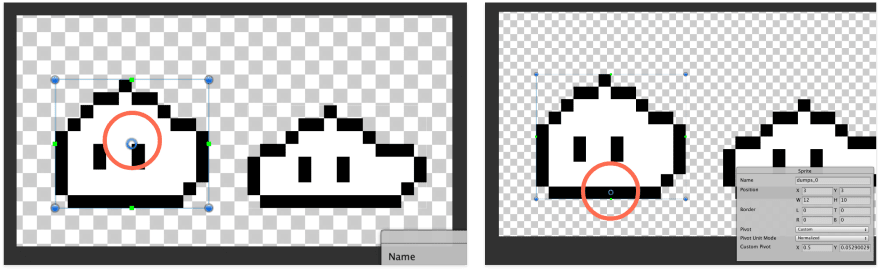
What we're doing here is moving the pivot point to where we want our animation to be anchored. When using sprites with different heights, it will make sure that the anchor will always remain in place so that your character will look like it's standing on the ground.
Protip: you may want to remember the XY coordinate of the pivot point and enter it into the popup for consistency!
Step 4: Success!
Hurray! You've just created your first animation in Unity! Now you can start making much more dynamic games without writing a single line of code. Mastering this skill is a huge bonus to your toolbelt, especially if you're interested in being a solo dev.
If you want your character to play more than a single idle animation, keep an eye out for Part 2 of my Unity Animator tutorial series! I'll be covering state-based animations, which will require a little bit of coding. If you have any questions or suggestions, leave a comment below or email me at hi@maryli.co!

Latest comments (6)
Have really been wanting to dip my toe into this world with my daughter to introduce her to programming. Pumped to have a beginner resource. Thanks!
Happy to help :) Let me know if there's anything specific you guys would like to learn about and I'd be happy to write something up!
This is awesome!
Thanks haha!
Great guide for beginers!
Thanks!