In the previous post, I looked at Pulumi to create a VPC. In this post, I’ll go over the steps to add some subnets to it.
The complete project is available on GitHub.
Configuration
A subnet is a logical partition of your network, so in case of the subnets in a VPC, they’ll divide up the VPC into smaller chunks. A VPC spans all availability zones of a region, whereas a subnet is only inside a single availability zone. To make sure the app you run inside your VPC can move from one availability zone to another in case there is a failure, you’ll need to have at least two availability zones. Each of the zones also needs their own CIDR block. The configuration below, which you can copy/paste into the YAML file from the previous blog, has two parameters. The parameter vpc:subnet-zones has a comma separated list of all the availability zones in which a subnet needs to be created. The parameter vpc:subnet-ips has a comma separated list of the CIDR blocks for each of the subnets.
vpc:subnet-zones: "us-east-1a,us-east-1c"
vpc:subnet-ips: "172.32.32.0/20,172.32.80.0/20"
You can either use the command line, like pulumi config set vpc:subnet-zones "us-east-1a,us-east-1c" to add these new configuration variables, or you can add them directly into the yaml file. The yaml file with all the configuration is called Pulumi.<name of your project>.yaml.
Creating subnets
The code below is an extension from the code created in the previous post. So you can copy/paste this snippet into your Go code too. Walking through the code, it gets the configuration for zones (subnetZones) and CIDR blocks (subnetIPs) from the YAML file. The code reads the variable and splits it on the comma delimiter. For each of the zones it’ll create a new subnet inside the VPC (see subnetArgs) and give it a name based on the name of the VPC. The last step in the range loop is to add the new ID to an array of subnets to export to the Pulumi console.
// Create the required number of subnets
subnets := make(map[string]interface{})
subnets["subnet_ids"] = make([]interface{}, 0)

subnetZones := strings.Split(getEnv(ctx, "vpc:subnet-zones", "unknown"), ",")
subnetIPs := strings.Split(getEnv(ctx, "vpc:subnet-ips", "unknown"), ",")

for idx, availabilityZone := range subnetZones {
    subnetArgs := &ec2.SubnetArgs{
        Tags: tags,
        VpcId: vpc.ID(),
        CidrBlock: subnetIPs[idx],
        AvailabilityZone: availabilityZone,
    }

    subnet, err := ec2.NewSubnet(ctx, fmt.Sprintf("%s-subnet-%d", vpcName, idx), subnetArgs)
    if err != nil {
        fmt.Println(err.Error())
        return err
    }

    subnets["subnet_ids"] = append(subnets["subnet_ids"].([]interface{}), subnet.ID())
}

ctx.Export("SUBNET-IDS", subnets["subnet_ids"])
Running the code
Like the previous time, the last thing to do is run pulumi up to tell Pulumi to go add subnets to your VPC! If you’re using the same project and stack, Pulumi will automatically realize it needs to add subnets to the existing VPC and won’t create a new VPC.
$ pulumi up
Previewing update (builderstack):

     Type Name Plan
     pulumi:pulumi:Stack builder-builderstack
 + ├─ aws:ec2:Subnet myPulumiVPC-subnet-1 create
 + └─ aws:ec2:Subnet myPulumiVPC-subnet-0 create

Outputs:
  + SUBNET-IDS: [
  + [0]: output<string>
  + [1]: output<string>
    ]

Resources:
    + 2 to create
    2 unchanged

Do you want to perform this update? yes
Updating (builderstack):

     Type Name Status
     pulumi:pulumi:Stack builder-builderstack
 + ├─ aws:ec2:Subnet myPulumiVPC-subnet-1 created
 + └─ aws:ec2:Subnet myPulumiVPC-subnet-0 created

Outputs:
  + SUBNET-IDS: [
  + [0]: "subnet-<id>"
  + [1]: "subnet-<id>"
    ]
    VPC-ID : "vpc-<id>"

Resources:
    + 2 created
    2 unchanged

Duration: 8s

Permalink: https://app.pulumi.com/retgits/builder/builderstack/updates/2
The permalink at the bottom of the output takes you to the Pulumi console where you can see all the details of the execution of your app and the resources that were created.
The Pulumi console also has really useful links to the AWS console to see the resources.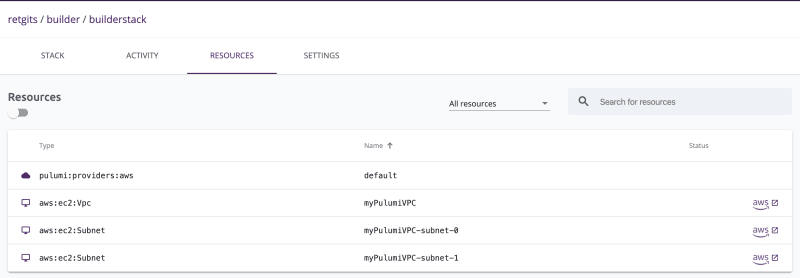

Top comments (0)