
The Kogito documentation states that “Kogito is a cloud-native business automation technology for building cloud-ready business applications”. In other words, a developer toolkit to create a custom business automation application targeting cloud environments.
Kogito enables a developer to have a business process integrated with complex business decisions and rules. This process is converted into a microservice that can be deployed on a containerized environment, such as Kubernetes.
In the following sections you'll learn step by step how you can deploy a custom Kogito service in a Kubernetes cluster using the Kogito Operator.
Getting Started
To get started deploying your first custom Kogito service on Kubernetes you will need:
- A Kubernetes cluster with cluster admin rights on it (minikube is recommended). You'll need cluster admin rights because you are going to install new Kubernetes types in the cluster
- The latest Kogito Operator. The latest released version is available at the Github page
- kubectl installed in your local machine
- Java 11, git (latest), maven (3.6.x) and podman (or docker) installed locally
TIP: If you're concerned about the resources consumed by the minikube instance, for this tutorial I used an instance with 2 CPUs and 4GB RAM.
In the Kogito Examples repository, you will find a lot of examples and use cases to get started with Kogito. To keep things simple, we will deploy the Process with Business Rules on Quarkus example. In this example, our business process will evaluate whether we need a special handling for children or not. To express the process we use the BPMN specification:

Kogito offers a VSCode plugin to author BPMN diagrams. This same editor can also be used online, try it out by clicking here to view and edit the above diagram live!
The nicest thing about BPMN is that you can use the same language to talk to business and IT personas. Plus, this diagram you are working with is about to be transformed into a microservice running on top of Kubernetes.
The image below illustrates the overall process since the creation of a new project to its deployment.
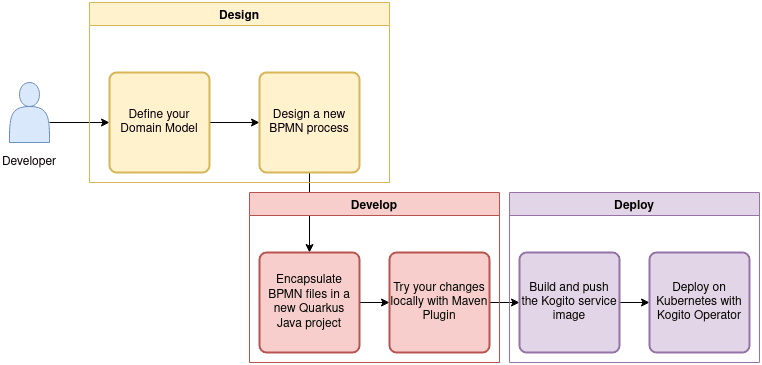
As a developer, you will create a new Java project having custom business rules, decisions or processes, then build and try it locally before deploying it into a Kubernetes cluster.
On Kubernetes, your custom Kogito service will be just one more microservice in your architecture, exposing the domain through REST API and well documented with Swagger. Other services won't even be aware of your internal implementation since no Kogito API internals are exposed. Domain data is the only thing that matters here.
Trying the Kogito service locally
The first step to try the example is to clone the Kogito Examples’s project and to run the target project with the Quarkus Maven plugin. Execute the commands below, and notice the command will keep on running:
TIP: This example is using Quarkus as the target runtime, but SpringBoot is also an option to build Kogito services.
After running the above command, open a new terminal and start a new instance of the process by making a request to the “persons” endpoint:
TIP: run it on a different terminal since the Quarkus maven plugin will be in the foreground.
To play around with the endpoints via the Swagger interface, go to http://localhost:8080/swagger-ui/. If you need more use cases of this service (such as how to retrieve a pending task), please refer to the example page.
Notice that every generated endpoint only contains information about the domain data, in other words, it does not have Kogito specific APIs exposed.
Before heading to the next step, stop the running instance of Quarkus to release the 8080 port.
Building the Kogito service Image
Having tried the custom service locally, it’s time to deploy it in your Kubernetes cluster. For this to work, you will have to build the package and the image locally and push it to a third party registry such as Quay.
To build the package, just run this command: mvn clean package
Packaged files will then be available into the “target” folder.
Then to build the image, use the following Dockerfile as reference:
Copy the content above into a Dockerfile file and add it to the project’s root (process-business-rules-quarkus). This Dockerfile is based on a special image offered by the Kogito project, and it has all the binaries and scripts needed by a custom Kogito service built with Quarkus to run. To build the image, execute the following command in the project’s root directory:
$ podman build — tag quay.io/<yournamespace>/process-business-rules-quarkus:latest .
Remember to update the yournamespace tag with your Quay.io username!
After building the image you can run it locally:
$ podman run — rm -it -p 8080:8080 quay.io/<yournamespace>/process-business-rules-quarkus:latest
TIP: Don’t forget to stop the Quarkus application that you were testing before, since the ports could clash.
You can do the same requests you’ve made so far running the example locally with the Quarkus plugin. Since we’re mapping the same port used by the service on the host machine, all the requests to localhost should work.
After checking that the image is working, we can push it to Quay:
$ podman push quay.io/<yournamespace>/process-business-rules-quarkus:latest
Once the image has been pushed to the registry, make sure that it is available publicly. Some Quay accounts create new tags in private mode by default.
Deploying with Kogito Operator
Here comes the fun part.
Having built the image, we can use the Kogito Operator to deploy it in the Kubernetes cluster. Assuming that you’ve installed and started the minikube locally (or you have cluster admin access to a remote Kubernetes cluster), let’s first install the operator.
Installing the Kogito Operator
To install the Kogito Operator in your cluster, you can download the latest source code of the Kogito Operator and use our installation script:
You should see the operator pod running in the namespace by executing:
If it is the first time you deploy the operator it could take a while to Kubernetes download and start the operator pod.
Alternatively, you can use OLM to install the operator in your cluster. If you want to give it a try, you can follow the instructions listed in the Kogito OperatorHub page.
Deploying the Kogito service
To deploy the Kogito service you’ll have to create a Kubernetes custom resource KogitoRuntime and deploy it in the namespace which you’ve installed the operator:
After a few seconds, you should be able to access the deployed service.
Try fetching it with:
Exposing the Kogito service with an Ingress
If you’re using Minikube, you can expose the service using an NGINX Ingress, to achieve that, follow the instructions in the Minikube documentation explaining how to expose a service. Then, create a new Ingress using the following example:
You need to update your hosts file as explained in the Minikube documentation to be able to access the service through http://kogito-example.com URL.
After updating the hosts file you can play around with the application endpoints using the same commands you used before:
Conclusion
In this tutorial you learned how to deploy a custom Kogito service in a Kubernetes cluster using the Kogito Operator. A Kogito service plays a crucial role in a microservice architecture that relies on complex business processes and decisions, abstracting the inner business requirements into standards, exposing only the domain data to other services.
There are a lot of examples in the Kogito Examples project structure, which you may try to deploy on Kubernetes using this tutorial as a reference.
In the next tutorial, you will approach how to deploy in Kubernetes a custom Kogito service that consumes and publishes events using Kafka. Stay tuned!

Latest comments (0)