Introduction
In this guide, I will walk you through how I set up an EC2 instance to compile, package, and publish a Java-based Maven project to AWS CodeArtifact. This setup ensures a robust and reusable package management process in a cloud-native CI/CD pipeline.
Step 1: Setting Up the EC2 Instance
1.1 Launching an EC2 Instance
I started by launching an Amazon Linux 2023 t3.micro EC2 instance with the following specifications:
- AMI: Amazon Linux 2023
- Instance Type: t3.micro
- Storage: 8 GB (default)
- Security Group: Allowed SSH (port 22) and HTTP (port 80)
1.2 Connecting to the EC2 Instance
After launching the instance, I connected via SSH using:
ssh -i my-key.pem ec2-user@<EC2-Public-IP>
This provided direct access to the instance for software installation.
Step 2: Installing Java and Maven
Maven is required to build and manage Java projects, while Java is needed to run Maven-based applications.
2.1 Installing Java Amazon Corretto 8
Amazon Corretto 8 is a free, production-ready distribution of OpenJDK. I installed it with:
sudo dnf install -y java-1.8.0-amazon-corretto-devel
Then, I set environment variables to ensure Java was properly recognized:
export JAVA_HOME=/usr/lib/jvm/java-1.8.0-amazon-corretto.x86_64
export PATH=$JAVA_HOME/bin:$PATH
To make this change permanent, I added the paths to ~/.bashrc:
echo 'export JAVA_HOME=/usr/lib/jvm/java-1.8.0-amazon-corretto.x86_64' >> ~/.bashrc
echo 'export PATH=$JAVA_HOME/bin:$PATH' >> ~/.bashrc
source ~/.bashrc
I verified the installation with:
java -version
2.2 Installing Maven 3.5.2
Maven 3.5.2 was required to build the Java web app. I downloaded and extracted it manually:
wget https://archive.apache.org/dist/maven/maven-3/3.5.2/binaries/apache-maven-3.5.2-bin.tar.gz
sudo tar -xzf apache-maven-3.5.2-bin.tar.gz -C /opt
Then, I added it to my system PATH:
echo "export PATH=/opt/apache-maven-3.5.2/bin:$PATH" >> ~/.bashrc
source ~/.bashrc
I confirmed Maven was installed by running:
mvn -version
Step 3: Cloning and Configuring the Java Project
I initialized a Git repository on my EC2 instance and connected it to my GitHub repository:
git init
git remote add origin https://github.com/richardatodo/nextwork-web-project.git
git pull origin main
Inside the project directory, I ensured the required dependencies were defined in pom.xml:
<dependencies>
    <dependency>
        <groupId>junit</groupId>
        <artifactId>junit</artifactId>
        <version>3.8.1</version>
        <scope>test</scope>
    </dependency>
</dependencies>
Then, I built the project to verify everything was working:
mvn compile
Step 4: Setting Up AWS CodeArtifact
4.1 Creating a CodeArtifact Repository and Domain
Got it! I'll update the blog post to reflect that you created the CodeArtifact domain and repository via the AWS Console instead of using the AWS CLI.
Here’s the revised section:
Step 4: Setting Up AWS CodeArtifact
I created the CodeArtifact domain and repository via the AWS Management Console:
-
Navigate to AWS CodeArtifact:
- Open the AWS Console and go to CodeArtifact.
-
Create a CodeArtifact Domain:
- Click Create domain.
- Enter the domain name:
nextwork. - Click Create domain.
-
Create a CodeArtifact Repository:
- Click Create repository.
- Enter the repository name:
nextwork-devops-cicd. - Select the domain
nextwork. - (Optional) Enable Upstream repositories if needed.
- Click Create repository.
4.2 Configuring IAM Permissions
To allow EC2 to interact with CodeArtifact, I created an IAM policy:
{
    "Version": "2012-10-17",
    "Statement": [
        {
            "Effect": "Allow",
            "Action": [
                "codeartifact:GetAuthorizationToken",
                "codeartifact:GetRepositoryEndpoint",
                "codeartifact:ReadFromRepository",
                "codeartifact:PublishPackageVersion",
                "codeartifact:PutPackageMetadata"
            ],
            "Resource": "*"
        },
        {
            "Effect": "Allow",
            "Action": "sts:GetServiceBearerToken",
            "Resource": "*",
            "Condition": {
                "StringEquals": {
                    "sts:AWSServiceName": "codeartifact.amazonaws.com"
                }
            }
        }
    ]
}
I attached this policy to an IAM role and associated it with my EC2 instance.
4.3 Generating an Authorization Token
To authenticate Maven with CodeArtifact, I generated a token and stored it in an environment variable:
export CODEARTIFACT_AUTH_TOKEN=$(aws codeartifact get-authorization-token --domain nextwork --query authorizationToken --output text)
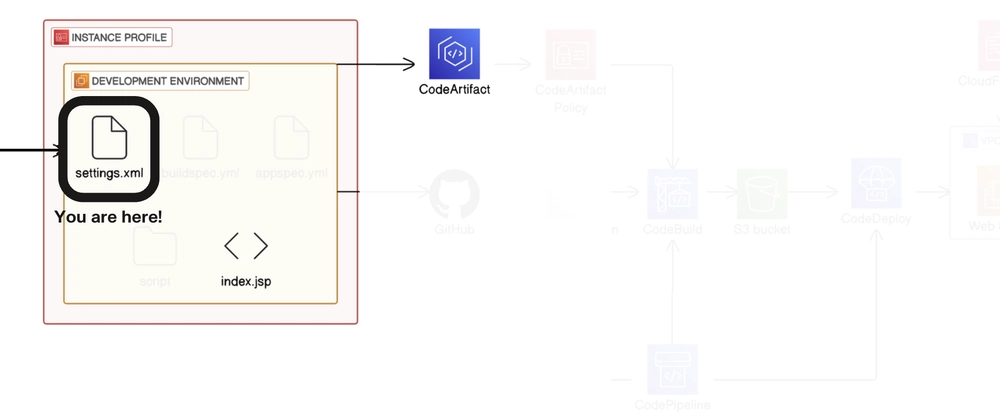
Step 5: Configuring Maven to Use CodeArtifact
I created a settings.xml file in my project directory:
<settings>
  <servers>
    <server>
      <id>nextwork-nextwork-devops-cicd</id>
      <username>aws</username>
      <password>${env.CODEARTIFACT_AUTH_TOKEN}</password>
    </server>
  </servers>
  <profiles>
    <profile>
      <id>nextwork-nextwork-devops-cicd</id>
      <activation>
        <activeByDefault>true</activeByDefault>
      </activation>
      <repositories>
        <repository>
          <id>nextwork-nextwork-devops-cicd</id>
          <url>https://nextwork-617439230997.d.codeartifact.us-east-1.amazonaws.com/maven/nextwork-devops-cicd/</url>
        </repository>
      </repositories>
    </profile>
  </profiles>
</settings>

Then, Run the Maven compile command, which uses the settings.xml file we just configured::
mvn -s settings.xml compile

Step 6: Publishing the Package to CodeArtifact
I updated my pom.xml to include distributionManagement:
<distributionManagement>
  <repository>
    <id>nextwork-nextwork-devops-cicd</id>
    <url>https://nextwork-617439230997.d.codeartifact.us-east-1.amazonaws.com/maven/nextwork-devops-cicd/</url>
  </repository>
</distributionManagement>

Then, I deployed the package:
mvn -s settings.xml deploy
Conclusion
This guide covered how I set up an AWS CodeArtifact repository, configured an EC2 instance to authenticate with it, and successfully deployed a Maven package. This process forms the foundation for integrating package management into a CI/CD pipeline, ensuring secure and scalable software delivery.

Top comments (0)