In this article, we'll create a web page from scratch. You'll get a feeling of what's like to be developer by working along. Don't worry about learning text elements or style sheet rules at this point, I'll cover that in another article. For this introduction, I've created a short agenda:
Agenda:
- Understand how tags, markups, and elements work.
- Learn the structure of HTML documents.
- Check how the browser interprets HTML document.
- See yourself how style sheet works in action.
I've created a small roadmap of website production for you to understand what we are doing at each stage.
- Create content. Write the text for your web page and choose images.
- Create an HTML document structure, learn syntax and elements that setup areas for content and metadata
- Identify and describe content using text elements.
- Add images to the web page and learn about attributes.
- Introduction to style sheets - change how the web looks.
I assume that you have a basic understanding of how the web works. I prefer to teach HTML old fashioned way - by hands and text editor. There's no better way to learn and remember by mechanical typing. You'll see how markups work by typing it out and then checking results in a browser. Professional web developers tend to mark up content manually for better control over the code and possibility to make decisions on what elements to use. We are going to be checking our work in a browser very frequently throughout this article - it's helpful at this stage to see the cause and effect of each small change in the code.
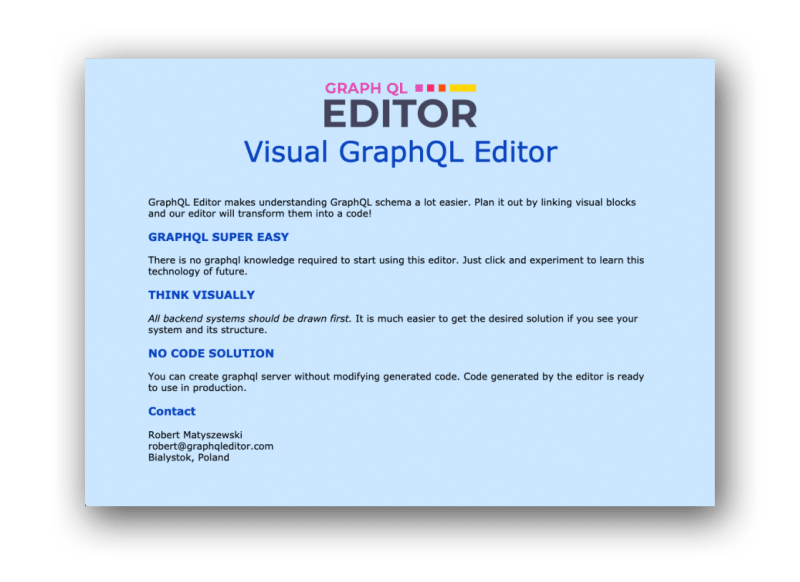
This is our final outcome - basic landing page for startup with logo and text description. It's a basic version of my startup landing page.
Open a text editor
For the purpose of this article, I'll be using most basic text editors on Mac - TextEdit or Windows Notepad. Other editors are also fine as long as they are able to edit plain text and save it as *.html.
Notepad in Windows
Normally in windows, you don't see file extensions so before launching Notepad you might try to change that. It's not obligatory but it's very useful. In folder settings, you have to uncheck "Hide extensions for known file types". That's it, now you can create a new document called mypage.html.
TextEdit in Mac
Normally in this app, you'll get rich end editor with a lot of options for making text bold, setting the font size and others. You can see if the editor is in rich edit mode when you have a lot of controls on the formatting toolbar. HTML documents need to be plain text so we need to change document format. On the New Document tab, select Plain text. Under Options, deselect all of the automatic formatting options. On the Open and Save tab, select Display HTML files as HTML Code and deselect “Add ‘.txt’ extensions to plain text files”. The rest of the defaults should be fine. Now you can create a new document and save it as an HTML page.
The content for our webpage.
Now that we have our new document it's time to get some writing. Type or copy already prepared content into a text editor, remain formatting like breaks between lines. You can use my text which I've posted below or write whatever you want. It's a text from my previous startup landing page https://graphqleditor.com.
Feel free to try our editor when you would like to explore more GraphQL!

VISUAL GRAPHQL EDITOR
GraphQL Editor makes understanding GraphQL schema a lot easier. Plan it out by linking visual blocks and our editor will transform them into a code!

GRAPHQL SUPER EASY
There is no graphql knowledge required to start using this editor. Just click and experiment to learn this technology of the future.

THINK VISUALLY
All backend systems should be drawn first. It is much easier to get the desired solution if you see your system and its structure.

NO CODE SOLUTION
You can create graphql server without modifying generated code. The code generated by the editor is ready to use in production.
Create a new folder and save the text as HTML file inside. Name the folder as "startup" and text file as index.html.
Open what you have created in chrome browser. Check what you see - do you have the same results as I am? I left the text with spaces between paragraphs and the browser interpreted it differently. See what's going on? If yours is not looking the same way check text document settings as mentioned before.

Our page is not looking too good right now. The text from the file is converted into one big block of text. Web browsers ignore things like line brakes, tabs, multi-character white spaces, unrecognized markups or text in comments. More on that later ;)
Tags and markups
Let's start by understanding the most basic HTML element on an example. Since now you haven't seen in this article any code or tags. A generic element of HTML looks like this:
<element>Text here</element>
This second example below is using heading tag meaning that it will be the title of the whole page.
<h1>Visual GraphQL Editor</h1>
A tag consists of element name with angle brackets. Element name appears in opening tag so-called start tag and again in closing tag preceded by a slash. The opening and closing tag work like ON an OFF switch where "/" works like OFF. Be careful to use proper slash "/" and not to mistake it with backslash "\".
The tags plus content are referred to as markup where HTML users markups to describe web pages. Basic HTML element has content and it's markup. There are also elements without content
The tags added around content are referred to as the markup. It is important to note that an element consists of both the content and its markup (the start and end tags). Not all elements have content, however. Some are empty by definition, such as the <img> element used to add an image to the page. We’ll talk about empty elements a little later in this chapter.
Capitalization in HTML is not important however most developers preferer writing code in lowercase.
HTML Structure
Below I've used the most basic HTML document from w3schools.com.
<!DOCTYPE html>
<html>
<head>
<title>Page Title</title>
</head>
<body>

<h1>My First Heading</h1>
<p>My first paragraph.</p>

</body>
</html>
The <!DOCTYPE html> declaration defines this document to be HTML5
The <html> element is the root element of an HTML page
The <head> element contains meta information about the document
The <title> element specifies a title for the document
The <body> element contains the visible page content
The <h1> element defines a large heading
The <p> element defines a paragraph
Are you ready to start updating our sample web page?
Open our .html document in a text editor and start updating.
Put entire document into <html></html> element, than create <head></head> and add <title></title> inside. Also, you should add <meta charset="utf-8"> in the same section. Define the body of the document by wrapping content into <body></body> and markup titles and paragraphs according to your needs. At the end save the document by replacing the old version. Check how it looks on my example. Do you have the same result?

File naming
HTML files must end with .html or .htm, graphics must be named according to their file format: .gif, .png, .jpg or .svg.
Never use character spaces within filenames. Use an underline character to visually separate words within filenames, like my_website.html.
Avoid special characters such as ?, %, #, /, :, ;, •, etc. and national characters (i.e. in Polish we have ł,ę,ó).
It is common among web developers to keep file names short and lowercase. That's an industry standard of keeping the web development clean.
Text elements
With experience from the previous paragraph, you should have no problem marking up a text according to your needs. The purpose of HTML is to add meaning and structure to the content, not intending how the content should look like. That will be introduced in the next paragraph where we'll touch style sheets. Check below some basic text elements and think about how to apply them to our document:
-
<b>- Bold text -
<strong>- Important text -
<i>- Italic text -
<em>- Emphasized text

You can follow my example or mark your own text as you want. For first time users, I suggest staying close to this example, therefore, you'll achieve small wins easily and stay motivated.
Ok so let's go. I've used:
- h3 - to mark paragraph titles,
- h2 - to mark the main title,
- p - to mark paragraphs and em to promote the main feature.
Additionally, if you will pay attention you'll find <br> element which is break liner - like enter in a text editor.
<!DOCTYPE html>
<head>
<title>VISUAL GRAPHQL EDITOR</title>
</head>
<body>

<h2><img src="logo.jpg" alt="logo"><br>Visual GraphQL Editor</h2>

<p>GraphQL Editor makes understanding GraphQL schema a lot easier. Plan it out by linking visual blocks and our editor will transform them into a code!</p>

<h3>GRAPHQL SUPER EASY</h3>
<p>There is no graphql knowledge required to start using this editor. Just click and experiment to learn this technology of future.</p>

<h3>THINK VISUALLY</h3>
<p><em>All backend systems should be drawn first. </em> It is much easier to get the desired solution if you see your system and its structure.</p>

<h3>NO CODE SOLUTION</h3>
<p>You can create graphql server without modifying generated code. Code
generated by the editor is ready to use in production.</p>

<h3>Contact</h3>
<p>Robert Matyszewski <br> robert@graphqleditor.com <br> Bialystok, Poland</p>
</body>
Adding images
You have probably noticed that I've inserted already some image inside - a logo to our landing page. That's right. We are getting close to the final result. Below you can download logo used in this code and add to your webpage. To do that - simply copy the code under the link to your HTML file. Remember to put an image in the same folder and keep naming properly according to file type. If you insert jpg file named .png - the browser won't show the file properly
https://thepracticaldev.s3.amazonaws.com/i/xvtvgoxn6iqksys6iw53.png

<img src="logo.jpg" alt="logo">
The image element <img> is an example of an empty element. It tells the browser to get an image file from the server and insert it at that spot in the flow of the text. Other empty elements include the line break <br>. So far we've only used elements that had start and end, so-called content elements. Below we have an example of <br> element:
<h3>Contact</h3>
<p>Robert Matyszewski <br> robert@graphqleditor.com <br> Bialystok, Poland</p>
Style sheets
We’ll change the presentation of the text elements and background by using some uncomplicated style sheet rules. Don’t worry about understanding them all right now. We’ll get into CSS in more detail in another article, but I want to at least give you a taste of what it means to add CSS to your page.
Open your HTML file and add style section into the head section of your document.
<head>
<title>VISUAL GRAPHQL EDITOR</title>
<style>

</style>
</head>
Now type those style rules between the start and end of the style tag. You can already spot that there are some specific visual rules assigned to the entire document described in body and font formatting for h2 and h3 titles. This will affect your entire page.
<head>
<title>VISUAL GRAPHQL EDITOR</title>
<style>

body {
font: normal 1em Verdana;
width: 80%;
margin: 1em auto;
background-color: #CAE7FF;
}

h2 {
font: normal 3em Verdana;
margin: 1em 0 1em;
text-align: center;
color: #0A45BE
}
h3 {
color: #0A45BE
}

</style>
</head>
Now it's time to save the entire HTML document and open it in chrome browser. Congratulations you have created your own webpage with images, HTML structure and style sheets. All went ok? Compare what you have created with my code at the end screenshot.
<!DOCTYPE html>
<head>
<title>VISUAL GRAPHQL EDITOR</title>
<style>
body {
font: normal 1em Verdana;
width: 80%;
margin: 1em auto;
background-color: #CAE7FF;
}

h2 {
font: normal 3em Verdana;
margin: 1em 0 1em;
text-align: center;
color: #0A45BE
}
h3 {
color: #0A45BE
}
</style>
</head>

<body>

<h2><img src="logo.jpg" alt="logo"><br>Visual GraphQL Editor</h2>

<p>GraphQL Editor makes understanding GraphQL schema a lot easier. Plan it out by linking visual blocks and our editor will transform them into a code!</p>

<h3>GRAPHQL SUPER EASY</h3>
<p>There is no graphql knowledge required to start using this editor. Just click and experiment to learn this technology of future.</p>

<h3>THINK VISUALLY</h3>
<p><em>All backend systems should be drawn first. </em> It is much easier to get the desired solution if you see your system and its structure.</p>

<h3>NO CODE SOLUTION</h3>
<p>You can create graphql server without modifying generated code. Code generated by the editor is ready to use in production.</p>

<h3>Contact</h3>
<p>Robert Matyszewski <br> robert@graphqleditor.com <br> Bialystok, Poland</p>

</body>

Top comments (1)
good tutorial for beginners