In this blog post, we’ll explore how we can build the classic Snake game using Lightning Web Components Open Source (LWC OSS). We’ll also explore how we can optimize the performance of the game and deploy it to any platform of our choice.
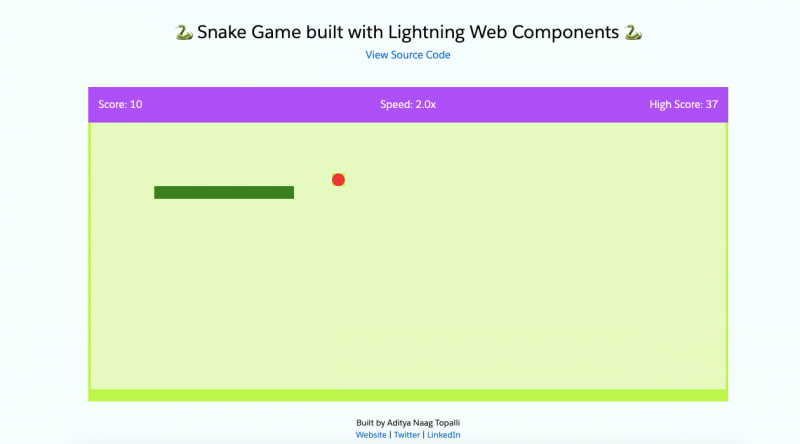
The below image shows how the completed game looks.
- Check out the source code here
- Play the game on Heroku or GitHub pages. You can also install it on your desktop and play offline.
- Check out the recording here to see how we built this game live from scratch.
The Guiding Principle
The guiding principle when building this game is the fact that “Using JavaScript to manipulate the DOM isn’t recommended because the Lightning Web Components engine does it more efficiently”.
We also won’t use the HTML5 Canvas because the only way to modify the contents of a canvas is using the Canvas API which is unrelated to Lightning Web Components and doesn’t leverage its benefits.
With this in mind, let’s dive in. We’ll start by creating the game area, to which we’ll add the snake and the food. We’ll then add the logic to move the snake based on keyboard controls and make the snake longer every time it eats the food. Finally, we’ll deploy the game to GitHub Pages and Heroku.
Creating the game area
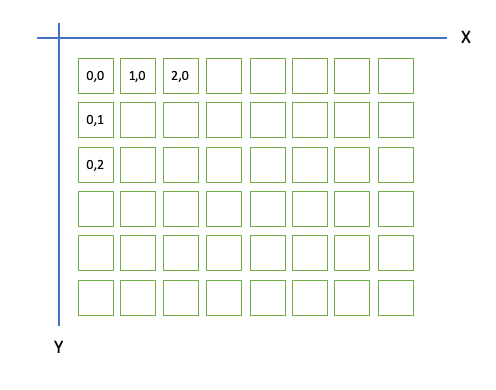
At the heart of the game is the area on which the snake moves. Since we aren’t going to use the HTML5 Canvas, the trick is to divide the available space into blocks of equal size, where each block is a div element.
To calculate the number of blocks needed to cover the area, we divide the available area by the block size. To get the available area we can use the clientWidth and clientHeight properties of the HTMLElement.
const gameContainerEl = this.template.querySelector('.game-container');
const eWidth = gameContainerEl.clientWidth;
const eHeight = gameContainerEl.clientHeight;
Once we’ve identified the number of blocks needed to cover the area, the next step is to actually create the blocks.
One approach is to create a div element for each block using JavaScript and explicitly adding it to the DOM. But as per our guiding principle, using the LWC engine to manipulate DOM is more efficient than using JavaScript.
To let the LWC Engine create the DOM for us, we can create an array of objects, where each object represents a block. We can then iterate over these objects in the template using the for:each directive to render the blocks. Each block is given an ID which we can use throughout the game to find that block. This ID is made up of the X and Y coordinates of the block in the form of X:Y.
This way, the LWC engine creates the required DOM nodes based on the number of elements in the array. Also, key attribute is used by the LWC engine to optimize performance by only re-rendering the item that changed in the list.
@track gameBlocks = [];
renderedCallback(){
    for (let y = 0; y < this.yMax; y++) {
        for (let x = 0; x < this.xMax; x++) {
            ...
            obj = { id: `${x}:${y}` };
            ...
            this.gameBlocks.push(obj);
        }
    }
}
<template for:each={gameBlocks} for:item="block">
      <div key={block.id}> ... </div>
</template>
This presents an interesting problem. If we use @track on a property, then changing it in the renderedCallback() will create an infinite loop of rendering cycles. To fix this, we can add a limiter using a boolean variable. But that doesn’t solve the problem completely.
Every time we push a new element to the array inside a for-loop, a rerender is triggered, which impacts the performance. To overcome this problem, we can create a temporary array that holds all the elements until the for-loop is complete. We can then simply assign its final value to the main array.
@track gameBlocks = [];
gameRendered= false;

renderedCallback(){
    if(!this.gameRendered){
        const tmpBlocks = []; //Declaring a temporary array
        for (let y = 0; y < this.yMax; y++) {
            for (let x = 0; x < this.xMax; x++) {
                obj = { id: `${x}:${y}`}; }
                tmpBlocks.push(obj);
            }
        }
        this.gameRendered = true; //assigning the temporary array to the main one
        this.gameBlocks = tmpBlocks;
    }
}
Creating the snake and food
The next step is to show the snake and food in the game area. One of the ways we can do this is to use CSS classes to color the div blocks where the snake and food are to be shown. We can then keep adding and removing these CSS classes to each block to create the effect of the snake moving.
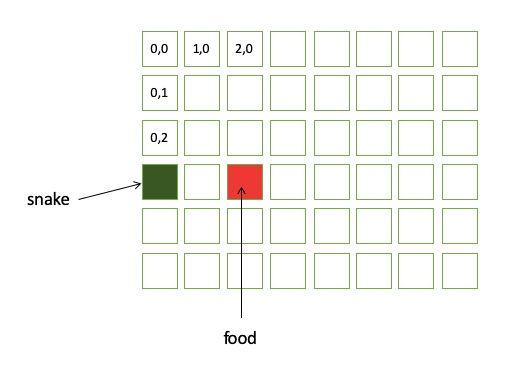
We can add new properties to the block objects to denote if a block is the snake, food, or is empty.
...
obj = { id: `${x}:${y}`, snake: true, food: false };
...
In the template, we can use the if:true directive to decide which type of block we want to show.
<template for:each={gameBlocks} for:item="block">
    <template if:true={block.snake}>
        <div class="snake" key={block.id}></div>
    </template>
    <template if:true={block.food}>
        <div class="food" key={block.id}></div>
    </template>
    ...
</template>
This approach works but causes slight performance degradation. This is because each time the snake moves, the if:true template tags have to be evaluated and the corresponding DOM nodes have to be created/destroyed which is an expensive operation.
A better approach is to manipulate the class on the existing DOM node as it is less expensive than destroying and recreating a DOM node. To do this, we can create another property called class on the block object, and assign its value to the class attribute of the div element.
This simple update of an element’s attribute value results in better performance as there are fewer evaluations.
...
obj = { id: `${x}:${y}`, snake: true, food: false, class: 'snake' };
...
<template for:each={gameBlocks} for:item="block">
    <div class={block.class} key={block.id}></div>
</template>
Now moving on to creating the food. Since food is placed randomly on the game area, we can use the Math.random() function to randomly decide the div block where the food must be present.
const xFood = Math.floor(Math.random() * (this.xMax - 1));
const yFood = Math.floor(Math.random() * (this.yMax - 1));
const foodPosIndex = this.gameBlocks.findIndex( (x) => x.id === `${xFood}:${yFood}`);
this.gameBlocks[foodPosIndex].food = true;
this.gameBlocks[foodPosIndex].class = 'food';
Moving the snake and making it longer
The snake can be moved across the game area by incrementing the position of the head of the snake based on the direction it’s moving. For example, if the snake is moving right, then the X value of the head is incremented by 1, and Y value stays 0.
xSpeed = 1;
ySpeed = 0;
xHead = 0;
yHead = 0;

move() {
    this.xHead += this.xSpeed;
    this.yHead += this.ySpeed;
}
To change the direction of the snake, we just need to update the xSpeed and ySpeed properties based on what arrow key is pressed.
window.addEventListener('keydown', (e) => {
    e.preventDefault();
    switch (e.key) {
        case 'ArrowUp':
            this.xSpeed = 0;
            this.ySpeed = -1;
            break;
        case 'ArrowDown':
        ...
    }
});
Finally, the move() function can be called at regular intervals depending on how fast we want the snake to move. We can call this whenever we want to start the game. For example, on click of a “Start” button, on page load, and so on.
setInterval(() => {
    this.move();
}, 300);
The trickiest part of creating the game is to increase the length of the snake’s tail whenever it eats the food. To achieve this, we’ll need to store the block IDs of the tail in a new array. To move the tail along with the head, we’ll need to remove the first element of the tail array and add the current position of the head to the end of the tail array. Whenever the snake eats the food, we just don’t remove the first element of the array.
move() {

    // Moving the tail.
    // Removing the first element only if food hasnt been eaten in the previous step
    const lastElement = this.tail[this.tail.length - 1];
    if (lastElement !== `${this.xHead}:${this.yHead}`) {
        this.tail.push(`${this.xHead}:${this.yHead}`);
        const removedElement = this.tail.shift();
        const curPosIndex = this.gameBlocks.findIndex( (x) => x.id === removedElement );
        this.gameBlocks[curPosIndex].snake = false;
    }

    // Adding the current head to the tail if food is eaten
    // so that in the next step we can determine if the snake ate food in the previous step
    if (this.gameBlocks[newPosIndex].food) {
        this.score++;
        this.tail.push(`${this.xHead}:${this.yHead}`);
        ...
    }
}
Deploying to multiple platforms
The app type that we choose when creating the LWC OSS project determines the platforms on which the app can be deployed. We can choose Standard or PWA to create a Web app or choose Electron App to create a Desktop app. We chose PWA when building this game so that it can run on the browser, and can be installed on our desktop to be run offline.
The LWC OSS project also includes the tools and services we need to build, test, and run our project locally. Each of these tools and services can be configured based on our needs using the corresponding config files.
The lwc-services.config.json file lets us configure settings like the directory for the build output, port numbers for development and production servers, as well as many more.
The scripts property in the package.json file lists all the scripts we can run on the project. For example, The build script builds the project and creates the executable files in the configured build directory. These executable files can then be deployed to any platform of our choice.
The watch script runs the project locally in “development” mode, meaning that any changes to the source files will auto-refresh the browser. The serve script on the other hand runs the project in “production” mode, where the executable files are served from the build directory.
With this in mind, let's look at how we can deploy the game to GitHub pages and Heroku. There are many ways to do this, and we picked the easiest one which involves pushing the code to GitHub and triggering the deployments to both environments from there.
GitHub Pages
GitHub Pages needs the executable files to be present either in the docs folder or the gh-pages branch.
Let's take the docs folder approach. This means that the build output of the project must go into the docs folder. To do this, we’ll need to update the lwc-services.config.json to configure the build directory (buildDir) to be docs. This is how the updated file looks:
module.exports = {
    buildDir: './docs',
    resources: [
        { from: 'src/resources/', to: 'docs/resources/' }
    ]
};
Once this is done, we'll need to run the command npm run build using Command Line or Terminal, to create the docs folder with the required executable files. We can then push this folder to GitHub and enable GitHub Pages from the Settings menu as shown below.

This auto triggers a deployment to GitHub Pages. Alternately, we can also create GitHub actions to automatically run the build command and update the docs folder or gh-pages branch whenever code is pushed to the repo.
Heroku
To deploy the same code to Heroku, we’ll need to create a file with the name Procfile in the root of the project, with the below contents.
web: npm run serve
The serve script from package.json spins up an Express server to serve the static HTML content from the build directory. Since we configured the build directory to be docs in the previous step, we also need to update the scripts/server.js file to reflect the same.
...
const DIST_DIR = './docs';
...
These changes can then be committed to the GitHub Repo.
We can then create a new app on Heroku, select GitHub as the Deployment Method, choose your GitHub repo, and enable Automatic Deploys. Learn more about using GitHub as a deployment method here.

This way, once we push code to GitHub, it automatically deploys to both GitHub pages and Heroku.
Summary
Building a game is a great and fun way to dive deep into Lightning Web Components. As we have seen, there can be multiple ways to achieve the desired result, but not every way leads to optimal performance. Also, since the apps we build with Lightning Web Components are truly reusable across different platforms, there is no better time than now to start thinking of scaling your solutions beyond just a single platform.
Hopefully, this has sparked your imagination and inspired you to build other games. Hint: Other classic games like Tetris, Ludo, and many more. We can’t wait to see what you build.
Source Code
Don’t forget to check out the source code of this game. Feel free to fork it, raise issues, or submit a PR to improve the game.

Top comments (0)