
React Query is a popular JavaScript library that is widely used in React applications. The library provides us with powerful tools for fetching, caching, and updating data from APIs, helping us to manage our requests efficiently and build fast, smooth, and clean applications.
The key benefits of this library that tempt every programmer to work with it are:
Simplifying data management: React Query makes managing remote data in our application easier by providing powerful tools for fetching, caching, and updating data. It makes managing complex data scenarios such as pagination, optimistic updates, and server-side rendering easier.
Improving application performance: React Query has a smart caching and refetching mechanism that reduces unnecessary requests, resulting in significant improvements in application performance.
Eliminating unnecessary code: React Query frees us from writing unnecessary code for managing data, saving us time and allowing us to focus on the logic of our project and components without worrying about data fetching and caching.
Real-time updates: React Query allows us to have real-time data updates using websockets and other stream APIs, eliminating the need for users to manually refresh the page to update the data.
In this article, we'll go over the key features of React Query and show you how to use it. We'll also discuss server states and client states and answer the question of whether React Query can be a useful tool for global state management.
Installation:
npm install react-query
After installing the package, we need to import QueryClientProvider and QueryClient in the index file as shown below:

We create a queryClient and pass it as a prop to QueryClientProvider, which is then wrapped around the App component. We can now easily use React Query in our components.
useQuery
This hook is one of the most important hooks that React Query provides, and you'll use it a lot. This hook is used to fetch data from the server and cache it for subsequent calls:

As you can see in the example above, this hook returns an object that we destructure to get the values we need.
The first parameter we need to pass to this hook is the query key, which we use for naming. This means that we tell it to go to this endpoint, make this request, and cache the data with this name (in the example, with the name "todos") so that if we want to update the data later and it asks for the name, we can refer to it with the same name and update it.
The second parameter we need to pass is an async function where we make the request and return the data.
The properties that this hook returns are the most important ones, which you can see in the image above.
The data property contains the data that was successfully returned from our request. The isLoading property is a boolean value that will be true if our request has not yet returned the data and is still in a pending state, and false otherwise. The isError property is the same, and will only be true if our request returns an error. We also have an Error property that we can use to display the error message, which is not in the example above.
The cool thing about this is that once the data is successfully fetched and we have it, it will be cached for subsequent calls, and when the user wants to see the data again, they can see it instantly without any loading or delay, while React Query is running a new request in the background to see if the data has changed. If the data has changed, React Query will replace it with the cached data, and if not, the data will remain the same.
As you can see, you're easily managing our request and all possible scenarios, such as when the request returns an error, is successful, or is loading. This is one of the key features of this library, and it allows us to avoid writing additional state management code for loading, error handling, try-catch blocks, and so on, making our code more efficient and clean.
useMutation
We use this hook when we want to change the data, such as when we want to add an item to the data, remove an item from the data, or update the current data.

As you can see in the example above, this hook returns an object that we can destructure to access its properties and use them accordingly.
The first parameter that we pass to this hook is an async function, where we make our request and return the data. If this function requires any parameters (like newTodo in the example above), we pass them to the mutate function when we call it.
The second parameter is an object that we can use to perform various actions based on its properties. In the example above, we used the onSuccess property to specify a method that is called when the request is successful. In this method, we can refetch or invalidate the updated data. This tells React Query that our cached data is outdated and needs to be updated with the new data. This is where the query key comes in handy, as we can specify which data needs to be updated using this key in the invalidateQueries method.
Regarding the queryClient, which we used its invalidateQueries method, I'll explain more about it later.
Now, the properties that this hook returns include the mutate function, which we can use to update the data and execute the entire process that I just explained. The next property is isLoading, which is true until the mutation is completed (i.e., the update is successful, and the request is no longer pending). We can use this property to show a loading indicator while the request is in progress.
Optimistic Updates
In addition to onSuccess, the second parameter of the useMutation hook also has other methods, such as onSettled and optimisticUpdate.
Let's say you want to add an item to your data (send it to the server). You're sure that the data will be sent successfully, and you don't want to wait for a response from the server or see any loading indicator when adding the item. So, as soon as you click the add button, you manually add the item to your cached data. This allows the user to instantly see the new data without any delay or loading indicator.
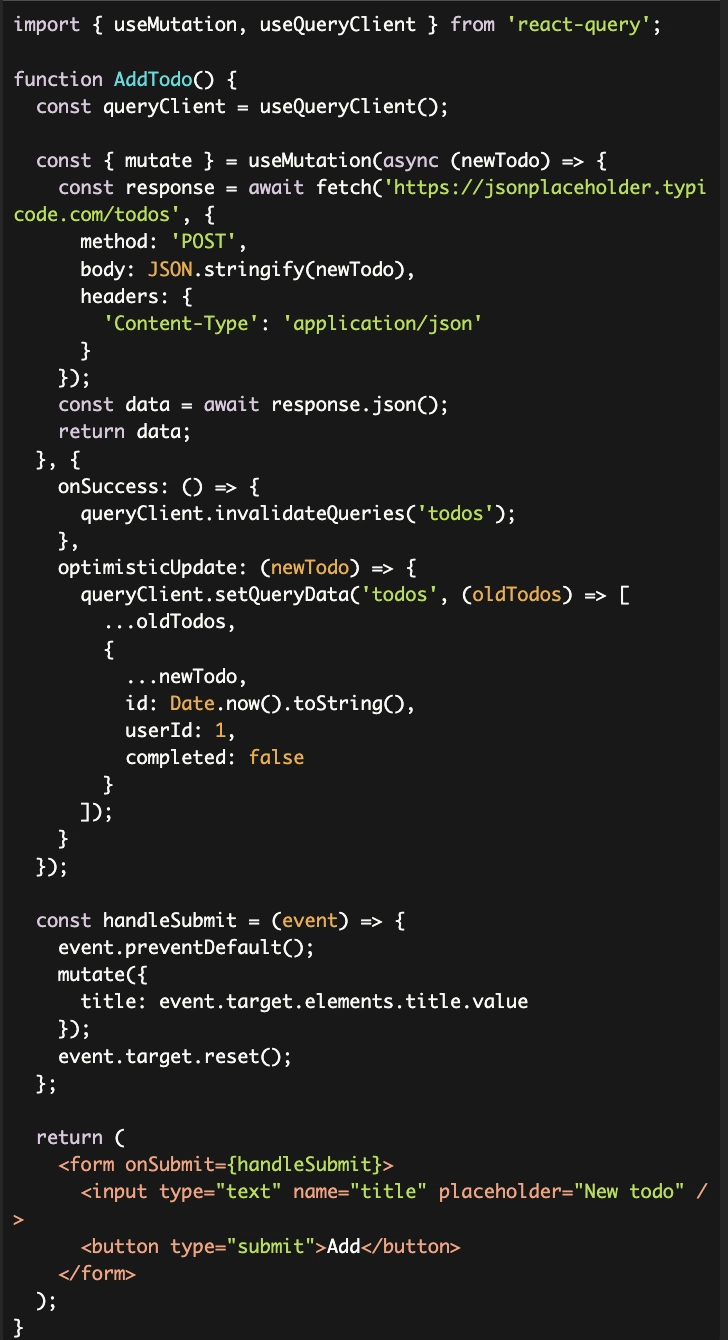
The optimisticUpdate method is executed as soon as the request is made and does not wait for the final response of the request. In the example above, as soon as we made the request, we used the setQueryData method to tell React Query to update the cached data with the name "todos". We passed this name as the first parameter and a callback function as the second parameter. The callback function takes the current cached data as an argument and returns a new data array that includes the current cached data plus the newly added item. It's worth noting that we give the IDs manually and temporarily in this process, but when the request is complete, the cached data changes again, and the data we added in this method is deleted to add the updated data with the actual IDs.
Now, the problem is that if for any reason the server returns an error and we cannot update the cached data, the fake data we added in optimisticUpdate will remain in the cache, even though we don't really have such data and just wanted to show it temporarily until the real data arrives.
This is where the next key method comes in, which I mentioned, onSettled. This method is called after the server returns a response, regardless of whether it was successful or returned an error. We can use it to tell React Query to remove the fake data we added in optimisticUpdate if the server returned an error, so that only the original data remains.

The onSettled method has several arguments, but we only need error and context. We use the error argument to check if it's true and if an error was returned, so that we can delete the fake data. Then, we use the setQueries method again to retrieve the cached data and filter it to keep only the items whose ID is not the same as the ID of our fake item, so that we keep only the original cached data. We return the cached data to its previous state in this way.
In addition, in our request, we check if response.ok is false and throw an error, so that onSettled is called when an error occurs. Also, we return the ID of our fake item in optimisticUpdate and use it as the context argument in onSettled to filter the data.
Overall, this process is called optimistic update and is one of the key features of this library.
useQueryClient
We used this hook in the above examples that is used to access the query client, which is responsible for managing the cache, changing cached data, and invalidating them.

The most important methods that this hook provides are:
setQueryData: This method updates the cached data for the query key that we provide to it.
getQueryData: This method returns the cached data for the query key that we provide to it.
invalidateQueries: This method updates the cached data for the query key that we provide to it by refetching or requesting the data from the server again.
Caching options
When we used useQuery in our first example to fetch data, we only talked about its first two parameters, which include the query key and our request. Now we have a third parameter that we can use to configure and manage its caching and request capabilities. The most important properties for configuring these options are:
staleTime: We use this property to determine how long the cached data should remain stale before being refetched. This property takes a numeric value in milliseconds.
cacheTime: We use this property to determine how long the data can remain in the cache before being automatically purged, which helps us manage our cache size. This property takes a numeric value in milliseconds.
refetchOnMount: We use this property to determine whether the query should refetch its data when the component mounts. This property takes a boolean value.
refetchOnWindowFocus: We use this property to determine whether the query should refetch its data when the window regains focus, which helps us keep the data up-to-date when the user switches between pages in our application. This property takes a boolean value.
refetchInterval: We use this property to determine how often the query should automatically refetch its data. This property takes a numeric value in milliseconds.
retry: We use this property to determine how many times the query should retry its request when it encounters an error from the server. This property helps us better manage server errors and keep our application responsive. This property takes a numeric value for the number of retries.
retryDelay: We use this property in conjunction with the retry property to determine how often the query should retry its request. This property helps us avoid overwhelming the server with too many consecutive requests. This property takes a numeric value in milliseconds.
staleWhileRevalidate: We use this property to show the cached data to the user while the query fetches new data from the server in the background and updates the cached data. This property takes a boolean value.
By using these configuration properties, we can have different strategies for caching in our application. Here are two strategies that I will explain below, and you can either use them or create your own strategy based on the needs of your project:
stale-while-revalidate strategy:
This strategy involves showing the user the cached (stale) data while fetching new data in the background and updating the cached data with it. This strategy helps us reduce the number of times the user has to wait for data and see a loading spinner, and allows them to instantly view the available data when they need it:

network-first strategy:
With this strategy, we prioritize fetching fresh data from the network over cached data, and it is suitable when we want to ensure that the data the user is seeing is always up-to-date, even if it comes at the cost of sacrificing some performance:

In this example, by setting cacheTime and staleTime to one minute, we are telling the system to purge the cache and refetch new data every minute. By setting refetchOnMount to false, we are instructing the system not to refetch data on mount and only do so every minute. With retry set to 3, we are telling the system to retry fetching data up to three times if an error occurs.
Note: If one minute passes and the system fails to fetch new data after three retries, it will check the cache and display any available data. If there is no data available, it will display an error.
Can we use React Query as a global state management tool and get rid of redux and other state management tools?
To answer this question, lets first understand types of states:
Client State and Server State
Client states are the states that are managed on the client side (e.g., user's browser) and their changes depend on the user's action within the application. These changes do not require sending a request and can be managed locally. Examples of client states include the user's login status, the theme they have selected for the site, the language they have selected for the site, and the data entered into form inputs that have not yet been submitted.
Server states, on the other hand, are the states that are managed on the server side (backend) and their changes require sending a network request. Examples of server states include the list of products available for purchase in an online store, the list of articles published on dev.to, etc...
So, to answer your original question, the React Query library is specifically designed and created for managing requests and caching data. Although it is possible to use it for global state management, it is not recommended for client states as it may add unnecessary complexity. Redux Toolkit is a better option for client state management, as it provides similar features to React Query for managing requests and caching data, as well as handling all types of states.
However, depending on your project requirements, you can choose to use either library, or even both. Ultimately, it's up to you to decide which package suits your needs best. I just wanted to introduce you to this great library that has a lot of features to offer. Hopefully, it was helpful for you.
Goodbye and Good luck🤞

Top comments (0)