Today, we will learn how to build your own stand alone Arduino on breadboard
Components Required

pin mapping diagram for AtMega328p
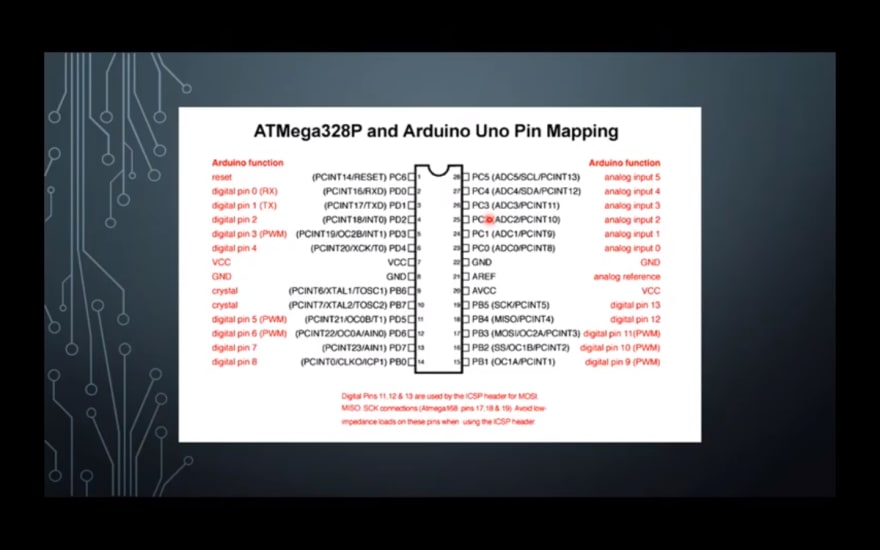
Here pin mapping diagram describes each and every pin need to be connected, pin No 1 of (AtMega328p) is connected to the reset switch, and a pull up resistor is also connected to the switch to ON state, pin No 7 & 20 connected to (+5v), pin no. 8 & 22 connected to (GND), pin no 9 & 10 connected to 16 MHz Oscillator to generate clock pulse coupled with two 22pF non electrolytic capacitors, an indicating LED is connected to pin no 19
Connections

Wire configuration to upload code to stand alone Arduino
in this step we will use an ARDUINO UNO(Without IC) as a programmer to program our stand alone circuit
ARDUINO PINS >> ATMega328p
Reset Pin-------Pin no one
Tx pin----------Pin no three
Rx pin----------Pin no two
5v--------------Pin no 7
GND-------------Pin no 8

Uploading sketch to our stand alone circuit
open Arduino IDE
Step:1
Tools> Board> Arduino UNO

Step:2
Tools> Port> (Relative comport depends upon your Serial communication ports)

Step:3
Tools> Programmer> ArduinoISP

Step:4
File> Examples> Basics> Blink

Step:5
Click Upload

Powering stand alone circuit

Find Full Video on YouTube

Top comments (0)