
Introduction
In the previous article, we explored the authentication offerings of Firebase to turbocharge your next Fauna-powered application and introduce the building blocks to architect applications for the client-serverless paradigm. Now we will build a serverless authentication business-to-consumer (B2C) backend with services from the AWS ecosystem. But first, let's look at a few prerequisites needed to begin our journey:
Requirements
- Register for a Firebase account if you don't have one and enjoy the free tier. Payment information is not required to begin until you upgrade your plan.
- Create a Fauna account and benefit from the free plan offerings. Payment information is not needed to get started.
- Sign up for an AWS account if you don't already have an account with these instructions. A payment method is required to create an account and access the AWS free tier.
Authentication Requirements and Strategy
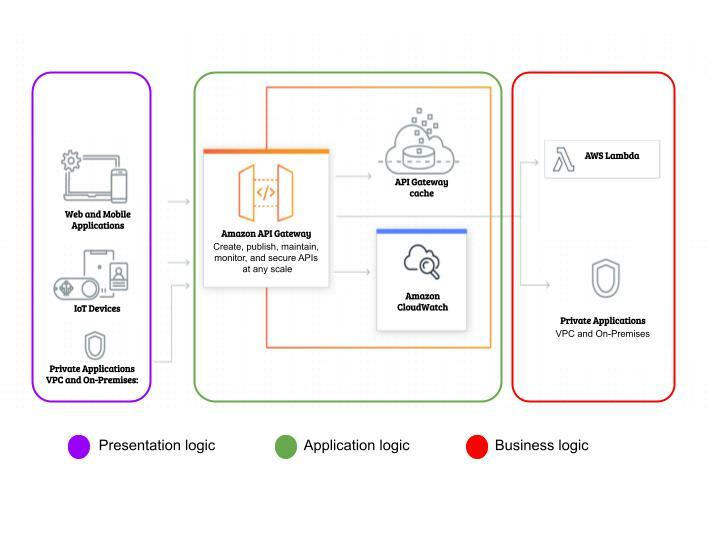
The client (frontend) application will communicate with our backend through an API. AWS provides API Gateway, which enables us to create, maintain, and secure our authentication API at any scale. API Gateway offers two RESTful API options for our B2C authentication application - HTTP and REST. Which option do we utilize for our business-to-consumer backend application? These two preliminary questions hold the clue to this puzzle:
- Where are the target users located?
- How do users access the authentication API?
This comprehensive guide helps you decide between the two for your application needs. For this sample application, we are working with the following assumptions:
- Our users reside in a single continent.
- Our users will access the authentication API from our client application.
Hence, we utilize the HTTP API option, which provides low latency and cheap regional API to proxy our business logic for authentication. AWS Lambda will encapsulate this business logic. To make working with the various AWS services a breeze, we will use the serverless framework. Let's build this faunabase authentication application.
 Serverless Authentication App in AWS ecosystem
Faunabase Authentication App
We install the serverless framework and get a free dashboard account from this guide. If you don't have Node installed, be sure to do that first. The recommended NodeJS version for installation is the long-term support (LTS) version. Next, we create our faunabase-auth application using the AWS NodeJS template with the following command:
serverless create --template aws-nodejs --path faunabase-auth
sls create -t aws-nodejs -p faunabase-auth
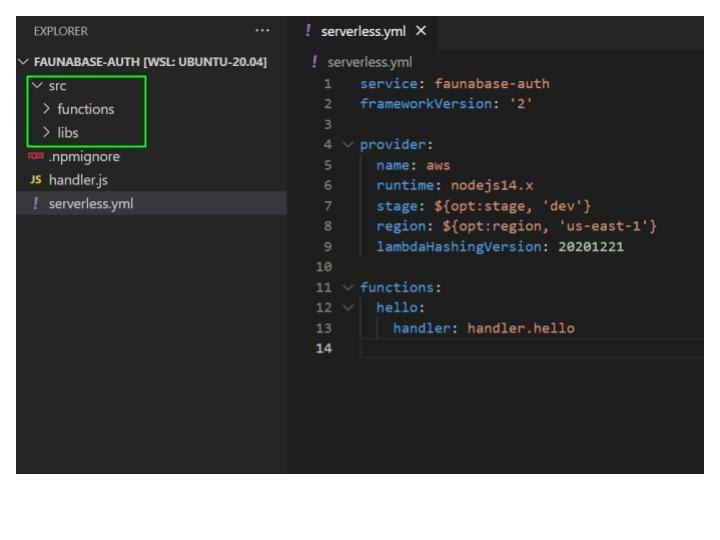
Open the faunabase-auth folder with your text editor and you should see the results below:
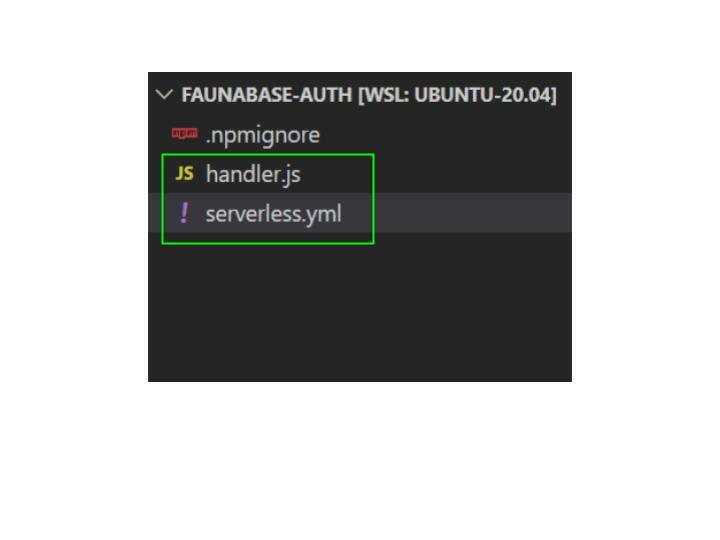
The command we run created two files:
serverless.yml and handler.js. The serverless.yml file serves as the control panel to manage all our AWS infrastructure resources. Let's go through the default configuration and make a few customizations. 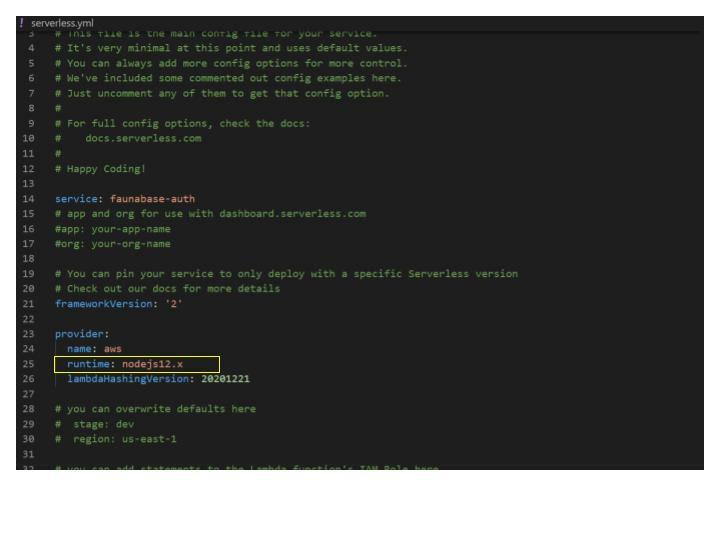
We will change the provider runtime from
nodejs12.x to the current LTS version, which is nodejs14.x. We add a region and stage to the provider and set the default stage to dev and the default region to us-east-1 for this demo. Set this region to the location of your end-users. You should get the following results:

Let's clear all the comments to tidy up the serverless.yml file. Next, we set up our authentication API and integrate it with the business logic encapsulated in Lambda functions.
Setting up Firebase project
Before we proceed to create our API, let's create a Firebase project and Fauna database. Open the Firebase console and click the Create a project button.

Enter
faunabase for the project name and click continue.
Click
Continue and disable Google Analytics for this project. Finally, click on the Create project button to complete the process.
Click
Continue to proceed to the project dashboard.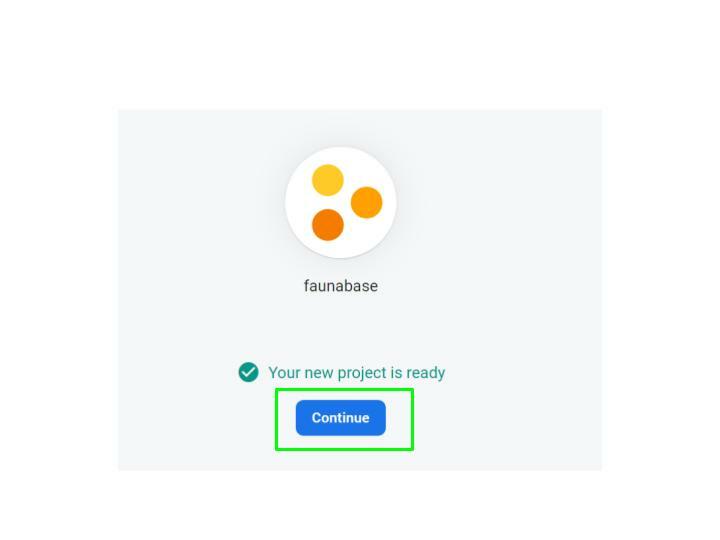
Click on the
Settings gear icon button in the sidebar menu and select Project settings.
Copy the Project ID for the project and save it. We need it later for the authentication API.

Creating a Database in Fauna
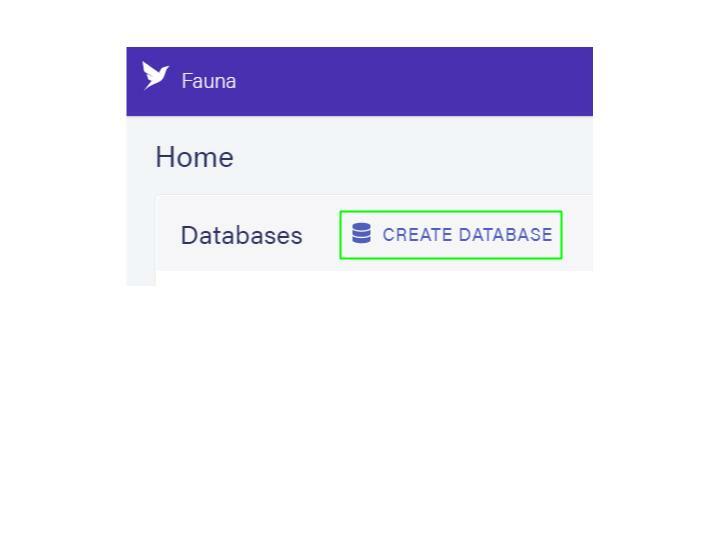
Login to your Fauna Dashboard, and click on the Create Database button to create a new database for this demo.
Type
faunabase-b2c as the database name, and select the United States option for the region group. Click on the Create button to complete the process. 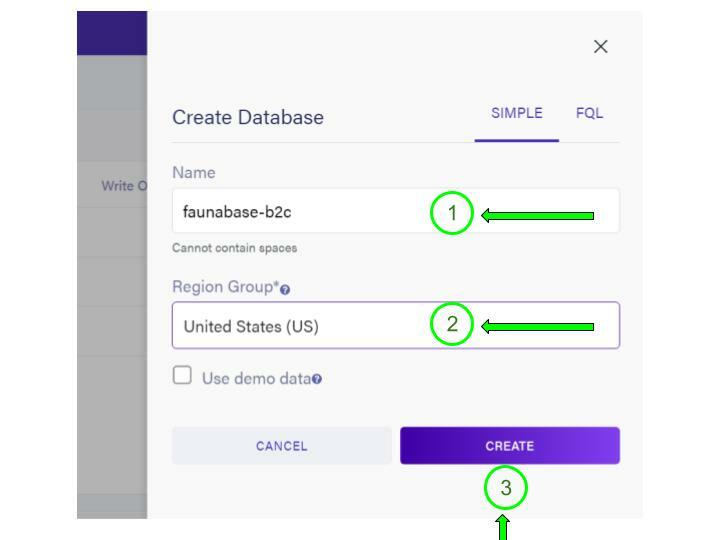
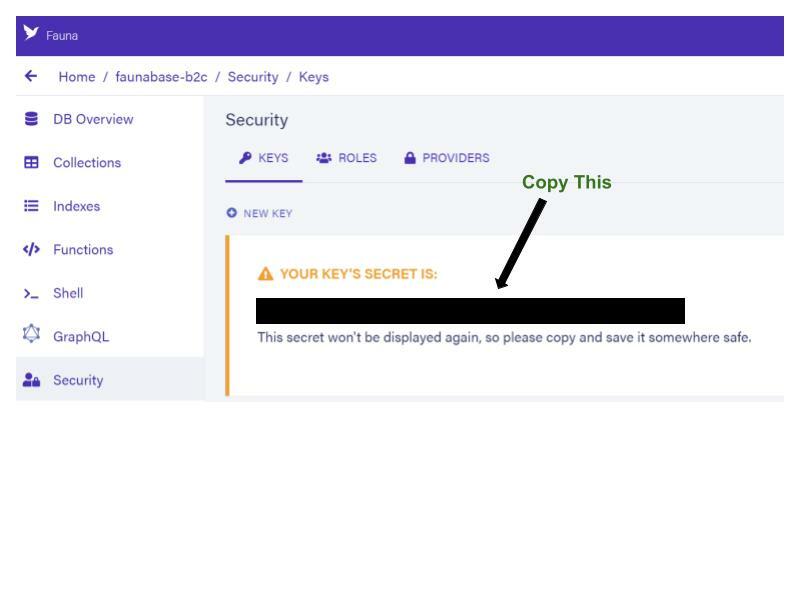
We chose the United States region for data locality and better latency since our authentication API (AWS) is in the United States. Once the database is available, select the
Security tab and choose New Key to create your first key. Accept the defaults of the current database and Server for the role. Enter AWS Serverless Framework as the Key Name, and choose Save to create a new key. 
Copy the generated secret. We are going to store it in the next step.
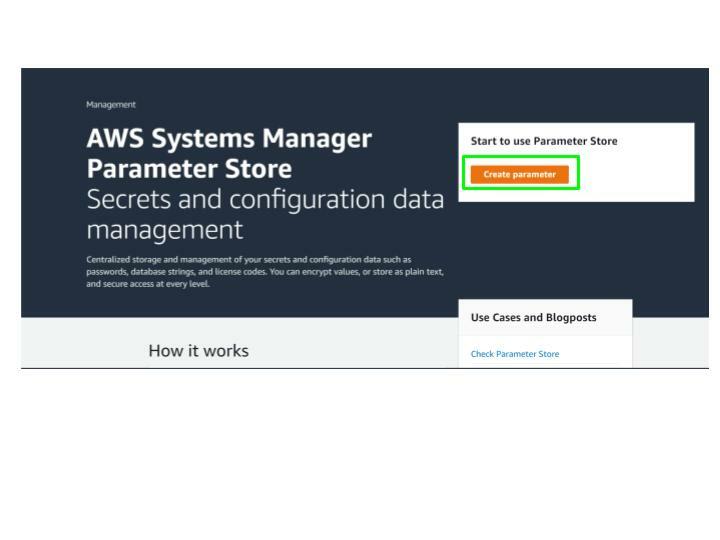
Securing Secret with AWS Parameter Store
The secret we generated in the previous step provides unlimited access to the newly created database. We have to store it safely and provide access to our authentication API logic. Hence, we use Parameter Store to safeguard the secret using SecureString value, which encrypts the key accessed from the authentication API. Click on the Create parameter button.
Parameter Store creates the
fauna-secret parameter and displays it on the My parameters tab. We will access this secret from our authentication logic encapsulated in our lambda functions.
Configure AWS Credentials for Serverless Framework
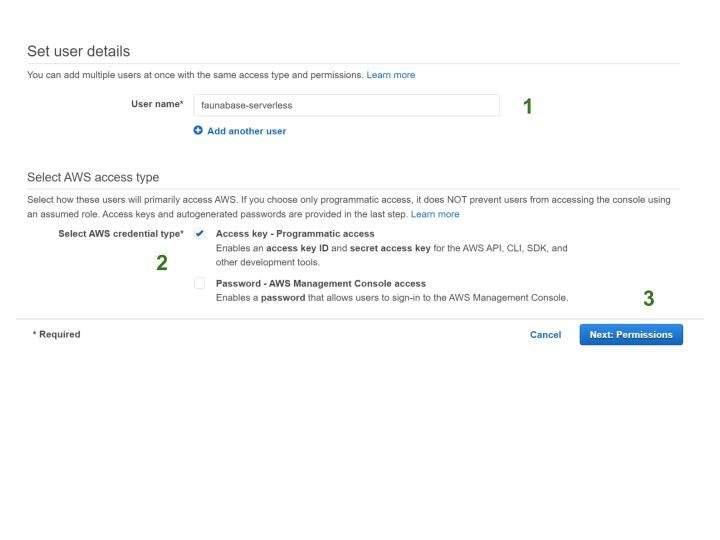
The Serverless Framework needs access to our AWS cloud account to create and manage resources on our behalf. Since we are using the serverless command-line interface (CLI) to set up our AWS credentials, we use an AWS profile and create an IAM user for the serverless framework. Ensure that you are logged in to your AWS account to proceed. Click on Users and then Add users. Type faunabase-serverless for the User name and tick the Access key checkbox to enable programmatic access. Click Next: Permissions to go to the permissions page.
Click on
Attach existing policies directly. Select the AdministratorAccess option in the list, then click Next: Tags.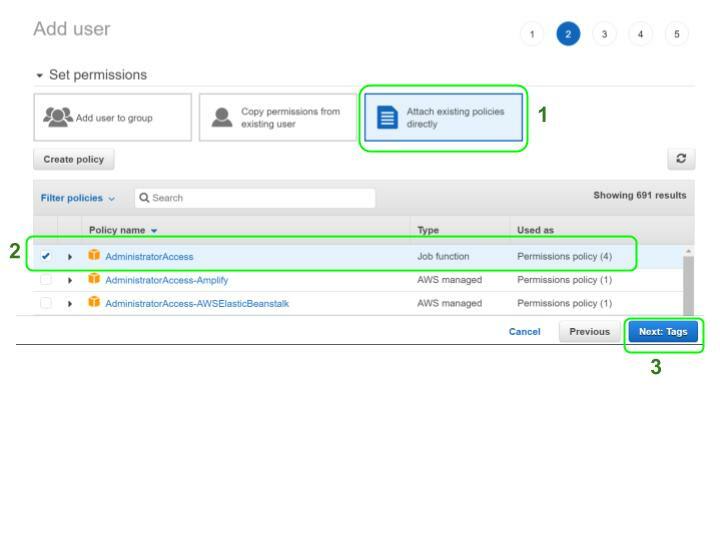
Add optional tags in the next step and select
Review to complete the process. Check to make sure everything looks good and click Create user. View and copy the Access Key ID & Secret Access Key as we will use them in the next step to configure our serverless CLI.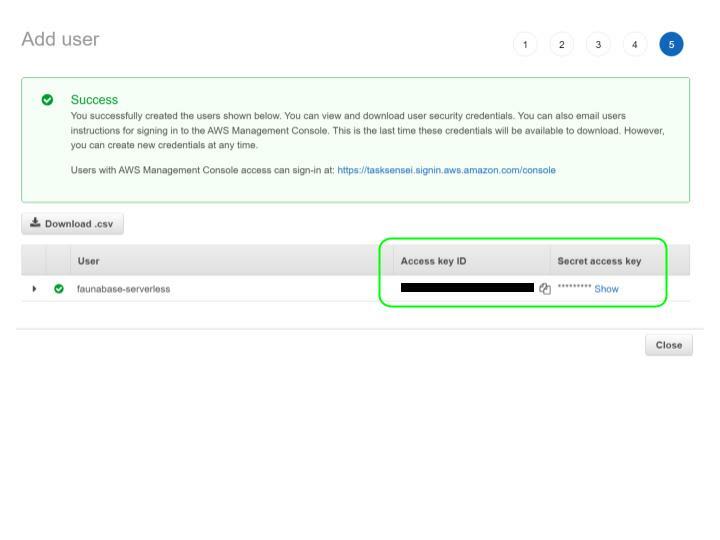
It is important to note that the above step grants unrestricted access to resources in the AWS account and makes starting our application easy. The recommended security practice is to provide fine-grained permissions through IAM policies to match the scope of the application. Configure the serverless CLI with the following command using the copied values from the previous step:
serverless config credentials --provider aws --key copied-access-key-id --secret copied-secret-access-key
Next, we proceed to set up API Gateway and integrate it with Lambda functions.
Configuring API Gateway
Our authentication API has two endpoints: signup and login. The client applications will use the Firebase client SDK to request an ID token - a JSON Web Token (JWT). It will send this token to our authentication API, which will verify the integrity of the JWT before calling the business logic at the API endpoint. But first, let us do a little housekeeping in our faunabase-auth folder. Create a folder at the root location and name it src. Inside the src folder, we will create the following folders - functions, libs.
Delete the
handler.js file. Next, let us set up our API in the serverless.yml file and connect it with the functions. In the YAML file under provider, add the apiName property and give it a value of auth-b2c-api. This value is our API Gateway name.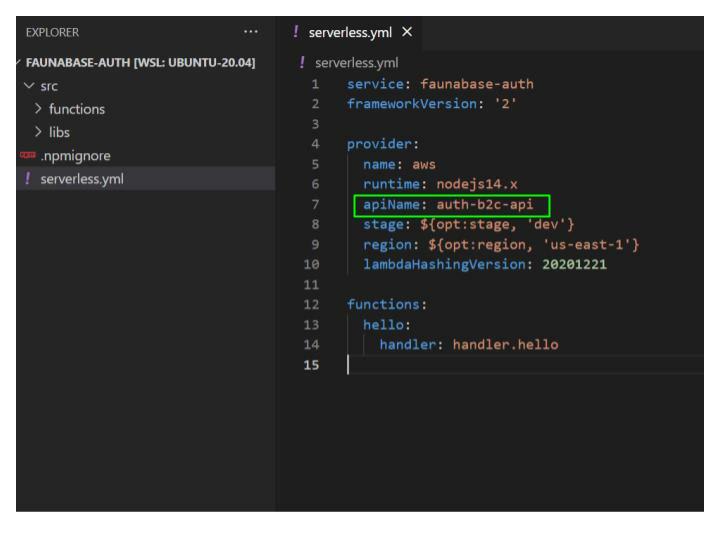
Delete the
hello function with its handler property and add the httpApi property under provider. Next, set the cors and metrics properties to true under httpApi. We enabled Cross-Origin Resource Sharing (CORS) and Cloudwatch metrics by setting cors and metrics to true. With CORS, we can specify which clients can access our API and what actions they can take. We also set up monitoring and alerts for our API with Cloudwatch. We enable logging for API Gateway - type logs under provider. Next, set httpApi under logs to true. Let's set up authorization logic in the authentication API. Firebase has an OIDC discovery document that will help us verify users from our firebase project in our authentication API. First, we will need the firebase project ID from earlier when setting up our firebase account. Go to the URL below and replace project-id with your firebase project ID.https://securetoken.google.com/project-id/.well-known/openid-configuration
In this demo, the project ID from the earlier is faunabase-687bd, so we visit the link below.
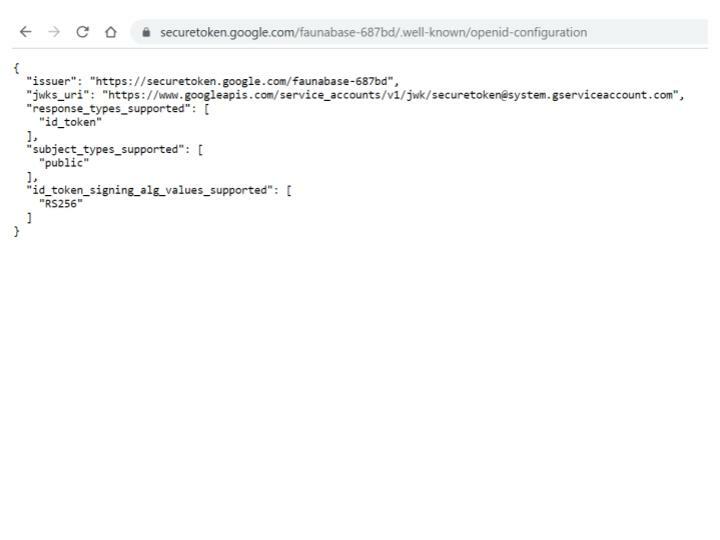
Our firebase project can accept and verify ID tokens from the discovery document. In
serverless.yml, create authorizers property under httpApi. Under authorizers, we name our authorizer as firebaseB2CAuthorizer. We have to set an identity source, issuer URL, and audience. Under firebaseB2CAuthorizer, set identitySource to $request.header.Authorization, issuerUrl to https://securetoken.google.com/project-id, and audience to project-id. Remember to replace project-id with your Firebase project ID. Change the frameworkVersion value from '2' to '>=2.66.1 <4.0.0' - serverless framework at the time of this writing is transitioning from version 2 to version 3 which is currently in beta. Version 3 comes with breaking changes to the serverless.yml configuration. The current version of the stable serverless node library is 2.66.1. The current code can upgrade to the version 3 package when it becomes stable.
The frontend client must pass a valid Firebase ID token in the authorization header of the request. The identity source tells our authentication API where to find the ID token, a JWT to perform validation checks before providing access to the business logic encapsulated in a function. We have configured our authentication API. Now let's connect it to our two authentication endpoints -
signup and login. We create the first endpoint for signing up. Navigate to the src folder --> then the functions folder. Create a signup.js and login.js file inside the functions folder.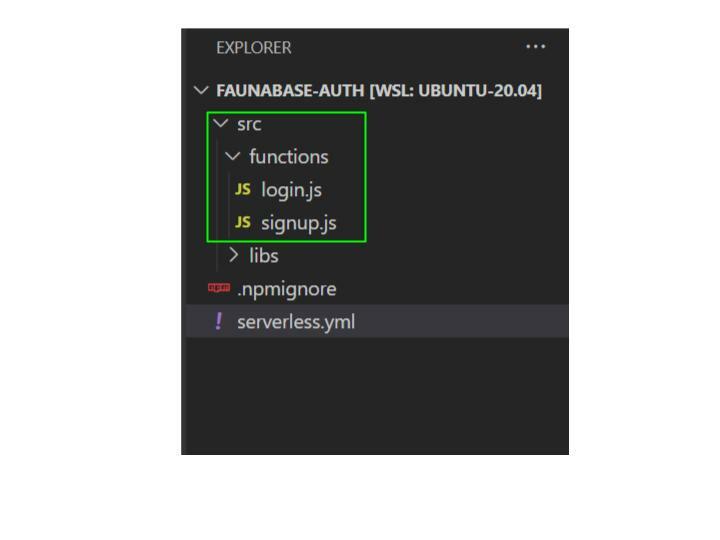
Enter the code below in both the signup.js and login.js.
 module.exports.handler = async (event, context) => {


 }
We have set up the boilerplate code for our two endpoints - signup and login. Let's link the business logic to the endpoints in serverless.yml, beginning with the signup endpoint. Enter signup under functions. Next, we write the following code under signup:
functions:
  signup:
    handler: src/functions/signup.handler
    description: create user in fauna
    memorySize: 1048
    timeout: 15
    events:
      - httpApi:
          method: POST
          path: /signup
          authorizer:
            name: firebaseB2CAuthorizer
- the
handlerproperty sets the source file location for the business logic - the
descriptionproperty provides information about the business logic - the
memorySizeproperty sets the memory size for this business logic in MB - the
timeoutproperty determines how long the business logic is allowed to run before termination in seconds - the
eventsproperty shows which AWS events can trigger the business logic to execute - the
httpApiproperty undereventstells us that the API Gateway HTTP API event can run this business logic - the
methodproperty underhttpApisets which HTTP method can access the API endpoint - the
pathproperty underhttpApisets the pathname for the API endpoint - Under
httpApi, theauthorizerproperty withname, its child property allows us to use thefirebaseB2CAuthorizerwe configured earlier to provide a security layer for the endpoint. Requests without a valid ID token from our Firebase project cannot execute the underlying business logic.
We have set up our signup endpoint for authentication API. Let's repeat the same process for our login endpoint. The final code configuration should look like this:
functions:
  signup:
    handler: src/functions/signup.handler
    description: create user in fauna
    memorySize: 1048
    timeout: 15
    events:
      - httpApi:
          method: POST
          path: /signup
          authorizer:
            name: firebaseB2CAuthorizer
  login:
    handler: src/functions/login.handler
    description: login user in fauna
    memorySize: 512
    timeout: 10
    events:
      - httpApi:
          method: POST
          path: /login
          authorizer:
            name: firebaseB2CAuthorizer
We have to make the database secret in Fauna available to the signup and login functions from the AWS Parameter Store. The serverless framework provides access to plugins. We will install the Serverless SSM Fetch plugin to help us retrieve the stored fauna secret in AWS. Run the command below to install the plugin as an npm package:
serverless plugin install --name serverless-ssm-fetch
Add the installed plugin to the serverless.yml file with the following code at the root:
plugins:
  - serverless-ssm-fetch
Next, add a custom variable called FAUNA_SECRET as a property of custom.serverlessSsmFetch with this code:
custom:
  serverlessSsmFetch:
    FAUNA_SECRET: fauna-secret~true
The serverlessSsmFetch is an accessor provided by the plugin we installed, which decrypts the encrypted fauna-secret parameter with the ~true flag and automatically injects the AWS Parameter Store Fauna server key as an environment variable, accessible in all our functions. Add the logRetentionInDays property under provider and set the number of days to retain the Cloudwatch logs we set up for the authentication API. We proceed to code the business logic for signup and login. The current serverless.yml file should have the following results:
service: faunabase-auth
frameworkVersion: '>=2.66.1 <4.0.0'

provider:
  name: aws
  runtime: nodejs14.x
  apiName: auth-b2c-api
  httpApi:
    cors: true
    metrics: true
    authorizers:
      firebaseB2CAuthorizer:
        identitySource: $request.header.Authorization
        issueUrl: https://securetoken.google.com/faunabase-687bd
        audience: faunabase-687bd
  logs:
    httpApi: true
  logRetentionDays: 14
  stage: ${opt:stage, 'dev'}
  region: ${opt:region, 'us-east-1'}
  lambdaHashingVersion: 20201221

plugins:
  - serverless-ssm-fetch

custom:
  serverlessSsmFetch:
    FAUNA_SECRET: fauna-secret~true

functions:
  signup:
    handler: src/functions/signup.handler
    description: create user in fauna
    memorySize: 1048
    timeout: 15
    events:
      - httpApi:
          method: POST
          path: /signup
          authorizer:
            name: firebaseB2CAuthorizer
  login:
    handler: src/functions/login.handler
    description: login user in fauna
    memorySize: 512
    timeout: 10
    events:
      - httpApi:
          method: POST
          path: /login
          authorizer:
            name: firebaseB2CAuthorizer
Business Logic in Lambda Functions
We need to create a collection in our database called User to house each user’s document. We access the database from our client application through FQL or GraphQL in Fauna. FQL can access resources created with the GraphQL API but not the converse. We create a main.gql file which we will upload to bootstrap resources for our database in this demo. Inside the src folder, navigate to the libs folder and create a new folder with fauna. Create a folder named schema within the fauna folder. Create the main.gql file inside the schema folder and type the following code in the schema:
type User {
  role: Role!
  email: String! @unique
}

enum Role {
  ADMIN
  MEMBER
}

type Mutation {
  logoutUser: Boolean! @resolver(name: "logout_user")
}
In the code above, we started with creating a collection in our database using type User with the role and email attributes. We also set a uniqueness constraint on the email field to validate against duplicates using the @uinque directive. The role attribute will allow us to implement fine-grained access control for the database using User Defined Roles. The logoutUser mutation allows our client application to revoke the access token from the frontend. We will implement the logout logic in the logout_user User Defined Function (UDF).
On the Fauna dashboard, Select the faunabase-b2c database and click the GraphQL tab. Click on the IMPORT SCHEMA button to upload the schema we created.
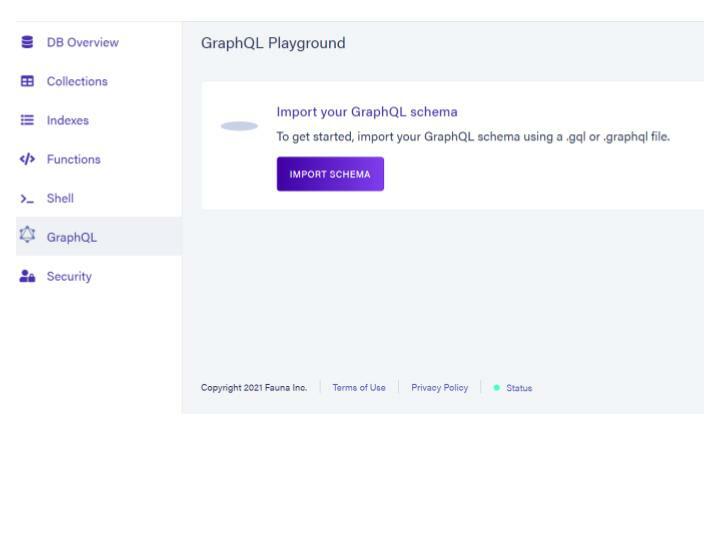
If successful, you should obtain the following results:

Click on
Functions located to the left of your Fauna dashboard. We will update the logic for the logout_user which was created when we uploaded our graphql schema.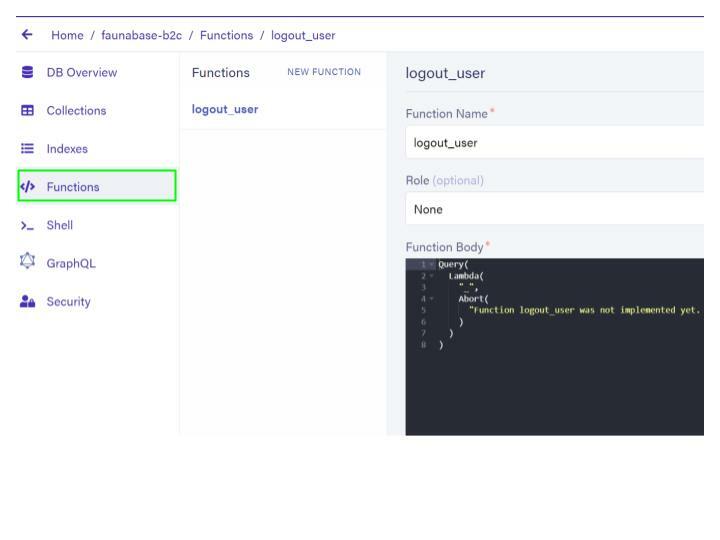
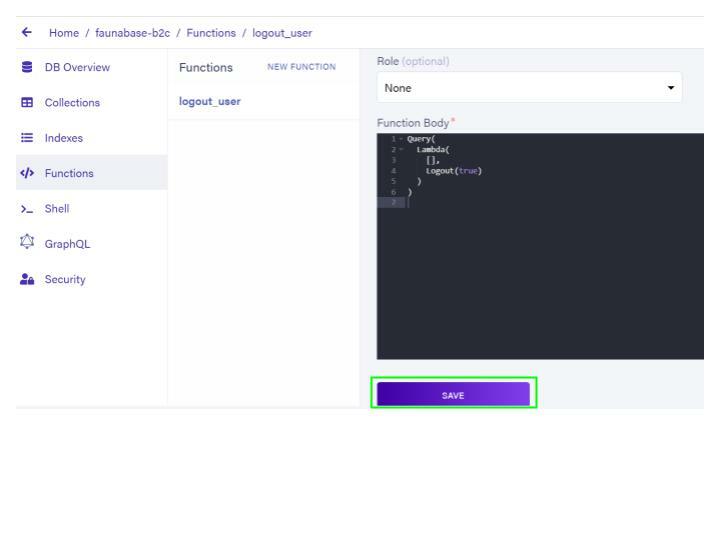
Clear the contents of
Function Body and replace it with the following code:Query(
Lambda(
[],
Logout(true)
)
)
This logout logic revokes all authenticated token access for the current user. The client application can access this functionality from the GraphQL API. Click on the SAVE button to update the logout logic.
Setting up Libraries
Next, let’s install the fauna driver with this command inside our codebase:
npm install --save faunadb
Create the firebase folder inside the libs folder in addition to the fauna folder. Also, create a util.js file inside the libs folder. The fauna folder will house all code about our Fauna database. The firebase folder will house functionality on Firebase authentication. The util.js file will contain all reusable utility functions which we will use in the login and signup endpoints. Paste the following code inside util.js:
const response = (code, message) => {
  return JSON.stringify({
    statusCode: code,
    body: message
  })
}

module.exports = { response }
The response function accepts an HTTP code and message and returns the response to the client application requesting the authentication API endpoint. The client application will send a request to API Gateway which will validate the JWT in the authorization header and call the AWS Lambda function. Inside the firebase folder, create an index.js which will contain logic to decode the JWT. Run the following code to install the jwt-decode node library:
npm install jwt-decode
Enter the following code in the index.js:
const decode = require('jwt-decode')

const decodeJWT = (jwt) => {
  return decode(jwt)
}

module.exports = { decodeJWT }
The decodeJWT function accepts a JWT as input and decodes the payload. Inside the fauna folder, create a function.js file and paste the following code:
const {
  Create, Tokens, Ref, Match, Now,
  Collection, Select, Get, Index, TimeAdd
} = require('faunadb').query

const loginUDF = (email) => {
  return Create(
    Tokens(), {
      instance: Ref(
        Collection('User'),
        Select(
          ["ref", "id"],
          Get(
            Match(
              Index('unique_User_email'),
              email
            )
          )
        )
      ),
      ttl: TimeAdd(Now(), 1, 'hour')
    }
  )
}

const registerUDF = (email) => {
  return Create(
    Collection("User"),
    {
      data: {
        email,
        role: "MEMBER"
      }
    }
  )
}

module.exports = { loginUDF, registerUDF }
This file contains the signup and login business logic. The loginUDF exchanges the decoded Firebase JWT token for an access token to the Fauna database which is valid for one hour. The registerUDF creates a new user in the Fauna database with the decoded email input from the Firebase JWT and assigns a basic role of MEMBER. Finally, we export the loginUDF and registerUDF with module.exports. Next, we set up our Fauna client to query the database - create an index.js file and input the following code:
const faunadb = require('faunadb') // import faunadb driver
const { loginUDF, registerUDF } = require('./function') // import UDFs
// create new fauna client
const client = new faunadb.Client({
  secret: process.env.FAUNA_SECRET
})
// get Fauna access token from verified and decoded JWT
const login = (email) => {
  return client.query(loginUDF(email))
}
// create new Fauna user from verified and decoded JWT
const register = (email) => {
  return client.query(registerUDF(email))
}

module.exports = { login, register }
The code above imports the Fauna driver as well as the user-defined functions (UDFs) we created in function.js. A new Fauna client is instantiated to perform the login and register operations in our database. Finally, we export the login and register functions for use in our API endpoints. Next, we finalize the signup and login lambdas in the functions folder.
Signup Lambda
Open the signup.js file inside the functions folder. We import the register function, we just created from the index.js file with the following code:
const { register } = require('../libs/fauna')
We also import Firebase JWT decode function with this code:
const { decodeJWT } = require('../libs/firebase')
Next, we import the response function from the util.js file:
const { response } = require('../libs/util')
The handler function accepts event and context as inputs. The event input contains information such as the JWT token in the authorization header from the API invoker. The context input provides information on the invocation, function, and execution environment. Since AWS Lambda utilizes a pay-as-you-go model, we want to timeout our function immediately after receiving a response from our promise instead of waiting for the event loop to complete. We configure the runtime to send the response immediately with context.callbackWaitsForEmptyEventLoop to false inside the handler function to obtain the following code:
const { register } = require('../libs/fauna')
const { decodeJWT } = require('../libs/firebase')
const { response } = require('../libs/util')

module.exports.handler = async (event, context) => {
  context.callbackWaitsForEmptyEventLoop = false
}
Add the following code after context.callbackWaitsForEmptyEventLoop inside the handler function:
 try {
    const user = event.headers && event.headers.authorization
    ? decodeJWT(event.headers.authorization)
    : { email: null }


    if(!user.email) return response(401, "authorization header not found")
  } catch (error) {
     console.log("signup error", error.message)
  }
In the above code, we decode the JWT located in event.headers.authorization and store it in user if the authorization header exists, else we exit the function with a 401 HTTP response. Next, we implement the logic to create a new user in our Fauna database with the following code:
 const dbResponse = await register(user.email).catch(
  error => {
   console.log("create fauna user error", error.message || error.description)
    return response(500, "Oops! Something went wrong from our end.")
  }
 )
 if (
   dbResponse && dbResponse.data
   && dbResponse.data.email === user.email
 ){
   return response(200, dbResponse.data)
 }
If the register function executes successfully, dbResponse data is sent to the invoker and the function exited immediately. However, if an error occurs during this process, the invoker is notified and the error logged to AWS Cloudwatch Logs. The complete code for signup is shown below:
const { register } = require('../libs/fauna')
const { decodeJWT } = require('../libs/firebase')
const { response } = require('../libs/util')
module.exports.handler = async (event, context) => {
  context.callbackWaitsForEmptyEventLoop = false
  try {
    const user = event.headers && event.headers.authorization
      ? decodeJWT(event.headers.authorization)
      : { email: null }
    if(!user.email) return response(401, "authorization header not found")

    const dbResponse = await register(user.email).catch(
     error => {
      console.log("create fauna user error", error.message || error.description)
      return response(500, "Oops! Something went wrong from our end.")
     }
    )
    if (
      dbResponse && dbResponse.data
      && dbResponse.data.email === user.email
    ) {
      return response(200, dbResponse.data)
    }
  } catch (error) {
    console.log("signup trycatch error", error.message)
  }
}
Now, we implement the login lambda function.
Login Lambda
Open the login.js file inside the functions folder. Next, we import the login function from the fauna folder, decodeJWT from the firebase folder, and response function from utils.js all located in the libs folder. Set the context.callbackWaitsForEmptyEventLoop to false inside handler like we did earlier in signup.js.The code should look like this:
const { login } = require('../libs/fauna')
const { decodeJWT } = require('../libs/firebase')
const { response } = require('../libs/util')

module.exports.handler = async (event, context) => {
  context.callbackWaitsForEmptyEventLoop =  false
}
Enter the following code after context.callbackWaitsForEmptyEventLoop inside the handler function:
try {
 const user = event.headers && event.headers.authorization
  ? decodeJWT(event.headers.authorization)
  : { email: null }
 if(!user.email) return response(401, "authorization header not found")
} catch (error) {
 console.log("login trycatch error", error.message)
}
Likewise in the signup lambda, we decode the JWT located in the event.headers.authorization and store it in user if the authorization header exists, else we exit the function with a 401 HTTP response. Next, we implement the login logic to create a user access token from the verified and decoded email with the code below inside the trycatch block:
 const dbResponse = await login(user.email).catch(
  error => {
   console.log("create fauna token error", error.message || error.description)
   return response(500, "Oops! Something went wrong from our end.")
  }
 )
 if (
   dbResponse && dbResponse.data
   && dbResponse.data.email === user.email
 ) {
      return response(200, dbResponse.data)
 }
On successful execution of the login function, dbResponse data is sent to the invoker and the function exited immediately. However, if an error occurs during this process, the invoker is notified and the error logged to AWS Cloudwatch Logs. The complete code for login is shown below:
 const { login } = require('../libs/fauna')
 const { decodeJWT } = require('../libs/firebase')
 const { response } = require('../libs/util')

 module.exports.handler = async (event, context) => {
  context.callbackWaitsForEmptyEventLoop =  false
  try {
   const user = event.headers && event.headers.authorization
    ? decodeJWT(event.headers.authorization)
    : { email: null }
   if(!user.email) return response(401, "authorization header not found")
   const dbResponse = await login(user.email).catch(
    error => {
     console.log("create fauna token error", error.message || error.description)
     return response(500, "Oops! Something went wrong from our end.")
    }
   )

   if (
      dbResponse && dbResponse.data
      && dbResponse.data.email === user.email
    ) {
      return response(200, dbResponse.data)
    }

  } catch (error) {
    console.log("login trycatch error", error.message)
  }
}
We have completed the signup and login lambda functions. Next, we look at the process to deploy the code to the AWS Cloud Service.
Deploy API to AWS
We are in the last mile of building our application and deploying it to the AWS cloud. Serverless Framework packages all node libraries and their dependencies which can result in very bloated lambda functions. Lambda functions in general are plagued by cold-starts which is the time taken to prepare the execution environment. This time scales with the code size. Therefore, we can reduce the cold-start time with webpack bundling, importing only the code needed for each function. The overarching benefit is that end-users get a better user experience with reduced latencies. The serverless-webpack plugin provides an option to achieve this optimization.
Webpack Bundle Setup
Install the serverless-webpack plugin, and webpack, as [devDependencies](https://docs.npmjs.com/specifying-dependencies-and-devdependencies-in-a-package-json-file) with this code:
npm install --save-dev serverless-webpack webpack
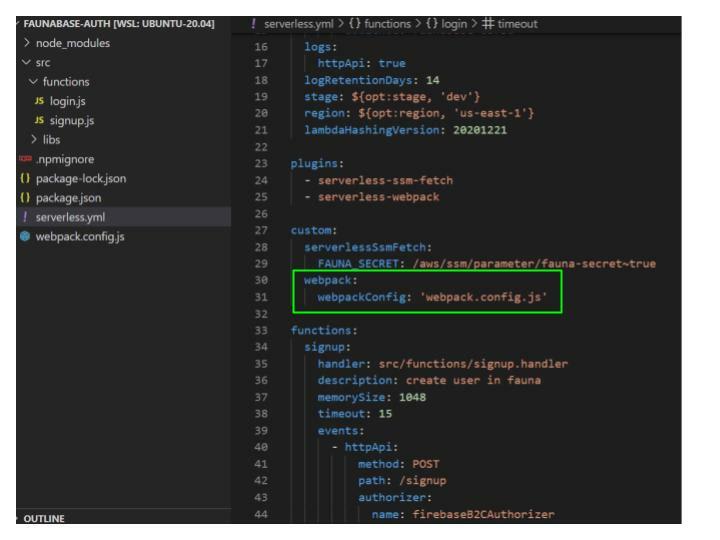
Go to the serverless.yml file at the root of the faunabase-auth folder and add the serverless-webpack plugin under plugins after serverless-ssm-fetch.
Next, we add the webpack configuration file to serverless.yml. Under the custom: property add the code below:
webpack:
    webpackConfig: 'webpack.config.js'
The serverless.yml file should be similar to the code below:
We exclude any GraphQL files (.gql) from the bundle with the
excludeFiles property under webpack: in our src folder.webpack:
webpackConfig: 'webpack.config.js'
excludeFiles: src/**/*.gql
After the plugins property at the root of the serverless.yml file add the code below to tell webpack to package our functions individually:
package:
individually: true
The final serverless.yml file should have the following code:
service: faunabase-auth
frameworkVersion: '>=2.66.1 <4.0.0'
provider:
name: aws
runtime: nodejs14.x
apiName: auth-b2c-api
httpApi:
cors: true
metrics: true
authorizers:
firebaseB2CAuthorizer:
identitySource: $request.header.Authorization
issueUrl: https://securetoken.google.com/faunabase-687bd
audience: faunabase-687bd
logs:
httpApi: true
logRetentionDays: 14
stage: ${opt:stage, 'dev'}
region: ${opt:region, 'us-east-1'}
lambdaHashingVersion: 20201221
plugins:
- serverless-ssm-fetch
- serverless-webpack
package:
individually: true
custom:
serverlessSsmFetch:
FAUNA_SECRET: fauna-secret~true
webpack:
    webpackConfig: 'webpack.config.js'
    excludeFiles: src/**/*.gql
functions:
signup:
handler: src/functions/signup.handler
description: create user in fauna
memorySize: 1048
timeout: 15
events:
- httpApi:
method: POST
path: /signup
authorizer:
name: firebaseB2CAuthorizer
login:
handler: src/functions/login.handler
description: login user in fauna
memorySize: 512
timeout: 10
events:
- httpApi:
method: POST
path: /login
authorizer:
name: firebaseB2CAuthorizer
Create a webpack.config.js file in the root directory and import the serverless-webpack library:
const slsw = require('serverless-webpack')
The file we created will house all our code bundling configurations for deployment. Export an empty object with module.exports:
const slsw = require('serverless-webpack')

module.exports = {


}
Inside the empty object, we set the target property to node. At build time, the plugin can automatically determine the correct entry point for each lambda function. We set the entry to use slsw.lib.entries inside the exported object. Finally, we set mode to run in development mode if we are running locally else production mode with:
slsw.lib.webpack.isLocal ? 'development' : 'production'
The final webpack configuration file should be similar to this result:
const slsw = require('serverless-webpack')
const nodeExternals = require('webpack-node-externals')

module.exports = {
  target: 'node',
  entry: slsw.lib.entries,
  mode: slsw.lib.webpack.isLocal ? 'development' : 'production'
}
Serverless Deploy to AWS Cloud
We run the serverless deploy command to deploy all artifacts to the AWS cloud with the default stage and region:
serverless deploy
Summary
We have been able to build a serverless authentication API for a business-to-consumer application. The frontend or client application can access the signup endpoint to create a new user and the login endpoint to exchange a Firebase JWT for an access token to the Fauna database to facilitate direct communication. It is important to secure the access token with a user-defined role (UDR). We will do that in a future article in this series. In the next article, we explore building a serverless authentication API for a multi-tenant business-to-business application.

Top comments (0)