
Introduction
In this tutorial, I want to dive into Solana and Solang to show you how to build an spl-token-minter program using solidity.
By the end of this tutorial, you'll have accomplished a working on-chain program that can be deployed to the Solana blockchain and interact with the Solana blockchain for extremely low fees and fast confirmation times.
This is the second part of the Solang series, this part features a practical example using a Solidity program called spl-token-minter within the Anchor framework. This example will give you hands-on experience in creating and minting fungible tokens on Solana using Solidity.
The code for the project is located here
Here's what you're gonna learn:
Table of contents
- How to write Solana program
-
Setting up a development environment.
- Step 0 installing dependencies.
-
Step 1 Spl-token minter.
- Solana blockchain cluster Types.
- Important Differences(Compared with EVM smart contract)
- Storing of state data.
-
Step 2 Creating the solidity program.
- What it takes to mint any custom spl tokens to token address.
- Write program.
-
Setting up for building, deployment and testing
- Writing test script
- Building program
- Deploying the program
- Testing Program
- Conclusion
- Further learning resources
How to write a Solana program
Continuing our discussion on building Solana programs with the aid of Solana's tools and languages, let's now embark on a detailed exploration of developing a Solana program. Specifically, we'll focus on creating a Solana program named "spl-token-minter" using Solidity within the Anchor Solana framework. To begin this endeavour, we must initiate the setup of a new project.
Setting up the development environment
Step 0 Install dependencies(Prerequisites)
Do not be scared of rust here this is mandatory to install because Anchor and Solang use rust to build programs
We are Installing and setting up required dependencies for working with Solidity on the Solana blockchain development platform Make sure to do this on your preferred system, whether it's Linux, MacOS, or Windows.
Install and set up Rust
https://www.rust-lang.org/tools/install
Make sure the installation is successful by running
rustup --version
rustc --version
cargo --version
Anchor requires nodejs and yarn on your machine to run so if you don’t have them yet install it from here
Install and set up Node.js
Once the installation is completed confirm the successful installation
like this:
node --version
npm --version
Installing yarn
npm i -g yarn
Next, we need to install Solana-tools from here
As mentioned solang pre-bundled with Solana tool suite.
The main things we'll be doing with the Solana CLI will be configuring our network (to devnet) as well as airdropping tokens into our wallets, pretty much everything else we'll be doing with the Anchor CLI.
Now Install and set up the Solana Tools Suite.
https://docs.solana.com/cli/install-solana-cli-tools
After a successful installation run:
solana --version
Make a wallet account that you'll use later for deploying the program on Solana Devnet.
solana-keygen new
Install and Configure Solang
The newest Solang version comes already included with the Solana Tools Suite that you've set up before. It should now work well together with Solana CLI.
To make sure Solang is installed correctly, use this command.
Solang --version
If everything is fine you see something like this
➜  ~ solang --version
solang version v0.3.1
➜  ~
Install and Configure Anchor Framework
https://www.anchor-lang.com/docs/installation
Once you've set up everything, just use the following command to install Confirm AVM and Anchor CLI:
avm --version
anchor --version
If everything is fine you see something like this
➜  ~ avm --version
avm 0.28.0
➜  ~ anchor --version
anchor-cli 0.28.0
➜  ~
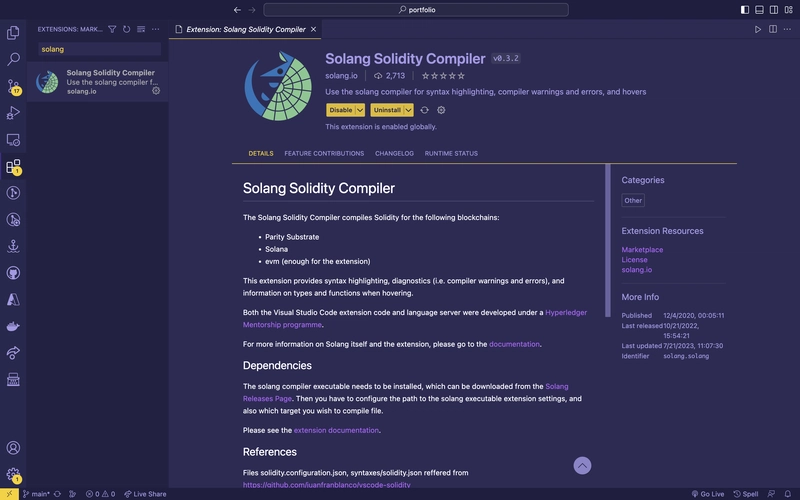
Install and Configure Solang VSCode Extension
With the setup complete, let's move on to initializing a new Anchor project. I'll also provide an overview of the project files.
Step 1 Create a development workspace
First of all, create a new folder where all your work will be located. Once you have created the folder, open a terminal in that folder and run the following command.
anchor init spl-token-minter --solidity
This will take some time
Anchor will be installing all dependencies that are needed for the project.
After going to the project directory
cd spl-token-minter
Run the following command to open the vscode
code .
You will go to your vscode app
from terminal
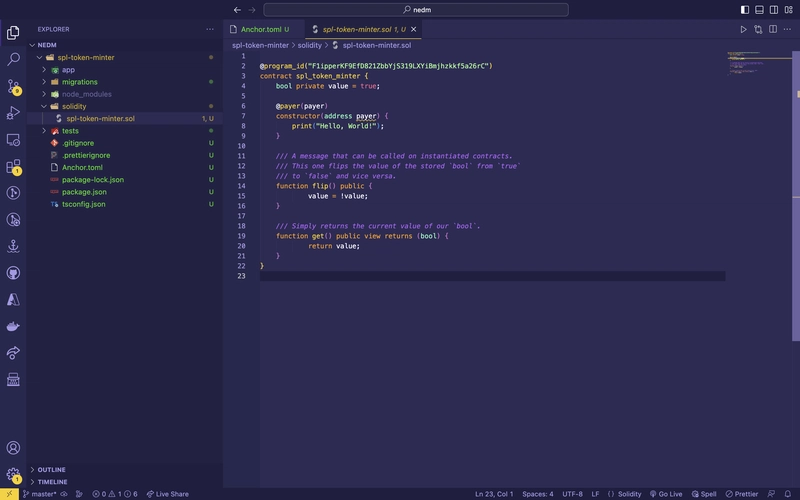
Then, You will see the project have a structure like this:
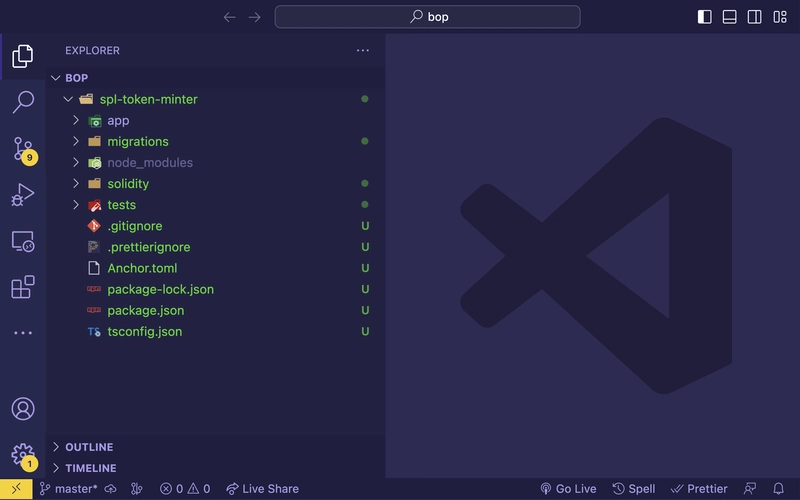
Below is How by default Anchor organizes newly created project, we will focus on these folders/files:
Here's a simplified and concise version of the content:
app: This folder holds frontend code if you plan to build and host it together with your code.
solidity: This folder contains your actual Solana smart contract code in ".sol" files.
tests: Here, you can test how your contract behaves when used, helping you build, deploy, and test Solana programs.
anchor.toml: Similar to package.json for Node.js, this tracks dependencies and important Anchor settings. You can install a VSCode extension to work with it easily.
.gitignore: This file lists things to ignore when you share your code on GitHub.
You can ignore these for now: migrations, node_modules, .prettierignore, package.json, tsconfig.json. We'll go over them later.
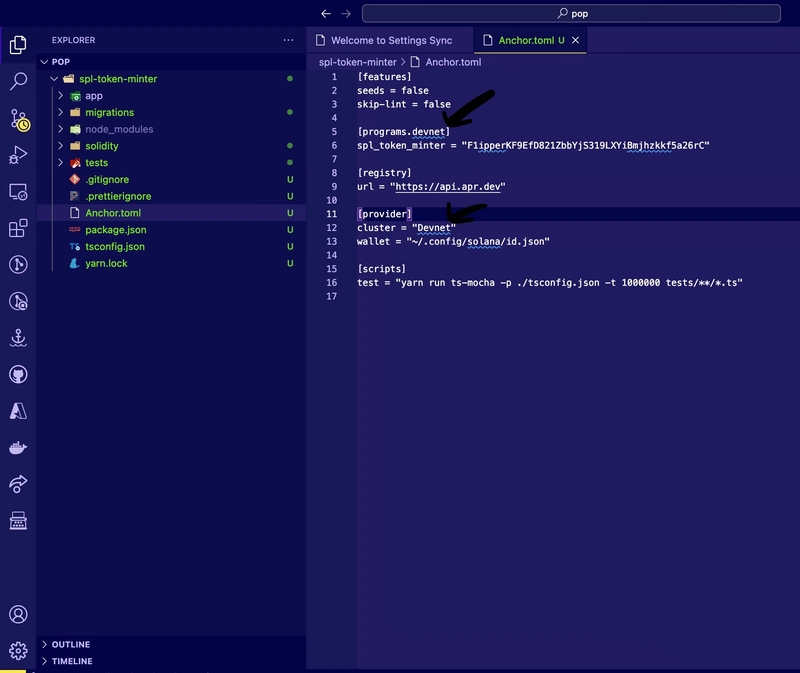
Note -:
If you're used to working with Solidity on Ethereum, you know about Mainnet and Testnet. With Solana, it might be a bit surprising to find out that there are three options instead of two.
Types of Solana Blockchain Cluster:
Mainnet: This is the actual Solana Blockchain where you use real SOL cryptocurrency. It's for doing real things with Solana programs, and once they're here, they can't be undone.
Devnet: When you're building on Solana using Solidity, you'll mostly be working here. It's a place to test your Solana programs before they go live on Mainnet. On Devnet, you get free SOL through airdrops (I'll explain how to get it below). Unlike Mainnet, stuff on Devnet can be reset, which means what you put here might not stay forever.
Testnet: This is like Devnet, The Testnet is where Solana's main team carefully tests the newest release features in a live cluster setup. Their main goal is to check network performance, stability, and validator behaviour while also paying attention to good grammar, clear writing, and a smooth flow of information.
You'll only need to worry about Testnet if you're directly dealing with the Solana protocol. The tokens on Testnet aren't real money, and you can get free SOL through airdrops.
In anchor.toml file you will need to change cluster
localnet to devnet
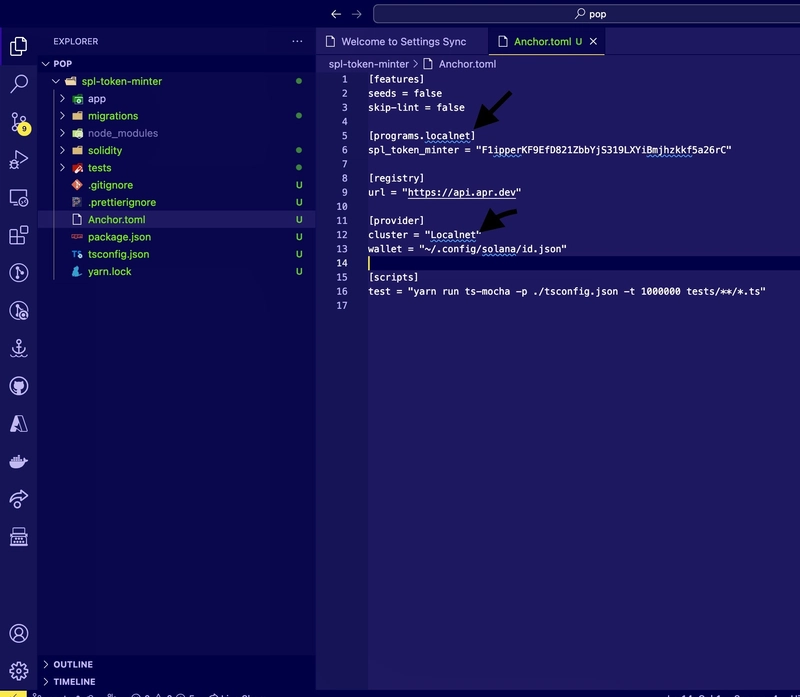
To this
Next, let’s go over the starter code beginning with the on-chain program itself. Within your project's ./solidity directory, you’ll find the following contract named spl-token-minter.sol below, which includes:
A constructor for state variable initialization.
A print function for messages in the program logs.
A flip function to update the state variable.
A get function to retrieve the current state variable value.
Important Differences(Compared with EVM smart contract).
Compared to an EVM smart contract, there are two important differences you might notice:
The @program_id annotation:
On Solana, smart contracts are referred to as “programs”. The @program_id annotation is used to specify the on-chain address of the program.
@program_id("F1ipperKF9EfD821ZbbYjS319LXYiBmjhzkkf5a26rC") //
on-chain program address.
The @payer annotation:
When storing data on the Solana blockchain, a certain amount of SOL needs to be allocated to cover the storage costs and the rent(we will discuss this later in further articles). The @payer annotation specifies the user that will pay the SOL required to create the account for storing the state variable.
@payer(payer) // payer for the "data account"
constructor(address payer) {
    print("Hello, World!");
}
Storing of state data
An important distinction between EVM smart contracts and Solana programs is how each store "state" variables/data:
EVM smart contracts can directly store state variables.
Solana on-chain programs, on the other hand, create separate accounts to hold state data. These are often referred to as "data accounts" and are "owned" by a program.
In this example, when the contract is deployed, it is deployed to the address specified in @program_id. When the constructor is called after the program is deployed, a separate account with its address is created to store the state variable, instead of being stored within the contract itself.
Step 2 Creating the solidity program
Now you can clear this all code off as we are going to build a spl-token-minter program
What it takes to mint any custom spl tokens to token address
- Minting SPL Tokens involves a conceptually straightforward process, yet the intricacy emerges in understanding Solana's mechanism for monitoring users' balances of SPL Tokens.
- By default, each Solana account tracks its SOL balance, the native token. However, a crucial question arises: How does every Solana account manage its balance for any possible SPL Token within the network?
- In reality, achieving this feat directly is unfeasible. The solution necessitates the creation of distinct accounts purposefully configured for each SPL Token, known as Associated Token Accounts.
- Imagine the scenario of introducing a new token named "JOE." To determine an individual's JOE token balance:
- Mint the JOE tokens.
- Establish an Associated Token Account customized for the user's wallet, designed to monitor their JOE balance.
- Mint or transfer JOE tokens into the user's JOE Associated Token Account.
- In essence, Associated Token Accounts operate as basic counters, directly tied to a Mint and a Wallet. Their primary function is to convey the balance linked to a specific Mint for a specific Wallet.
Write program
Design
We will create a Solana program focused on minting fungible SPL tokens. To make this happen, we'll need the right Solidity libraries that handle creating tokens, making a token mint, and sending the freshly minted tokens to a user's wallet.
Create a directory name libraries in the project root and add these files to it
No need to delve into the code just yet. Let me clarify what we're aiming for with these files: we'll be importing this code and utilizing specific methods to create and mint SPL tokens.
Create mpl_metdata.sol in the library and add code from here
mpl_metadata.sol
This library provides a way for Solidity to interact with Metaplex mpl metadata
Create spl_token.sol in the library and add code from here
spl_token.sol
This library provides a way for Solidity to interact with Solana's SPL-Token
Create system_instruction.sol in the library and add code from here
system_instruction.sol
This library provides a bridge for Solidity to interact with Solana's system instructions.
Now go over to spl-token-minter.sol file and let’s import these libraries
import "../libraries/spl_token.sol";
import "../libraries/mpl_metadata.sol";
Using Import Directives for Solidity Files
In this code block, the import directive helps bring things from libraries. This is handy when you want to keep one definition in a file and use it in lots of other files.
These import statements let the current contract use the functions, data structures, and variables from "spl_token.sol" (Solana SPL token) and "mpl_metadata.sol" (Metaplex) files. This adds to the contract's ability to create and mint tokens.
Next, write this
@program_id("4Huxs8ujxKqT76qqfmfJXMThmo4WMsvmdiCkqzNKF5kq")
On Solana, smart contracts are referred to as “programs”. The @program_id annotation is used to specify the on-chain address of the program.
Next, write a program
contract spl_token_minter {
@payer(payer)
    constructor() {}
}
Within a contract constructor, you have the option to include the @payer annotation, which takes a sequence of characters as an argument. This annotation designates a Solana account responsible for funding the initialization of the contract's data account.
The syntax @payer(payer) introduces an account named payer, which becomes essential for every invocation of the constructor.
The significance of the @payer annotation:
Allocating SOL for Blockchain Data Storage
When you put data on the blockchain, you need to set aside some SOL to pay for storage costs, including rent (which we'll explain more about later in the series). The @payer annotation tells us who's responsible for giving the needed SOL to create the account that stores the data.
Next, write this code block (createTokenMint function) after the constructor in spl_token_minter contract
function createTokenMint(
        address payer, // payer account
        address mint, // mint account to be created
        address mintAuthority, // mint authority for the mint account
        address freezeAuthority, // freeze authority for the mint account
        address metadata, // metadata account to be created
        uint8 decimals, // decimals for the mint account
        string name, // name for the metadata account
        string symbol, // symbol for the metadata account
        string uri // URI for the metadata account
    ) public {
        // Invoke System Program to create a new account for the mint account and,
        // Invoke Token Program to initialize the mint account
        // Set mint authority, freeze authority, and decimals for the mint account
        SplToken.create_mint(
            payer,            // payer account
            mint,            // mint account
            mintAuthority,   // mint authority
            freezeAuthority, // freeze authority
            decimals         // decimals
        );

        // Invoke Metadata Program to create a new account for the metadata account
        MplMetadata.create_metadata_account(
            metadata, // metadata account
            mint,  // mint account
            mintAuthority, // mint authority
            payer, // payer
            payer, // update authority (of the metadata account)
            name, // name
            symbol, // symbol
            uri // URI (off-chain metadata json)
        );
    }
Let's break down what's happening in this code block:
The createTokenMint function makes use of these parameters:
- address payer, // payer account(who pay for the rent)
- address mint, // mint account to be created (mint account for that specific any custom spl token)
- address mintAuthority, // mint authority for the mint account(mint authority is account signer )
- address freezeAuthority, // freeze authority for the mint account(same as mint authority)
- address metadata, // metadata account to be created(metadata address used for storing metadata using metaplex program)
- uint8 decimals, // decimals for the mint account(eth does not have decimal concept to create and mint token eth have different types of interfaces like erc-20 for fungible token and ERC721 for nft whereas in Solana is single spl token program is responsible for minting both type of tokens using decimal concept)
- string name, // name for the metadata account(title, name of the token)
- string symbol, // symbol for the metadata account(symbol of token)
- string uri // uri for the metadata account(this is uri that is stored in somewhere decentralized storage providers like (ipfs) this is used for storing token logo and different types of metadata).
This is responsible for creating a new token mint and its associated metadata within the Solana blockchain ecosystem.
We use the public specifier for this function to make it accessible to everyone.
Creating a Mint Account and Setting Authorities
In this step, we're making a mint account for our token and deciding who's in charge and how many decimal places it has. We do this by using the System Program and the Token Program. It happens when we use the SplToken.create_mint call. This sets up things like who's in charge, who can freeze, and how many decimals there are for the Mint account.
SplToken.create_mint(
            payer,            // payer account
            mint,            // mint account
            mintAuthority,   // mint authority
            freezeAuthority, // freeze authority
            decimals         // decimals
        );
Creating Metadata Account for Minted Tokens
After making the mint account, the process moves on to using the Metadata Program. This program helps set up a new account just for storing metadata linked to the minted tokens. We make this happen by using the MplMetadata.create_metadata_account call. This step takes care of things like who owns the metadata account, the name and symbol of the tokens, and a link to off-chain metadata using a URI (Uniform Resource Identifier).
// Invoke Metadata Program to create a new account for the metadata account
        MplMetadata.create_metadata_account(
            metadata, // metadata account
            mint,  // mint account
            mintAuthority, // mint authority
            payer, // payer
            payer, // update authority (of the metadata account)
            name, // name
            symbol, // symbol
            uri // uri (off-chain metadata JSON)
        );
Now place the "mintTo" function directly under the "createTokenMint" function.
function mintTo(address mintAuthority, address tokenAccount, address mint, uint64 amount) public {
        // Mint tokens to the token account
        SplToken.mint_to(
            mint, // mint account
            tokenAccount, // token account
            mintAuthority, // mint authority
            amount // amount
        );
    }
Here we are minting tokens to user wallet with mintTo Function
The mintTo function does something important: it mints tokens to a user's associated token account in their wallet. This helps Solana keep track of how many tokens each account has.
We create associated accounts using the token mint and minting towards a user's wallet. Here's an example:
Imagine I create the JOE token. To see how much JOE someone has, I'd have to:
Make the JOE token
Make an Associated Token Account for that person's wallet to keep track of their JOE balance
Mint or send JOE tokens to their JOE Associated Token Account
Our Solidity program is now complete, allowing us to create and send tokens to a user's wallet.
Next, we'll move to building, deploying, and running this program on the chain using the devnet cluster. Thanks to the anchor framework, this is an easy and smooth process. To do this, we just need to set up the steps for running and testing our program.
Setting up for deployment and testing
First, go to the package.json file and change this block of code
{
    "scripts": {
        "lint:fix": "prettier */*.js \"*/**/*{.js,.ts}\" -w",
        "lint": "prettier */*.js \"*/**/*{.js,.ts}\" --check"
    },
    "dependencies": {
        "@coral-xyz/anchor": "^0.28.0",
        "@metaplex-foundation/js": "^0.19.4",
        "@solana/spl-token": "^0.3.8",
        "@solana/web3.js": "^1.78.4",
    },
    "devDependencies": {
        "@types/bn.js": "^5.1.0",
        "@types/chai": "^4.3.0",
        "@types/mocha": "^9.0.0",
        "chai": "^4.3.4",
        "mocha": "^9.0.3",
        "prettier": "^2.6.2",
        "ts-mocha": "^10.0.0",
        "typescript": "^4.3.5"
    }
}
Save this go to the terminal and write the command-:
npm install
For installing these dependencies
The anchor.toml file serves as the central driver for our application. It's responsible for both app configuration and running tests.
[scripts]
test = "yarn run ts-mocha -p ./tsconfig.json -t 1000000 tests/**/*.ts"
This script is an anchor.toml file responsible for running tests in test folder
Now, let's proceed with writing a test script for spl-token-minter. To do this, navigate to the test folder and open the spl-token-minter.ts file. Remove all existing code in that file.
Start with importing these programs and dependencies at the top of the file
import * as anchor from "@coral-xyz/anchor";
import { Program } from "@coral-xyz/anchor";
import { SplTokenMinter } from "../target/types/spl_token_minter";
import { PublicKey, SystemProgram, SYSVAR_RENT_PUBKEY,LAMPORTS_PER_SOL,ParsedAccountData } from "@solana/web3.js";
import { Metaplex } from "@metaplex-foundation/js";
import { assert } from "chai"
import {
  ASSOCIATED_TOKEN_PROGRAM_ID,
  getOrCreateAssociatedTokenAccount,
  TOKEN_PROGRAM_ID,
  getAccount
} from "@solana/spl-token";
Here are the imported modules, classes, and tools that are utilized in test for creating and sending SPL tokens to a user's associated token account:
import * as anchor from "@coral-xyz/anchor";: This line brings in the entire Anchor library, enabling us to reference it as "anchor." Anchor is a valuable tool for developing Solana programs.import { Program } from "@coral-xyz/anchor";: This import specifically fetches the Program class from the Anchor library. The Program class facilitates the creation and interaction with Solana programs.import { SplTokenMinter } from "../target/types/spl_token_minter";: This import statement obtains the SplTokenMinter class from thespl_token_mintermodule, which will be explored further during the building process.import { PublicKey, SystemProgram, SYSVAR_RENT_PUBKEY, LAMPORTS_PER_SOL, ParsedAccountData } from "@solana/web3.js";: In this line, we import classes such as PublicKey, SystemProgram, and others from the@solana/web3.jslibrary. These classes are valuable for managing Solana's public keys, system program, and rent-related aspects.import { Metaplex } from "@metaplex-foundation/js";: This import statement brings in the Metaplex class from the@metaplex-foundation/jslibrary. Metaplex is likely used for tasks related to NFTs and metadata.import { ASSOCIATED_TOKEN_PROGRAM_ID, getOrCreateAssociatedTokenAccount, TOKEN_PROGRAM_ID, getAccount } from "@solana/spl-token";: These imports originate from the@solana/spl-tokenlibrary, which is dedicated to Solana's token standard (SPL tokens). They are instrumental in managing associated token accounts and handling various token-related tasks.
Now describe the test for spl-token-minter
describe("spl-token-minter", () => {
});
In this section, we will discuss and thoroughly test the functionality of the "spl-token-minter" program. Our testing process will include the creation of various test cases, assertions, and expectations to ensure the program's accurate behaviour. These tests will encompass a variety of scenarios, including token creation and minting.
For this, you need to first set the requirements for the test
Let’s write this
// Configure the client to use the local cluster.
  const provider = anchor.AnchorProvider.env();
  anchor.setProvider(provider);

  // Generate a new keypair for the data account for the program
  const dataAccount = anchor.web3.Keypair.generate();
  // Generate a mint keypair
  const mintKeypair = anchor.web3.Keypair.generate();
  const wallet = provider.wallet as anchor.Wallet;
  const connection = provider.connection;

  const program = anchor.workspace.SplTokenMinter as Program<SplTokenMinter>;

  // Metadata for the Token
  const tokenTitle = "Solana pro";
  const tokenSymbol = "Gold";
  const tokenUri =
    "https://raw.githubusercontent.com/solana-developers/program-examples/new-examples/tokens/tokens/.assets/spl-token.json";
Here we are configuring and initiating the setup for testing our spl-token-minter Solana program.
- Configuration and Provider Setup: First, we connect to the local cluster and set up the provider using AnchorProvider.env(). This provider is then assigned with anchor.setProvider(provider) The Provider is an abstraction of a connection to the Solana network, typically consisting of a Connection, Wallet, and a preflight commitment.
- Generating Key Pairs: To store the program's state, we create a new data account using a key pair. We also generate a mintKeypair, likely for the minting process. We set up wallet and connection variables too.
- Initializing the Program: We use anchor.workspace.SplTokenMinter to make an instance of the program as Program. This prepares the SplTokenMinter program from the workspace, The program is an abstraction that combines the Provider, idl, and the programID (which is generated when the program is built) and allows us to call RPC methods against our program.
- Defining Metadata: We provide info about the token's metadata. This means giving the token a title, symbol, and URI. These metadata bits are super important for describing what the token is all about.
Now to initialize the data account write this
it("Is initialized!", async () => {
    // Initialize data account for the program, which is required by Solang
    const tx = await program.methods
      .new()
      .accounts({ dataAccount: dataAccount.publicKey })
      .signers([dataAccount])
      .rpc();
    console.log("Your transaction signature", tx);
  });
Here we initialise the data account for the program, a crucial requirement for Solang, the Solidity compiler for Solana. The initialization process is conducted using the new() method from the program.methods object
Here we specify the dataAccount as an account parameter and the dataAccount keypair as a signer. This ensures that the transaction possesses the necessary authorization and input parameters for the initialization operation.
Now create spl token
it("Create an SPL Token!", async () => {
    // Get the metadata address for the mint
    const metaplex = Metaplex.make(connection);
    const metadataAddress = await metaplex
      .nfts()
      .pdas()
      .metadata({ mint: mintKeypair.publicKey });

    // Create the token mint
    const tx = await program.methods
      .createTokenMint(
        wallet.publicKey, // payer
        mintKeypair.publicKey, // mint
        wallet.publicKey, // mint authority
        wallet.publicKey, // freeze authority
        metadataAddress, // metadata address
        9, // decimals
        tokenTitle, // token name
        tokenSymbol, // token symbol
        tokenUri // token uri
      )
      .accounts({ dataAccount: dataAccount.publicKey })
      .remainingAccounts([
        {
          pubkey: wallet.publicKey,
          isWritable: true,
          isSigner: true,
        },
        { pubkey: mintKeypair.publicKey, isWritable: true, isSigner: true },
        {
          pubkey: new PublicKey("metaqbxxUerdq28cj1RbAWkYQm3ybzjb6a8bt518x1s"), // Metadata program id
          isWritable: false,
          isSigner: false,
        },
        { pubkey: metadataAddress, isWritable: true, isSigner: false },
        { pubkey: SystemProgram.programId, isWritable: false, isSigner: false },
        { pubkey: SYSVAR_RENT_PUBKEY, isWritable: false, isSigner: false },
      ])
      .signers([mintKeypair])
      .rpc({ skipPreflight: true });
    console.log("Your transaction signature", tx);
  });
Here we create an custom spl token named solana pro and have title gold
For this first, we create the metaplex connection using this
const metaplex = Metaplex.make(connection);
Get the metadata address for our token mint
// Get the metadata address for the mint
const metadataAddress = await metaplex
      .nfts()
      .pdas()
      .metadata({ mint: mintKeypair.publicKey });
Let's look at how we get metadata details for a specific mint. We use mintKeypair.publicKey to say which mint we're looking at. When we run this code, we find the metadata address connected to that mint and save it in metadataAddress.
Next, we use the createtokenmint method from our spl-token-minter program to make a token mint. We give it necessary accounts, data, and a decimal of 9 to make sure we create a fungible token mint. We also give accounts or signers for the methods.
After that, we execute the transaction using .rpc() and set skipPreflight to true for an async process. We get the transaction signature (tx) for reference, and the results show up in the console.
Now mint some solana pro tokens to our wallet
it("Mint some tokens to your wallet!", async () => {
    // Wallet's associated token account address for mint
    const tokenAccount = await getOrCreateAssociatedTokenAccount(
      connection,
      wallet.payer, // payer
      mintKeypair.publicKey, // mint
      wallet.publicKey // owner
    );

    const tx = await program.methods
      .mintTo(
        wallet.publicKey, // payer
        tokenAccount.address, // associated token account address
        mintKeypair.publicKey, // mint
        new anchor.BN(15900000000) // amount to mint
      )
      .accounts({ dataAccount: dataAccount.publicKey })
      .remainingAccounts([
        {
          pubkey: wallet.publicKey,
          isWritable: true,
          isSigner: true,
        },
        { pubkey: tokenAccount.address, isWritable: true, isSigner: false },
        { pubkey: mintKeypair.publicKey, isWritable: true, isSigner: false },
        {
          pubkey: SystemProgram.programId,
          isWritable: false,
          isSigner: false,
        },
        { pubkey: TOKEN_PROGRAM_ID, isWritable: false, isSigner: false },
        {
          pubkey: ASSOCIATED_TOKEN_PROGRAM_ID,
          isWritable: false,
          isSigner: false,
        },
      ])
      .rpc({ skipPreflight: true });
    console.log("Your transaction signature", tx);
  });
Initially, we establish an associated token account by leveraging the token mint and associating it with the user's wallet address. To accomplish this, we employ the getOrCreateAssociatedTokenAccount() method. This method requires several parameters, including the connection, the payer (associated with the wallet), the mint, and the owner (the wallet's owner).
Next, we make a transaction by using the mintTo method from our spl-token-minter program. We give it important stuff like the wallet, the address of the associated token account, the mint key pair, and the number of tokens we want to mint (like Bn). We also include the accounts and signers, making sure we provide all the accounts needed to mint tokens to the user's wallet.
Now let’s test and make an assertion if our tokens are minted or not by getting the token amount balance
And make assert.equal with 159 tokens
// Get the minted token amount on the associated token account
    const tokenAmount = (await getAccount(connection, tokenAccount.address)).amount;
    console.log("tokenAmount", tokenAmount);
    // Converting tokenAmount to a regular number using Number()
    let tokens = Number(tokenAmount);
    console.log("minted token amounts", tokens / LAMPORTS_PER_SOL);
    assert.equal(tokens / LAMPORTS_PER_SOL, 159);
Aha, All test writing is done
Now we can move forward to build our program to generate program types and idl
open anchor.toml file
and add this block of code in the end of the file
[[test.validator.clone]]
address = "metaqbxxUerdq28cj1RbAWkYQm3ybzjb6a8bt518x1s"
This is the metadata program id for Metaplex
It’s time to build our spl-token-minter program
Building program
Go to the terminal in project root
and write command
anchor build
This command will generate a target folder in the project root and generate idl and types of our Solana program to interact with the client side using rpc methods
Now open a new terminal and check our configuration By writing this command
solana config get
After running this you will see something like this
Config File: ~/.config/solana/cli/config.yml
RPC URL: https://api.devnet.solana.com
WebSocket URL: wss://api.devnet.solana.com/ (computed)
Keypair Path: ~/.config/solana/id.json
Commitment: confirmed
For Devnet, please note that it uses an RPC URL, and your wallet's default location is specified by the keypairpath. Make sure to generate a wallet keypair for program deployment.
You can set devnet for cluster
by writing this command
solana config set --url https://api.devnet.solana.com
by writing this command you can generate a new keypair
solana-keygen new
Now you have a wallet
You can check the address(pubkey) and balance of this account using these commands
solana address
solana balance
If you have some devnet sol then it is okay for deployment if it is not then Get some devnet airdrop by writing this command
solana airdrop 4
Deploying the program
Open the terminal in the new tab and start the network cluster
by writing this command
solana-test-validator
This will start a devnet cluster in the system
Next, deploy the program using
anchor deploy
you will get something like this
Deploying cluster: https://api.devnet.solana.com
Upgrade authority: ~.config/solana/id.json
Deploying program "spl_token_minter"...
Program path: ~/Desktop/demo/spl-token-minter/target/deploy/spl_token_minter.so...
Program Id: 3iCbv94ivHb4of8NEeikMbk2kckLVSDmUEprpQZ1cBUw
Deploy success
Our program is now deployed on the Devnet cluster. It possesses program upgrade authority, which is granted to our wallet. To proceed, we need to obtain the program ID of our deployed program on-chain.
Once we have the program ID, update it in our program (solidity file) as well as the anchor.toml file. Make sure to replace the existing program ID with the new one in both files.
Build the program again with the command
anchor build
Testing Program
Before testing check dependencies and run:
yarn install
Now we are doing testing with the command
anchor test
after this, you will get results like this
spl-token-minter
Your transaction signature 5KzehPTbYCuUtwQzbigvTnwnkiuNcWuXPtuWSMGMVc914xcV8ddFLV3BqEr3hMsbS9ga6SJjzEDcjRMZhGi6KgvJ
✔ Is initialized! (4616ms)
Your transaction signature ePvkJFcHdgjbWnYh1e5nab57bv32TyviXgrfNi1QQFsHytXgcJvuneD9BzmrEv4rcMu1KXQSr2hpJ2Gsqzf2TAm
✔ Create an SPL Token! (1466ms)
Your transaction signature 4qdXPTQArZTyFq5mCtdyJVx2Hu1NxeYnY1wwGCVpHy91SZjdkngvRYVWDJvmaTigUEshACFbKMULojfChMxcNp85
minted token amounts **156**
✔ Mint some tokens to your wallet! (6090ms)
3 passing (12s)
All test is passed and we can see minted tokens in Solana Explorer
Get the workspace program wallet address using this command Write in the terminal
solana address
Now goto this link
https://explorer.solana.com/?cluster=devnet
Paste wallet address in the search explorer
you will get something like this
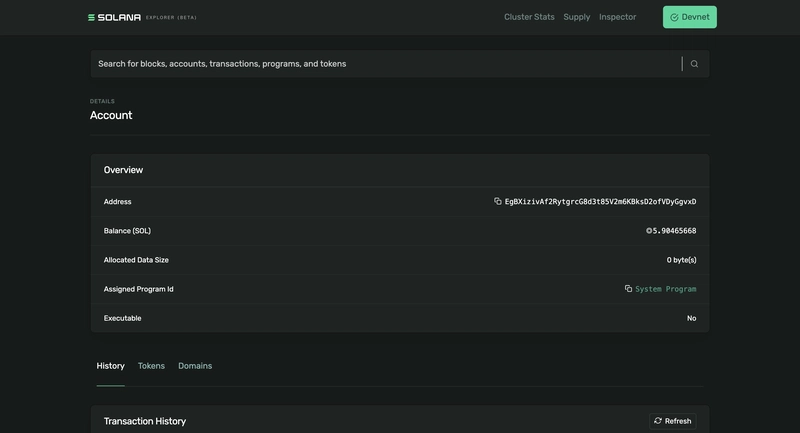
This will give you info about the wallet
like balance transactions and token holdings
To see our minted tokens click on tokens then you will see something like this
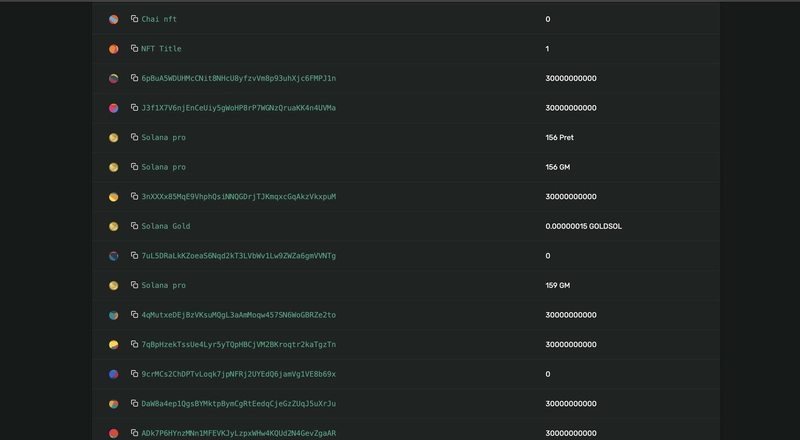
Find out minted tokens with the title solana pro that have 159 GM supply
Click on this you will see something like this
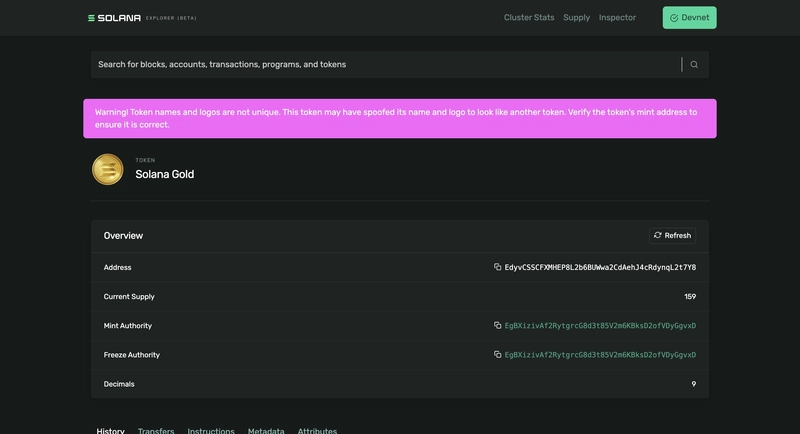
All the information related to minted tokens is here
that’s it
This is how you can mint fungible tokens on Solana using solidity(solang).
Conclusion
This article, delved deep into different aspects of Solana program development using Solidity. It laid a solid foundation by highlighting the differences in behaviour between Solidity programs on the Solana and Ethereum platforms.
To enhance clarity and organization, the article was methodically partitioned into two distinct sections, facilitating a well-structured grasp of the subject matter for readers.
The initial section was dedicated to imparting a fundamental comprehension of Solidity Solana programs within the context of the Solana ecosystem. This segment intricately elucidated multiple aspects of Solana blockchain development utilizing the Solidity (Solang) approach.
The subsequent section offered an engaging hands-on experience by meticulously detailing the creation of a "spl-token-minter" program using Solidity. This practical example empowered readers with the ability to practically apply the previously discussed concepts.
As the series advances, the upcoming article will pivot its focus towards crafting a Flip program using CPI(Cross-program-invocation) and PDA(program-derived address) in Solidity (Solang), thereby deepening and expanding the scope of knowledge conveyed throughout this series.

Top comments (0)