ali emas tlog
阿里巴巴
版本 远程日志
```TLog```
## 介绍
远程日志服务提供远程手机日志拉取功能,解决移动
```App```
线上异常排查困难的问题。
远程日志服务支持
```Android/iOS```
应用类型。
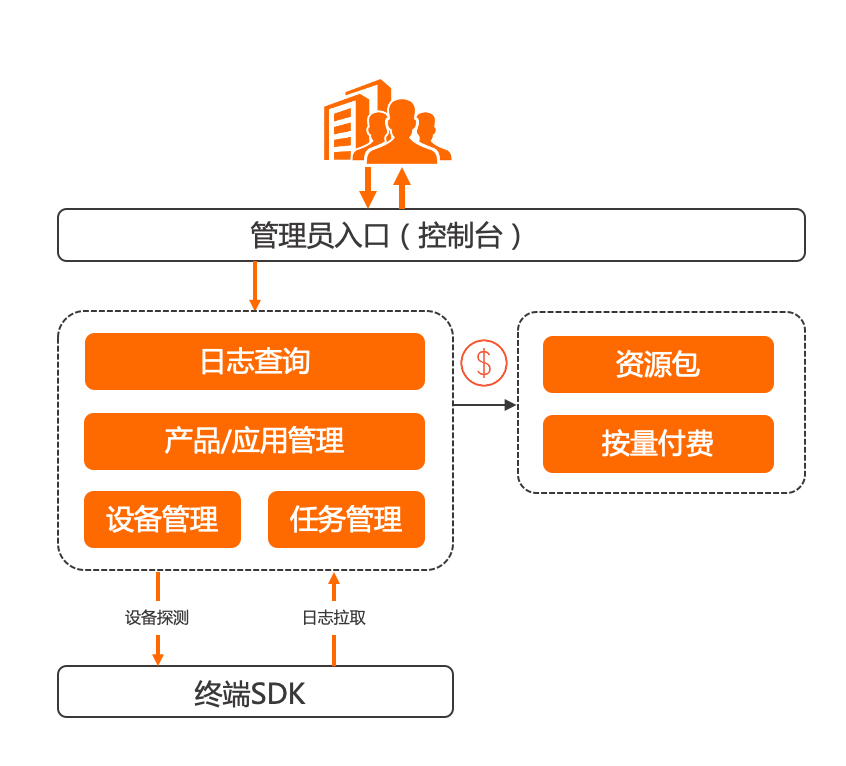
## 产品架构

1.移动
```App```
集成
```SDK```
。
2.远程日志服务通过心跳探测识别已安装
```App```
的移动终端,并进行日志拉取配置。
3.远程日志服务拉取指定移动终端
```App```
的用户日志,并对拉取任务进行管理。
4.远程日志服务查看已从终端设备拉取至控制台的用户日志。
官网地址:[官网地址](https://help.aliyun.com/document_detail/164992.html)
本项目是根据官方来制作的
```flutter```
版本
## 快速开始
#####
```flutter```
配置:
emas_tlog: ^0.0.2
初始化:
方法的声明:
static void init(String appKey,String appSecret,String rsaPublicKey,
String appKeyIos,String appSecretIos,String rsaPublicKeyIos,
{String androidChannel = "line",String userNick = "NoLogin",ApmLogType? type,bool debug = true}){
// xxxxxx
}
方法的调用:
EmasTlog.init("", "", "",
"","","",
androidChannel :"HEHE",userNick: "lalala2");
参数说明:


```appKey```


```appSecret```


```rsaPublicKey```


```appKeyIos```

:

```iOS```

的

```emas.appKey```


```appSecretIos```

:

```iOS```

的

```emas.appSecret```


```rsaPublicKeyIos```

:

```iOS```

的

```appmonitor.tlog.rsaSecret```


```androidChannel```

:   渠道 (

```iOS```

 指定

 ```App Store```

)


```userNick```

:  用户昵称说明:  默认值

```NoLogin```


```type```

 (*日志上传类型,

```注:iOS若不传,默认是I```

)


```debug```

 (底层运行日志答应)

```true```

 测试环境开启

 ```false```

 正式环境 关闭(

```iOS```

可不传)

*星号标记说明


```V:```

可拉取所有级别的日志。(

```iOS```

无此类型)


```D:```

可拉取

```DEBUG/INFO/WARN/ERROR```

级别的日志。


```I:```

可拉取

```INFO/WARN/ERROR```

级别的日志。


```W:```

可拉取

```WARN/ERROR```

级别的日志。


```E:```

可拉取

```ERROR```

级别的日志。

日常使用:
方法的声明:
static void init(String appKey,String appSecret,String rsaPublicKey,
String appKeyIos,String appSecretIos,String rsaPublicKeyIos,
{String androidChannel = "line",String userNick = "NoLogin",ApmLogType? type,bool debug = true}){
// xxxxx
}
方法的调用:
EmasTlog.log(ApmLogType.I, "tag2_1231231",module: "hehe2_flutter",tag: "tag_hehe2");
EmasTlog.log(ApmLogType.V, "tag2_1231231",module: "hehe2_flutter",tag: "tag_hehe2");
EmasTlog.log(ApmLogType.W, "tag2_1231231",module: "hehe2_flutter",tag: "tag_hehe2");
EmasTlog.log(ApmLogType.E, "tag2_1231231",module: "hehe2_flutter",tag: "tag_hehe2");
EmasTlog.log(ApmLogType.D, "tag2_1231231",module: "hehe2_flutter",tag: "tag_hehe2");
EmasTlog.log(ApmLogType.I, "tag2_1231231",module: "hehe2_flutter",tag: "tag_hehe2");
说明:


```module```

 为模块业务,可以为空
EmasTlog.comment(); 主动上传日志
EmasTlog.updateNickName(name) 修改用户名(用于登录切换用户)
#####

```Android```

 配置:
1、在根项目

```Android```

目录

```build.gradle```

配置如下代码
ext {
tlog = [
openUtdid : true
]
}
说明:
如果项目编译期报类似如下错误
Duplicate class com.ta.utdid2.a.a.a found in modules jetified-alicloud-android-utdid-2.5.1-proguard (com.aliyun.ams:alicloud-android-utdid:2.5.1-proguard) and jetified-utdid-1.5.2.1 (com.umeng.umsdk:utdid:1.5.2.1)
则代码需要调整为
ext {
tlog = [
openUtdid : false
]
}
配置展示:
ext {
tlog = [
openUtdid : true
]
}
buildscript {
ext.kotlin_version = '1.3.50'
repositories {
google()
jcenter()
}
dependencies {
    classpath 'com.android.tools.build:gradle:4.1.0'
    classpath "org.jetbrains.kotlin:kotlin-gradle-plugin:$kotlin_version"
}
}
allprojects {
repositories {
google()
jcenter()
}
}
根

```app AndroidManifest```

 配置:
xmlns:tools="http://schemas.android.com/tools"
** >
**
tools:replace="android:label">
说明需要 配置

 ```tools:replace="android:label"```


#####iOS 的配置说明
1、在

```Flutter```

项目的

```iOS```

端的

```Podfile```

中添加如下索引库地址:
alicloud
source "https://github.com/CocoaPods/Specs.git"
source "https://github.com/aliyun/aliyun-specs.git"
2、在

```Flutter```

项目的

```iOS```

端的

```info.plist```

文件中添加如下代码:
NSAppTransportSecurity
NSAllowsArbitraryLoads
NSBonjourServices
_dartobservatory._tcp
NSLocalNetworkUsageDescription
Main
3、在

```iOS```

端项目

```Build Setting```

中,将

```Allow Non-modular Includes In Framework Modules```

设置为

```YES```


#####iOS报错情况解决:


```问题1:```
Flutter: target has transitive dependencies that include statically linked binariesxxxx
```解决问题1:```
target 'Runner' do
use_frameworks!
use_modular_headers!
flutter_install_all_ios_pods File.dirname(File.realpath(FILE))
end
```注释掉use_frameworks! ```


如果存在其他含swift文件的插件的情况,这会造成新问题(Swift与OC汇编找不到文件)
故,以上解决办法不可取,需要保留

```use_frameworks!```

加入下面的代码即可:
pre_install do |installer|
# workaround for https://github.com/CocoaPods/CocoaPods/issues/3289 静态库
Pod::Installer::Xcode::TargetValidator.send(:define_method, :verify_no_static_framework_transitive_dependencies) {}
end


Top comments (0)