
If you are a professional developer or someone who is starting out, you might have come across OAuth 2.0. You might have tried to learn more about it but found it a bit tricky to understand. That's okay because OAuth 2.0 can be a bit like a puzzle with various pieces involving technical terms and processes that might seem overwhelming
In this post, I'll try to go through the core concepts of OAuth 2.0 that will provide you with a strong foundation. We'll focus on the essential building blocks that form the basis of this authorization protocol.
Before we get started it is important to remember that OAuth 2.0 is a specification and does not provide any concrete implementation. Keeping that in mind let's get started.
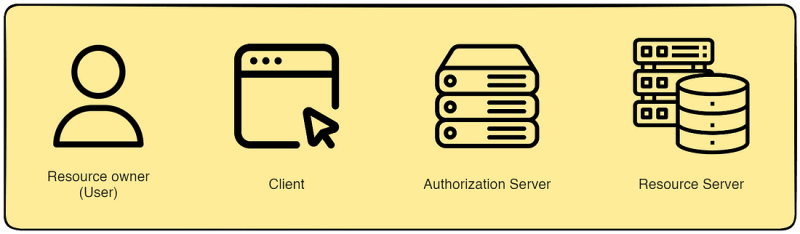
In the OAuth 2.0 specification, there are 4 main actors or roles.
Resource owner - It is the user who is trying to access a resource
Client - The client can be the browser, mobile app, desktop app, or any other application.
Resource Server - It is simply the backend of an application that hosts the protected resources(APIs). The user can access the resources on the backend through a client using a request protocol like HTTP using access tokens.
Authorization Server- The server that issues access token to the client after successful authentication. Using the access token, protected resources on the resource server can be accessed by the user through the client.
Authorization Grant
Authorization Grant is a credential that gives that client authorization to obtain access token from the Authorization Server. There are a few grant types but we'll discuss following the types because these are the recommended ones to use.
- Authorization Code
- Client Credential
- Refresh Token
Authorization Code
After a user successfully authenticates itself with the authorization server, the authorization server sends the client an authorization code. The authorization code is kind of a key or a secret. The client can now make a POST request using this authorization code and get an access token back. It is important that the client itself should authenticate with the authorization server when making the request.
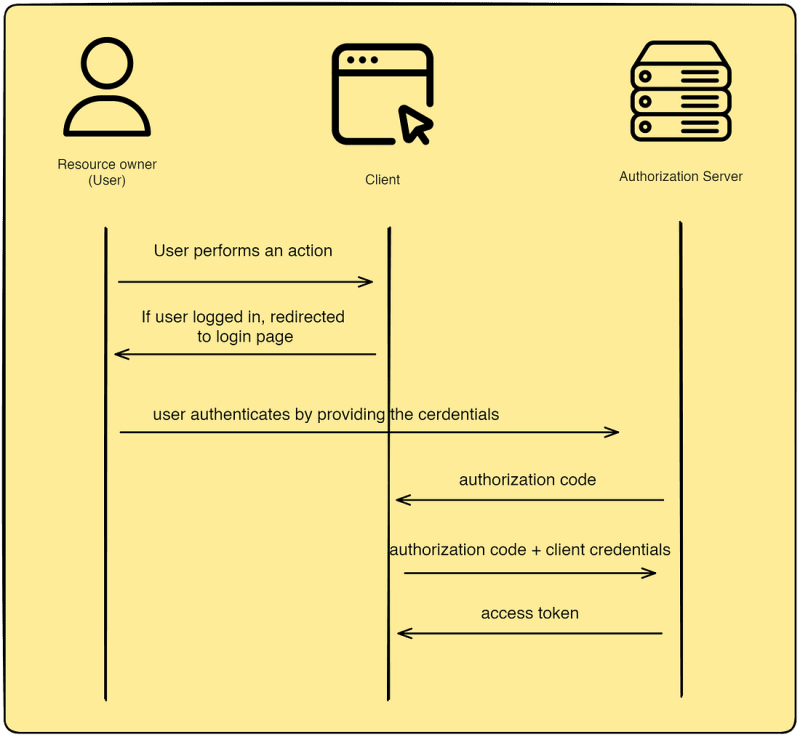
The above shows the typical flow for grant type of Authoziraztion Code.
Points to remember:
- When the user is not logged in and tries to perform an action on a specific URL, the user is redirected to the login, and the same URL is passed to the Authorization.
For example, a user tries to comment on a post on Reddit on the URL reddit.com/r/java/post10. The user is redirected to the login page and the same URL is passed to the authorization server. After entering the user credentials and completing the flow to get the access token, the user is again redirected to the reddit.com/r/java/post10 URL.
- The login page is not provided by the client (front-end application) but by the Authorization Server itself.
For example, when you log in to Reddit and select Google to log in. The login page to select Google account is provided by Google, not Reddit. The same goes for other OAuth 2.0 login providers like Github, Facebook, Apple, etc.
A user's login credentials are never shared with the client. The login credentials are directly processed by the Authorization Server.
After successful user authentication, the Authorization Server sends the client Authorization Code. The Authorization Code can be used only once by the client to get access token. It doesn't matter whether the request by the client was successful or not, once the Authorization Code is consumed by the Authorization Server it cannot be used anymore.
When the client makes the POST request to get access token, the client itself has to authenticate with Authentication Server by using some kind of authentication mechanism like Http Baisc.
The Authorization Server manages both the user credentials and the client credentials. The user credentials are usually username and password. The client credentials are clientId and secret.
Authorization Code With PKCE
PKCE stands for "proof Key for Code Exchange". It is an extension to OAuth 2.0 for native client applications which store the client credentials in the application itself. The client credentials can be compromised when it resides in the codebase of native applications like mobile apps. In web apps, the client credentials are safe enough as the code is present on the server that is not accessible to the public. But it is recommended to use PCKE even for web apps because your applications can never be safe enough.
Two things we need to know when dealing with PKCE is verifier and challenge. The verifier can be a random piece of string, or code and the challenger is a hash value of the verifier
verifier = "random string code"
challenge = hash(verifier)
Let's see the steps involved
When the user is redirected to the login page, the client application generates the verifier and the challenge.
The challenge is sent to the Authorization Server along with user credentials for authentication request.
After successful authentication and getting the Authorization Code, the client makes the request to get the access token, and instead of sending the client credentials along with the request the client sends the verifier to the Authorization Server.
The Authorization Server that already has the challenge now can validate if the verifier is indeed the same as the challenge by using the hash function matches.
//Authorization Server has the challenge already
tempChallenge = hash(verifier)
if(tempChallenge.equals(challenge))
//If it is equal, client validation is successful and access token is genereated

Points to remember:
The verifier never leaves the client, so it is never exposed to the public.
The hash function and the algorithm used by the function is only known by the client and Authorization Server.
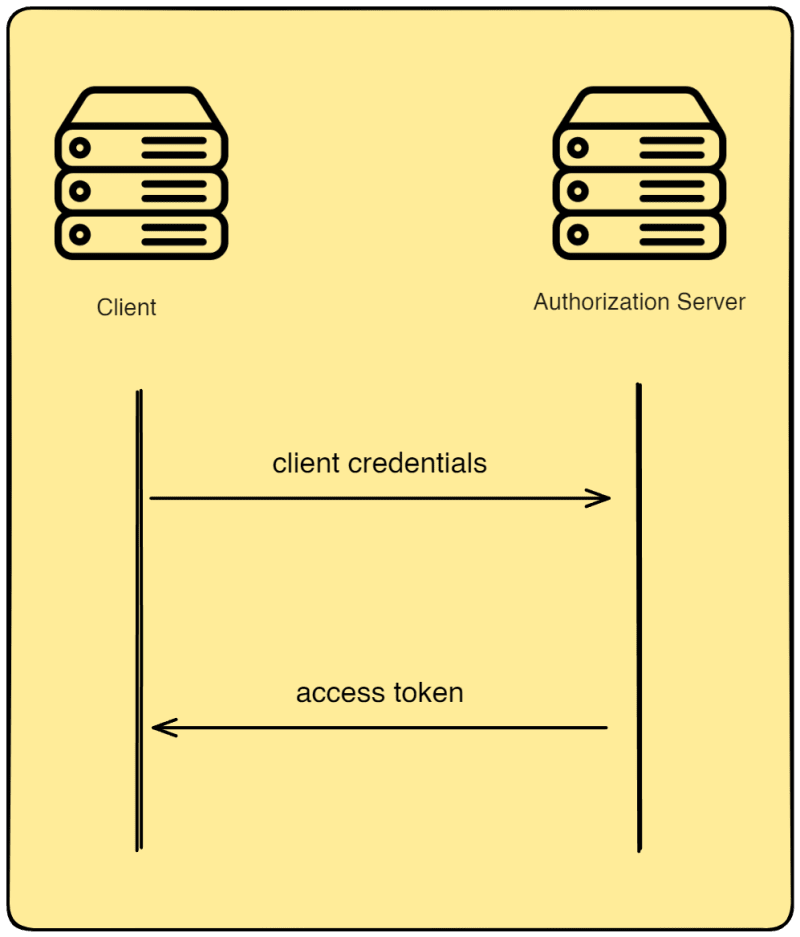
Client Credentials
In situations where there is no user, the client acts on its own behalf and can request access to resources on the Resource Server. For example, services in a microservice, monitoring tools, and orchestration tools like Kubernetes can request access to resources from a Resource Server. Since there is no user here, they act like a client and need client credentials to be validated by the Authorization Server to get a token. Only then using the tokens these clients can access the protected resources.
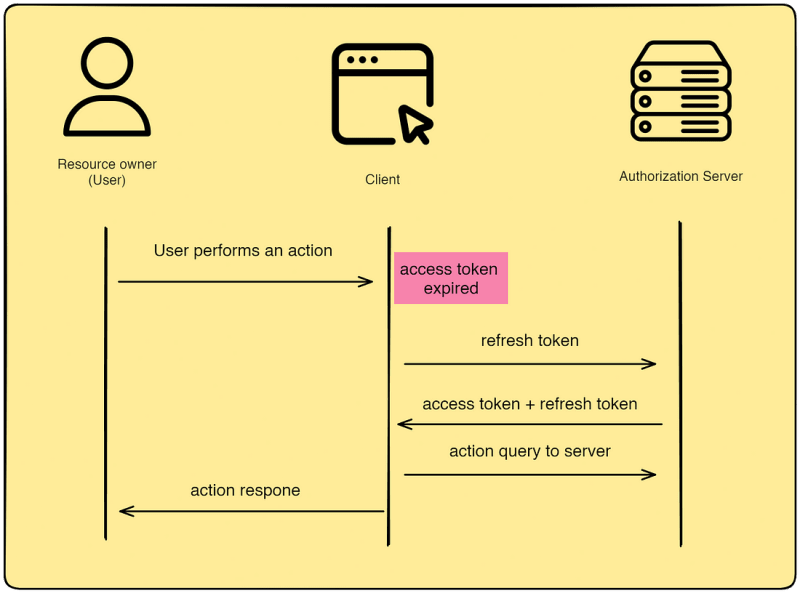
Refresh Token
We have already seen the flow for getting an access token after the user has been authenticated. The access token always expires after a prescribed amount of time then the user has to log in to get the access token again. Instead of the user logging in again, a refresh token is used to get the access token. This client is configured such that once the access token expires, it uses the access token to get a new access token and the refresh token. This happens without the user ever knowing.
These are the basic building blocks that you can use to create your own Oauth 2.0 authorization mechanism using any popular OAuth 2.0 provider like OpenID Connect(OIDC) or Keycloak. There are many other providers available and you can easily work with any of them if you have understood the basics fundamentals we have discussed in this post.
In the next post, we'll implement OAuth 2.0 with OIDC as an implementation provider using Spring Boot and check out some endpoints we need to know to validate and generate different tokens. So make sure to follow and leave a like on this post.

Top comments (0)