
Juggling passwords and those pesky OTP codes is a major pain, right? Thankfully, Single Sign-On (SSO) using platforms like GitHub offers a smoother and safer way to log in to apps.
This guide will show you how to set up SSO with GitHub OAuth2 in a React application. We’ll use a basic Python backend as an example, but you can choose whichever language works best for you. The code is straightforward, so you can easily tweak it to fit your needs. We’re keeping things simple here for now, but don’t worry — you can always add fancier stuff like routes or Redux later if your project gets more complex.
We’re aiming to make your app login experience a breeze! Let’s dive in!
What is OAuth2?
Think of It Like Borrowing Your Friend’s Key
Ever forget your gym locker combo? No worries, you can just ask your friend who remembers it to open it for you, right? That’s kind of how OAuth2 works for logging into apps.
There are two main things your apps need to know:
Who You Are (Authentication): This is like proving you’re the rightful owner of the locker with a code or your fingerprint.
What You Can Do (Authorization): Even if you open the locker, your friend might limit what you can take (water bottle vs. their whole gym bag!).
OAuth2: The Helpful Friend
Here’s where OAuth2 comes in. It acts like that helpful friend who remembers your login info for other places (like GitHub). Instead of creating a new account and password for every app, you can use your existing, trusted GitHub login.
Here’s the process:
Click Login: You see a “Login with GitHub” button in the app.
Head to GitHub: The app sends you to the familiar and secure GitHub login page.
Log In There: You enter your usual GitHub credentials.
Special Code: If all goes well, GitHub gives your app a special code, not your actual password. Think of it like a temporary key.
Back to the App: You’re automatically sent back to the app.
Access Granted (or Denied): The app uses that code to ask GitHub for a special “access token.” This token tells the app what you’re allowed to do within the app (like view stuff or even edit things).
The Code Thingy (Authorization Code Flow):
GitHub uses the authorization code flow which uses a code instead of your actual password. This is a smart security feature. It adds an extra layer of protection, kind of like having two locks on your gym locker!
Why OAuth2?
There are a bunch of ways to do SSO in apps, but we’re going with OAuth2 for two cool reasons:
Super Easy to Use: Setting up OAuth2 is a breeze compared to other options. Developers love it because it saves them time and headaches.
Extra Security Boost: OAuth2 is more secure than some other methods. Think of it like letting a trusted friend (like GitHub) handle your login instead of your app having to remember your password itself. It’s a safer way to go!
Super Convenient: No more password overload!
You’re in Control: You choose what info from GitHub to share with the app.
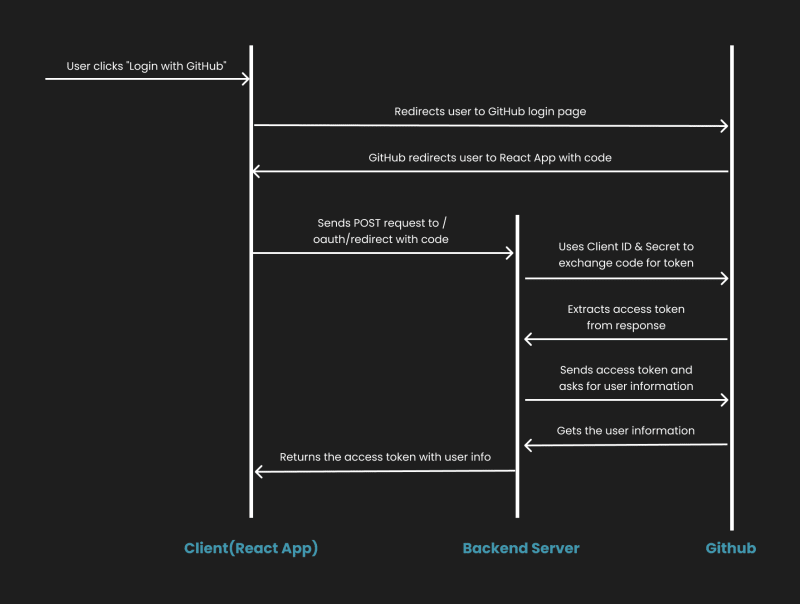
The overall flow
Add GitHub application
Here’s a breakdown of the steps to add an OAuth application in GitHub, creating the secret handshake that allows your app to interact with user accounts:
- Navigate to Settings:
- Head to your GitHub profile settings by clicking on your profile picture in the top right corner and selecting “Settings”.

2. Developer Settings:
- In the left sidebar, under “Developer settings”, click on “OAuth Apps”.


3. Register a New App:
Click on the blue button “Register a new application”.
Give your app a descriptive and recognizable name.
Authorization callback URL:
_ This is the URL in your application where GitHub will redirect the user after a successful login. Make sure this URL matches the one you’ll define in your React app’s code.
_ If you are using the code of this tutorial set http://localhost:5173

- Save the client ID and generate a new client secret for further use in the code

You can also check GitHub docs.
Implement react app
Let’s ditch those pesky passwords and create a smooth login experience for your React app using GitHub! Here’s a breakdown of what we’ll do:
1. Setting Up Your React Playground:
Imagine a shiny new React app — that’s what we’ll build! We’ll use a cool tool called Vite to set it up.
Here’s the magic spell (command) to get things rolling:
yarn create vite my-awesome-app --template react-ts
Replace my-awesome-app with your app name. Follow the prompts, and voila — your app is ready!
- Running the App:
Once your app is prepped, open your terminal, navigate to the project directory, and cast another magic spell:
yarn dev
This will fire up the development server, and your app should appear in your browser, usually at http://localhost:5173/.
here is the code of App.tsx:
import { useEffect, useState } from "react";
import "./App.css";
import Profile from "./components/profile/Profile";


function App() {
 // Extracting the 'code' parameter from the URL query string (used for authorization)
 const urlParams = new URLSearchParams(window.location.search);
 const code = urlParams.get("code");


 // State to store the retrieved user data
 const [data, setData] = useState(null);
 // State to indicate if data is being fetched
 const [loading, setLoading] = useState(false);


 // Runs whenever the 'code' variable changes (likely on authorization flow)
 useEffect(() => {
   const token = localStorage.getItem("token");
   if (token) {
     setLoading(true); // Set loading to true while fetching data
     fetch("https://api.github.com/user", {
       headers: { Authorization: token },
     })
       .then((res) => res.json()) // Parse the response as JSON
       .then((data) => {
         setData(data); // Update state with fetched user data
         setLoading(false); // Set loading to false when done fetching
       });
   } else if (code) {
     // If no token but 'code' is available (GitHub OAuth flow)
     setLoading(true); // Set loading to true while fetching data
     fetch(
       `http://localhost:8589/oauth/redirect?code=${code}&state=YOUR_RANDOMLY_GENERATED_STATE`
     )
       .then((res) => res.json()) // Parse the response as JSON
       .then((data) => {
         setData(data.userData); // Update state with user data from response
         localStorage.setItem(
           "token",
           `${data.tokenType} ${data.token}`
         ); // Store access token in local storage
         setLoading(false); // Set loading to false when done fetching
       });
   }
 }, [code]);


 // Function to redirect the user to the GitHub OAuth authorization page
 function redirectToGitHub() {
   const client_id = "blah blah";
   const redirect_uri = "http://localhost:5173/";
   const scope = "read:user";


   const authUrl = `https://github.com/login/oauth/authorize?client_id=${client_id}&redirect_uri=${redirect_uri}&scope=${scope}`;


   window.location.href = authUrl;
 }


 // Conditionally render content based on loading state and data availability
 if (loading) {
   return <h4>Loading...</h4>;
 }


 if (data) {
   return <Profile user={data} />;
 }


 return (
   <>
     <div className="login-container">
       <h1>Login to MyApp</h1>
       <button className="github-button" onClick={redirectToGitHub}>
         <img
           src="https://github.githubassets.com/images/modules/logos_page/GitHub-Mark.png"
           alt="GitHub Logo"
         />
         Login with GitHub
       </button>
     </div>
   </>
 );
}


export default App;
1. Initiating GitHub Authorization:
- When the user clicks the “Login with GitHub” button, the redirectToGitHub function constructs a URL that initiates the OAuth 2.0 authorization flow. This URL includes: _ Client ID: A unique identifier for your app, provided by GitHub. _ Redirect URI: The URL where GitHub should redirect the user after successful authorization. _ Scope: Specifies the permissions your app requests from the user’s GitHub account.
2. Redirecting to GitHub for Authentication:
The user is redirected to GitHub’s secure login page to enter their credentials.
Upon successful authentication, GitHub grants an authorization code to your app, which is then redirected back to the specified redirect URI along with the code.
3. Exchanging Authorization Code for Access Token:
Initial Login:
_ The React app sends a request to a server-side endpoint (backend server or a secure third-party service) that handles the exchange of the authorization code for an access token.
_ The server-side endpoint communicates with GitHub’s OAuth API, exchanging the code for a token and retrieving user data.
_ The access token, which grants access to the user’s GitHub data, is then stored securely within the app for subsequent API calls.If a valid access token is already available, the app skips the code exchange and directly fetches user data from the GitHub API using the token.
4. Retrieving and Displaying User Profile Information:
Once the access token is obtained, the app calls the GitHub API to retrieve the user’s profile information, including:
_ Avatar (profile image)
_ Login (username)
_ ID (unique user identifier)
_ Follower count
_ Following count
_ Public repositoriesThe Profile component receives and renders this information, presenting a visual overview of the user’s GitHub profile.
Key Considerations:
Replace “blah blah” with your actual client ID from GitHub.
For production-level apps, employ a secure storage mechanism for access tokens, such as HttpOnly cookies or browser storage mechanisms with appropriate protections.
The loading state in App.tsx tracks API calls, displaying a loading indicator while data is fetched.
Here is the Profile component:
import "./profile.css";

type UserType = {
 avatar_url: string;
 login: string;
 id: string;
 type: string;
 followers: number;
 following: number;
 public_repos: number;
};

const Profile = ({ user }: { user: UserType }) => {
 return (
   <div className="user-info">
     <h2>User Information</h2>
     <div className="avatar-container">
       <img
         src={user.avatar_url}
         alt="User Avatar"
         className="avatar"
       />
     </div>
     <div className="info-container">
       <p>Login: {user.login}</p>
       <p>ID: {user.id}</p>
       <p>Type: {user.type}</p>
       <p>Followers: {user.followers}</p>
       <p>Following: {user.following}</p>
       <p>Public Repos: {user.public_repos}</p>
     </div>
   </div>
 );
};


export default Profile;
Implement backend server
This Python server acts like a trusted friend between your React app and GitHub. It keeps your app’s secret code safe (like a secret handshake) and helps it get the user’s information from GitHub.
server.py:
import uvicorn
from fastapi import FastAPI, HTTPException
import requests


app = FastAPI()


CLIENT_ID = "your client id"
CLIENT_SECRET = "your client secret"


@app.get("/oauth/redirect")
def oauth_redirect(code: str):
   # Exchange code for access token
   token_response = requests.post(
       "https://github.com/login/oauth/access_token",
       headers={"Accept": "application/json"},
       data={
           "client_id": CLIENT_ID,
           "client_secret": CLIENT_SECRET,
           "code": code
       }
   )


   if token_response.status_code != 200:
       raise HTTPException(
           status_code=400, detail="Error fetching access token from GitHub.")


   # Extract the access token
   token_data = token_response.json()
   print(token_data)
   access_token = token_data["access_token"]
   token_type = token_data["token_type"]


   # Fetch user profile with the access token
   user_response = requests.get(
       "https://api.github.com/user",
       headers={"Authorization": f"{token_type} {access_token}"}
   )


   if user_response.status_code != 200:
       raise HTTPException(
           status_code=400, detail="Error fetching user data from GitHub.")


   user_data = user_response.json()
   print(f'Github profile: {user_data}')


   return {"userData": user_data, "token": access_token, "tokenType": token_type}


if __name__ == '__main__':
   uvicorn.run(app, host='0.0.0.0', port=8589)
Here is a simple explanation of the code:
The server grabs your app’s special ID and secret code, like checking your badge at the door.
When it catches the code, it trades it with GitHub for a VIP pass (token) to access user information.
It sends the VIP pass (and maybe the details it gathered) back to your React app safely
Here we can see the whole flow:
Conclusion
This is just a basic setup, there are other ways to do it. But it gives you the idea! The code for this is over at Github if you want to check it out.
Next time, we might explore building your login system instead of relying on external services. Stay tuned for more coding adventures!

Top comments (0)