
What is FAST?
Microsoft FAST is a collection of technologies built on Web Components and modern Web Standards It helps you write your custom HTML elements with ease.
You can read more about web components on this mozilla docs page
What we will try to achieve?
- Set up a managed typescript project to write the components.
- Have hot reload and watch mode enabled.
- Create a web component that displays the name in uppercase based on an input attribute with an optional greeting.
Setting up the environment.
- Install Node from https://nodejs.org/en/download/ page.
- After the installation is complete, open a command line window (cmd, bash, powershell anything is fine) and type
node -v
If all is good you should see something like
~/srungta>node -v
v12.3.1
- Next, type
npm -v
If all is good you should see something like
~/srungta>npm -v
6.9.0
Creating the package
- Create a workspace folder.
mkdir FAST-playground
cd FAST-playground
- Initialize the npm package using
npm init
This should ask you a couple of questions about your package.
This is what i used.
~/FAST-playground>npm init
This utility will walk you through creating a package.json file.
It only covers the most common items, and tries to guess sensible defaults.
See 'npm help json' for definitive documentation on these fields
and exactly what they do.
Use 'npm install <pkg>' afterwards to install a package and
save it as a dependency in the package.json file.
Press ^C at any time to quit.
package name: (FAST-playground) FAST-playground
version: (1.0.0)
description: Test package to create FAST components
entry point: (index.js) index.js
test command:
git repository:
keywords: FAST
author: srungta
license: (ISC) MIT
About to write to ~/FAST-playground\package.json:
{
  "name": "FAST-playground",
  "version": "1.0.0",
  "description": "Test package to create FAST components",
  "main": "index.js",
  "scripts": {
    "test": "echo \"Error: no test specified\" && exit 1"
  },
  "keywords": [
    "FAST"
  ],
  "author": "srungta",
  "license": "MIT"
}
Is this OK? (yes) yes
~/FAST-playground>
At this point it would also be advisable to initialize a Git repo in the same directory using
git initso that you can track changes across files easily.
Adding typescript
Typescript adds much needed type support for javascript.
Webpack makes it easier to create bundles for JS, CSS and HTML files. It also helps us setup the TS to JS transpilation.
So we add typescript to the package and use that instead of plain JS.
- Install typescript using
npm install --save typescript
If you are using git, better add a
.gitignorefile withnode_modulesas one of the omissions.
- Initialize a
tsconfig.jsonfile using
~/FAST-playground>.\node_modules\.bin\tsc --init
- Edit your
tsconfig.jsonto set your preferences. I am using the below configuration. You can check the other options mentioned in the official documentation
{
  "compilerOptions": {
    "allowJs": true,
    "allowSyntheticDefaultImports": true,
    "experimentalDecorators": true,
    "module": "ES2015",
    "moduleResolution": "Node",
    "noImplicitAny": true,
    "target": "ES2015"
  },
  "files": ["src/index.ts"]
}
Add dummy typescript files
- Create a file
src/index.tswith following contents.
const adder = (a: number, b: number):number => {
    return a+ b;
}
console.log("Stuff printed from js file");
export {adder};
- In
package.json, add a build script that we will use to build this package.
...
"scripts": {
    "build": "tsc",
    ...
  },
...
- Run the build command at the package root.
npm run build
You should see a new folder called dist that has the transpiled js file.
You should also add this
distfolder to your.gitignore.
Adding a dummy HTML file
Add a index.html file with the following contents.
<!DOCTYPE html>
<html>
  <head>
    <meta charset="utf-8" />
    <title>Webpack App</title>
  </head>
  <body>
    <h1>Hello world!</h1>
    <h2>Tip: Check your console</h2>
  </body>
</html>
Adding webpack
While the tsc is sufficient for now, running it again and again after every change is annoying.
We will setup webpack as our build system, so that it can watch the changed files, generate the js files, bundle them as a single file and serve up the html (yet to be added) files.
tsccomes with a default--watchflag that we could use to watch the files for compilation. We are using webpack as it helps add plugins for other things also.
- Install webpack as a dependency.
npm install webpack webpack-cli webpack-dev-server --save-dev
- Install the loaders that we will use.
Since we want to use webpack to transpile typescript, we need a loader that can do that. We will use
ts-loader.
npm install ts-loader --save-dev
- Add webpack.config.js
Add a new file next to
package.jsoncalledwebpack.config.js. We will try to do a few things. - Process SCSS files to CSS
- Transpile TS files to JS
- Inject the bundled files in an html file to test.
- Process assets.
- Minify CSS and JS files.
We can do this using the below webpack file.
// Generated using webpack-cli https://github.com/webpack/webpack-cli
const path = require("path");
const HtmlWebpackPlugin = require("html-webpack-plugin");
const MiniCssExtractPlugin = require("mini-css-extract-plugin");
const isProduction = process.env.NODE_ENV == "production";
const stylesHandler = isProduction
  ? MiniCssExtractPlugin.loader
  : "style-loader";
const config = {
  entry: "./src/index.ts",
  output: {
    path: path.resolve(__dirname, "dist"),
  },
  devServer: {
    open: true,
    host: "localhost",
  },
  plugins: [
    new HtmlWebpackPlugin({
      template: "index.html",
    }),

    // Add your plugins here
    // Learn more about plugins from https://webpack.js.org/configuration/plugins/
  ],
  module: {
    rules: [
      {
        test: /\.(ts|tsx)$/i,
        loader: "ts-loader",
        exclude: ["/node_modules/"],
      },
      {
        test: /\.css$/i,
        use: [stylesHandler, "css-loader"],
      },
      {
        test: /\.s[ac]ss$/i,
        use: [stylesHandler, "css-loader", "sass-loader"],
      },
      {
        test: /\.(eot|svg|ttf|woff|woff2|png|jpg|gif)$/i,
        type: "asset",
      },

      // Add your rules for custom modules here
      // Learn more about loaders from https://webpack.js.org/loaders/
    ],
  },
  resolve: {
    extensions: [".tsx", ".ts", ".js"],
  },
};

module.exports = () => {
  if (isProduction) {
    config.mode = "production";
    config.plugins.push(new MiniCssExtractPlugin());
  } else {
    config.mode = "development";
  }
  return config;
};
For this webpack config to work, you need to install the dependencies as well.
npm install -D css-loader html-webpack-plugin mini-css-extract-plugin sass sass-loader style-loader
- Add webpack script to npm commands.
In your
package.jsonfile add the following scripts
...
"scripts": {
  "build": "webpack --mode=production --node-env=production",
  "build:dev": "webpack --mode=development",
  "build:prod": "webpack --mode=production --node-env=production",
  "watch": "webpack --watch",
  "serve": "webpack serve",
  "start": "webpack serve"
}
...
Type
npm run build:devto see adistfolder getting created with anindex.htmlfile and amain.jsfile.Type
npm run startto see a dev server start and your html file should pop up. Changes to your files should automatically refresh the browser.
Adding FAST element.
Now that we have the basic dev experience setup, we will start with FAST element development.
Install the FAST element package using
npm install @microsoft/fast-element
Adding the custom component.
- Create a new file called
src/PersonCard.tswith following contents.
import { attr, customElement, FASTElement, html} from "@microsoft/fast-element";
const template = html<PersonCard>`<h1>${(x) => x.shouldGreet ? "Hello" : ""} ${(x) => x.name?.toUpperCase()}</h1>`;
@customElement({
  name: "person-card",
  template: template,
})
class PersonCard extends FASTElement {
  @attr name: string;
  @attr({ mode: 'boolean' }) shouldGreet: boolean;
}
export { PersonCard };
- Export the newly created web component.
Update your
index.tswith the following
export * from "./PersonCard";
You can remove rest of the dummy code.
- Update your
index.htmlfile to use your new web component.
<!DOCTYPE html>
<html>
...
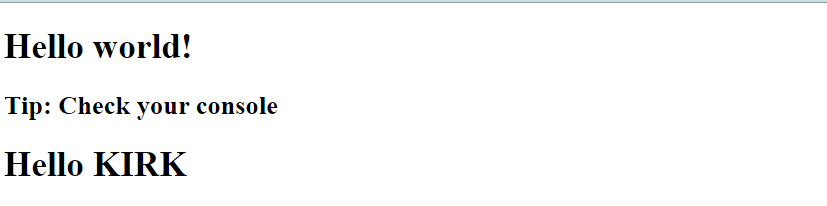
<body>
<h1>Hello world!</h1>
<h2>Tip: Check your console</h2>
<person-card name="Kirk" shouldGreet></person-card>
</body>
</html>
Run npm run start to see the web component in action.
Voila. Your first web component works.
Keep committing your changes at regular intervals as checkpoints.
BONUS : Setup up storybook
Storybook JS is a nifty tool for UI component testing.
We will setup a storybook so that we can test the web component in isolation.
Add storybook js
We will use the storybook init command to add storybook dependencies automatically.
At project root, runnpx sb initChoose the
htmloption.
√ Do you want to manually choose a Storybook project type to install? ... yes
√ Please choose a project type from the following list: » html
- This command should add the dependencies in
package.json, it will also add the related scripts and some sample stories.
Adding stories for PersonCard
- Create a file named
src/PersonCard.stories.tswith following contents.
import { Story, Meta } from "@storybook/html";
import { PersonCard } from ".";
PersonCard;
export default {
  title: "Components/PersonCard",
  argTypes: {
    name: { control: "text" },
    shouldGreet: { control: "boolean" },
  },
} as Meta;
const Template: Story<{ name: string; shouldGreet: boolean }> = (args) => {
  return `<person-card  name="${args.name}" shouldGreet="${args.shouldGreet}"></person-card>`;
};
export const Primary = Template.bind({});
Primary.args = {
  name: "Captain Kirk",
  shouldGreet: true
};
- Run
npm run build-storybookto build and thennpm run storybookto start your storybook. You will get an error if the sortTypeError: Cannot read property 'get' of undefinedThis is being tracked as a Github issue on the storybookjs repo. DefinePlugin cannot read property 'get' of undefined
You should add
storybook-staticto your.gitignore
- Based on the suggestion in the issue, run this command to install
dotenv-webpack
npm install dotenv-webpack
- Run
npm run storybookagain to start your storybook. You should see an option in left nav withPersonCardtitle. Click on it and you should see a UI like below.
Click on person card. But why does the UI does not show the text?
This is because there is an existing issue with storybook.
Storybook uses babel as a transpiler for typescript instead of ts-loader.
We can force storybook to use ts-loader by updating the .storybook/main.js.
This is what is also done in the official FAST repo
module.exports = {
  stories: ["../src/**/*.stories.mdx", "../src/**/*.stories.@(js|jsx|ts|tsx)"],
  addons: ["@storybook/addon-links", "@storybook/addon-essentials"],
  webpackFinal: async (config) => {
    config.module.rules.push({
      test: /\.ts$/,
      use: [
        {
          loader: require.resolve("ts-loader"),
        },
      ],
    });
    return config;
  },
};
The UI will still not pick up. By default installing ts-loader adds the latest version to package.json.
However FAST elements in storybook do not work with that version for some reason 😢.
This can be fixed by running
npm install -D ts-loader@^7.0.2
This is the same version that the official FAST repo uses. Link to the Github repo
Rerun npm run storybook and things should work now with a UI like below. 😊

Change the text in the controls and see it live in action.
Fin.

Top comments (0)