
This post was originally published at StepZen.
You're building a modern app using React. You likely have a number of backend systems providing the data. Using StepZen, you can easily connect all those backends in a unified GraphQL API and query all your data at once. Now, with one command you can create a React app preconfigured with your unified GraphQL API.
A StepZen CLI tool enables you to quickly start building a new React app, with everything set up for you to bootstrap your app.
npx create-stepzen-app
- Your project structure is created for you. It includes the React app folders
publicandsrc, and astepzenfolder, which contains a set of sample GraphQL files that connect the data that powers your app. - A simple default GUI (or single page) lets you visualize how the React app consumes and uses the data provided by the StepZen GraphQL API. In a subsequent blog post, we'll show you how to easily customize this interface.
Getting Started with npx create-stepzen-app
First, you'll need to be logged in to your StepZen account. If you don't have an account, sign up for free.
Then, run this command from your terminal:
npx create-stepzen-app your-project-folder-name-here
This creates the project structure for your React app. We'll take a look at this below but first let's take a look at the simple default UI created with this command.
The Default User Interface
Besides spinning up your StepZen endpoint and a React app starter,npx create-stepzen-app provides a default single page so that you can visualize the default StepZen template before adding your own customizations.
Inside your project folder, run npm start to lauch the UI:
Before we dive into the folder structure, note a couple of things.
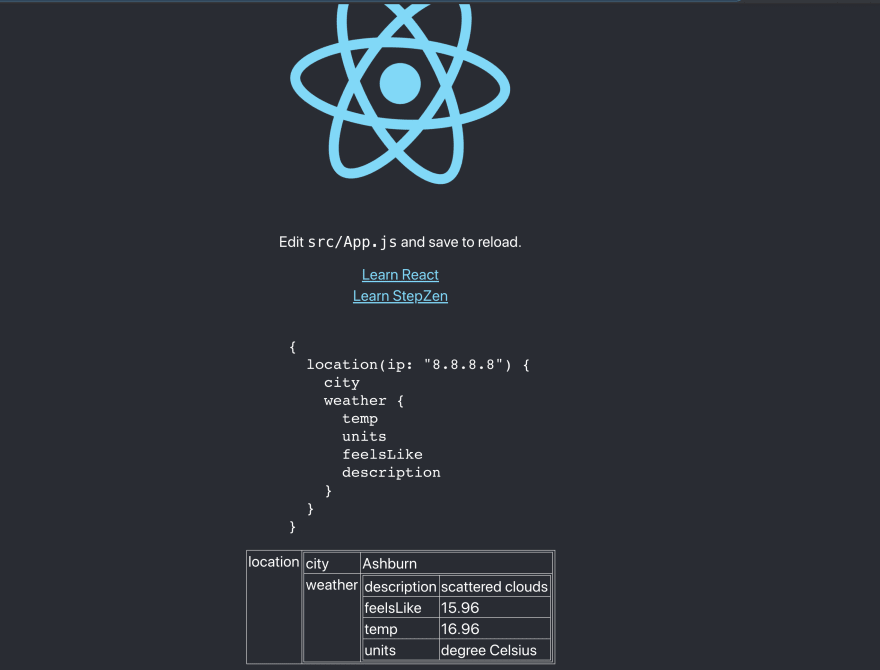
Your GraphQL API is up and ready right out of the box. As an example, our starter template has a pre-built GraphQL API connecting two backends, ip-api geolocation API and OpenWeatherMap.
We can query the OpenWeatherMap API to get the weather, based on the location that a query to ip-api provides. As you can see, the location is pre-set to Ashburn in our starter template, and data on the weather is also returned for that location.
Your Folder Structure
Now, cd into your folder and let's take a look at your project structure. Alongside the public and src React app folders, we have a stepzen folder. Inside this folder are two subdirectories, ip-api and openweathermap. You'll also see an index.graphql file.
├── _ip-api
│   └── ipapi.graphql
├── _openweathermap
│   └── openweathermap.graphql
└── index.graphql
Your ip-api folder holds the IP-API schema, just as your openweathermap folder holds the OpenWeatherMap schema.
index.graphql ties the schemas together using a comma-separated list of files, which lets StepZen know that these files contain the types and queries we want to use.
If you want more details on how this example works, see our HelloWorld tutorial, which walks through the example in more detail.
For more on designing your own schemas with StepZen, see our docs on how to design a schema.
User Interface Code: Understanding How the React app consumes the data from the StepZen endpoint
How is the data coming in from the StepZen endpoint consumed? Let's check it out in src/HelloWord.js.
At the top of the imports you'll see that we're using graphql-request to make our graphql requests.
import { GraphQLClient, gql } from "graphql-request";
import { useEffect, useState } from "react";

const { REACT_APP_STEPZEN_API_KEY, REACT_APP_STEPZEN_URI } = process.env;

const GET_STEPZEN = gql`
  {
    location(ip: "8.8.8.8") {
      city
      weather {
        temp
        units
        feelsLike
        description
      }
    }
  }
`;
Next, we import React. Lastly, you see the evironment variables we need to import. If you'd like to read more about the StepZen URI and API key, check out our docs on connecting to StepZen.
Then, we create the GET_STEPZEN variable which uses the graphql-request library to make the query inside the backticks.
Let's go deeper.
Styles are set beneath the imports:
const styles = {
  table: {
    borderLeft: "1px solid #ccc",
    borderTop: "1px solid #ccc",
    textAlign: "left",
  },
  tbody: {
    verticalAlign: "top",
  },
  td: {
    borderBottom: "1px solid #ccc",
    borderRight: "1px solid #ccc",
    padding: "10px",
  },
  span: {
    padding: "5px 10px",
  },
  link: {
    marginTop: "20px",
  },
};
Next, we've got the StepZenResults function which takes in data and returns it as a convenient-to-read table on the page:
const StepZenResults = ({ data }) => {
  return (
    <div>
      <table style={styles.table}>
        <tbody style={styles.tbody}>
          {Object.keys(data).map((key) => (
            <tr key={key}>
              {!Array.isArray(data) && (
                <td style={styles.td}>
                  <span>{key}</span>
                </td>
              )}
              {(() => {
                if (data[key] && typeof data[key] === "object") {
                  return (
                    <td style={styles.td}>
                      <StepZenResults data={data[key]} />
                    </td>
                  );
                }
                return (
                  <td style={styles.td}>
                    <span>{data[key]}</span>
                  </td>
                );
              })()}
            </tr>
          ))}
        </tbody>
      </table>
    </div>
  );
};
And lastly, our HelloWorld function.
function HelloWorld() {
  const [data, setData] = useState();

  useEffect(() => {
    (async () => {
      const graphQLClient = new GraphQLClient(REACT_APP_STEPZEN_URI, {
        headers: {
          Authorization: `Apikey ${REACT_APP_STEPZEN_API_KEY}`,
        },
      });
      const result = await graphQLClient.request(GET_STEPZEN);
      setData(result);
    })();
  }, []);

  if (!data) {
    return <p>Loading ...</p>;
  }

  return (
    <>
      <a
        className="App-link"
        href="https://stepzen.com"
        target="_blank"
        rel="noopener noreferrer"
        style={styles.link}
      >
        Learn StepZen
      </a>
      <pre style={{ textAlign: "left" }}>
        {GET_STEPZEN}
      </pre>
      <StepZenResults data={data} />
      <br />
      <br />
      <br />
    </>
  );
}
First, we track the data using useState.
Then, in our useEffect function, we use our environment variables as well as the GET_STEPZEN variable to make our request, which we then store with useState.
Our loading paragraph ensures a smooth user experience, and then we return the HelloWorld component, making sure to pass in our current data as a prop for StepZenResults.
And there you have it! That's how we made the page you see in the browser upon running npm start.
Where To Go From Here
This is cool, but how do you switch out the weather by location sample and create a GraphQL API that connects the backend data sources of your choice?
Stay tuned for our upcoming blog post in the series, which will teach you how to customize an npx-create-stepzen app.

Top comments (0)