
In this tutorial, you will learn how to build a productivity tips app using Render, Remix and Strapi.
The productivity app will have the following:
- A landing page that describes the app,
- A
/tipspage to view all the productivity tips in the database, and - A page that displays the other details of a productivity tip.
This productivity tips web app is an app that displays a list of tips to improve productivity. This app works by passing tips and information about them from the app’s database to the frontend.
You can get the final project in the Strapi repo and the Remix repo.
Prerequisites
To follow this article, you will need knowledge of the following:
- JavaScript
- Basic Remix
- Basic Strapi
You also need the following installed:
Why Remix?
Remix is a web framework that allows you to concentrate on the user interface, while taking care of the speed and responsiveness of your application. Remix uses nested routing, which promotes effective interaction between a frontend and one or more backends.
The productivity tips application consists of both a frontend using Remix and a backend using Strapi. Effective communication between ends of the application leads to a better and faster user experience.
Why Strapi?
Strapi is an open-source headless CMS that allows you to build GraphQL and RESTful APIs. A headless CMS allows developers to easily create APIs that can be integrated with any frontend.
A CMS (Content Management System) is a software that allows users to create and maintain contents for a web application. A headless CMS is just like a regular CMS, but it does not have a frontend that people interact with.
With Strapi you can create an API that is the following:
- Easily integrated with any frontend,
- Customizable,
- Easy to maintain, and
- Easily developed.
Why Render?
Render is a cloud service that allows you to deploy and run your websites, apps, and much more. With render you can set up and deploy your entire project with a single configuration file. This configuration file acts as a blueprint for setting up your project.
To get your Remix website and the Strapi app running, you need to deploy them on a cloud. After deploying the applications, you can access them using the domain name provided by the cloud provider, or you can add a custom domain name.
The Strapi Application
Before you start, make sure you have a GitHub Account, then follow the steps below:
- Open this repo in your browser.
- Click Use this template button to copy the repo to your account.

- Click Create repository from template after filling any name as the repo name (you don't need to include all branches).
- Clone your copy of the repo to your local machine.
- Navigate to the local repo in your terminal.
- Run
yarn installto install the dependencies. - Run
cp .env.example .envto copy the environment variables from.env.exampleto.env. - Run
yarn developto start the strapi application in development mode.
After setting up and starting the Strapi application, you need to do a few things:
- Open the http://localhost:1337/admin page in your browser.
- Create an admin account in the admin page.

The Strapi application in the repo already has the productivity tip's Content Type setup. You can see it by navigating to Content Type Builder -> Tip.

Before using your API, you need to add sample productivity tips:
- Navigate to Content Manager.
- Click Create New Entry.
- Fill the boxes and choose an author.
- Click Save.
You can also add more tips to your application before continuing if you want.

Now, you are done with setting up the Strapi app. You can begin to create the frontend.
The Remix App
To create the remix app, follow the below steps:
- Fork this repository to your GitHub account.
- Clone the forked repository to your local machine.
-
cdinto the local repository - Run
npm installto install its dependencies.
This repository is split into five (5) branches, each showing the steps taken to build the application.
Step 1: Initialize the Remix App
The link to this step is available here. In this branch, the remix application was created and initialized. When you run npm run dev in this branch, the web application looks like the below:

Step 2: Add Styling
The link to this step is available here.
To switch to this branch, use git checkout step-2. The changes made in this step were to the app/root.tsx file:
1. Import the Pico CSS library.
    import {
      Link,
      Links,
      LiveReload,
      Meta,
      Outlet,
      Scripts,
      ScrollRestoration,
    } from "remix";

    export function links () {
      return [{
        rel: "stylesheet",
        href: "https://unpkg.com/@picocss/pico@latest/css/pico.min.css"
      }]
    }

    export function meta() {
      return { title: "Productivity Tips" };
    }

    export default function App() {
      return (
        <html lang="en">
          <head>
            <meta charSet="utf-8" />
            <meta name="viewport" content="width=device-width,initial-scale=1" />
            <Meta />
            <Links />
          </head>
          <body>
            <nav style={{marginLeft: 10}}>
              <h1>
                <Link to="/" style={{color: "var(--h1-color)"}}>
                  Productivity Tips
                </Link>
              </h1>
            </nav>
            <Outlet />
            <ScrollRestoration />
            <Scripts />
            <LiveReload />
          </body>
        </html>
      );
    }
2. Change the page title
    import {
      Link,
      Links,
      LiveReload,
      Meta,
      Outlet,
      Scripts,
      ScrollRestoration,
    } from "remix";

    export function links () {
      return [{
        rel: "stylesheet",
        href: "https://unpkg.com/@picocss/pico@latest/css/pico.min.css"
      }]
    }

    export function meta() {
      return { title: "Productivity Tips" };
    }

    export default function App() {
      return (
        <html lang="en">
          <head>
            <meta charSet="utf-8" />
            <meta name="viewport" content="width=device-width,initial-scale=1" />
            <Meta />
            <Links />
          </head>
          <body>
            <nav style={{marginLeft: 10}}>
              <h1>
                <Link to="/" style={{color: "var(--h1-color)"}}>
                  Productivity Tips
                </Link>
              </h1>
            </nav>
            <Outlet />
            <ScrollRestoration />
            <Scripts />
            <LiveReload />
          </body>
        </html>
      );
    }
3. Add "Productivity Tips" header and link it to /
    import {
      Link,
      Links,
      LiveReload,
      Meta,
      Outlet,
      Scripts,
      ScrollRestoration,
    } from "remix";

    export function links () {
      return [{
        rel: "stylesheet",
        href: "https://unpkg.com/@picocss/pico@latest/css/pico.min.css"
      }]
    }

    export function meta() {
      return { title: "Productivity Tips" };
    }

    export default function App() {
      return (
        <html lang="en">
          <head>
            <meta charSet="utf-8" />
            <meta name="viewport" content="width=device-width,initial-scale=1" />
            <Meta />
            <Links />
          </head>
          <body>
            <nav style={{marginLeft: 10}}>
              <h1>
                <Link to="/" style={{color: "var(--h1-color)"}}>
                  Productivity Tips
                </Link>
              </h1>
            </nav>
            <Outlet />
            <ScrollRestoration />
            <Scripts />
            <LiveReload />
          </body>
        </html>
      );
    }
When you run this program, the web app will look the below:

Step 3: Edit the Content [Add the Tips]
The link to this step can be found here.
To switch to this branch use the git checkout step-3 command.
The file changed in this step is src/index.tsx, and the following were the changes made:
1. Add a paragraph that describes the app:
    import { Link } from "remix";

    export default function Index() {
      return (
        <main className="container">
          <p>
            Over time everyone develops a Swiss army knife of tips, tricks,
            and hacks to boost productivity. At Render, I created a
            #productivity-tips Slack channel for anyone to share their best
            productivity boosters with everyone on the team. Using
            <a href="https://strapi.io">Strapi</a> and
            <a href="https://remix.run">Remix</a>, we made a little web app to
            catalog all of these tips and share them with others. 🤓
          </p>
          <Link to="/tips">👉 Productivity Tips</Link>
        </main>
      );
    }
2. Add a link to /tips
    import { Link } from "remix";

    export default function Index() {
      return (
        <main className="container">
          <p>
            Over time everyone develops a Swiss army knife of tips, tricks,
            and hacks to boost productivity. At Render, I created a
            #productivity-tips Slack channel for anyone to share their best
            productivity boosters with everyone on the team. Using
            <a href="https://strapi.io">Strapi</a> and
            <a href="https://remix.run">Remix</a>, we made a little web app to
            catalog all of these tips and share them with others. 🤓
          </p>
          <Link to="/tips">👉 Productivity Tips</Link>
        </main>
      );
    }
/tips is a page that will be created in the next step. This page holds a list of all the tips stored in the Strapi backend.
When you run the program at this step, the web application looks like the below:

Step 4: Create New Files
The link to this step can be found here
The following are new files created in this step:
-
app/routes/tips.jsxfile, which is the template that shows both the content of the list of tips and individual tips details.
    import { Outlet } from "remix";

    export default function TipsRoute() {
      return (
        <main className="container">
          <Outlet />
        </main>
      );
    }
-
index.jsxfile inside a newapp/routes/tipsfolder. This component will be rendered in place of the<Outlet />above.
    import { Link, useLoaderData } from "remix";
    import { checkStatus, checkEnvVars } from "~/utils/errorHandling";

    export async function loader () {
      checkEnvVars();

      const res = await fetch(`${process.env.STRAPI_URL_BASE}/api/tips?populate=*`, {
        method: "GET",
        headers: {
          "Authorization": `Bearer ${process.env.STRAPI_API_TOKEN}`,
          "Content-Type": "application/json"
        }
      });

      // Handle HTTP response code < 200 or >= 300
      checkStatus(res);

      const data = await res.json();

      // Did Strapi return an error object in its response?
      if (data.error) {
        console.log('Error', data.error)
        throw new Response("Error getting data from Strapi", { status: 500 })
      }

      return data.data;
    }

    export default function Tips() {
      const tips = useLoaderData();

      return (
        <ul>
          {tips.map((tip) => (
            <li key={tip.attributes.Slug}>
              <Link to={tip.attributes.Slug}>{tip.attributes.Name}</Link>
            </li>
          ))}
        </ul>
      );
    }
-
errorHandling.jsinside a newapp/utilsfolder. TheerrorHandling.jsfolder provides thecheckEnvVars()andcheckStatusfolder that theapp.routes/tips/index.jsxfolder.
    // Custom error class for errors from Strapi API
    class APIResponseError extends Error {
        constructor(response) {
            super(`API Error Response: ${response.status} ${response.statusText}`);
        }
    }

    export const checkStatus = (response) => {
        if (response.ok) {
            // response.status >= 200 && response.status < 300
            return response;
        } else {
            throw new APIResponseError(response);
        }
    }

    class MissingEnvironmentVariable extends Error {
        constructor(name) {
            super(`Missing Environment Variable: The ${name} environment variable must be defined`);
        }
    }

    export const checkEnvVars = () => {
        const envVars = [
            'STRAPI_URL_BASE',
            'STRAPI_API_TOKEN'
        ];

        for (const envVar of envVars) {
            if (! process.env[envVar]) {
                throw new MissingEnvironmentVariable(envVar)
            }
        }
    }
In the index.jsx file, the useLoaderData() function calls the loader function on lines 4-27. the loader function is helpful for separating the program that interacts with APIs, from the view.
    import { Link, useLoaderData } from "remix";
    import { checkStatus, checkEnvVars } from "~/utils/errorHandling";

    export async function loader () {
      checkEnvVars();

      const res = await fetch(`${process.env.STRAPI_URL_BASE}/api/tips?populate=*`, {
        method: "GET",
        headers: {
          "Authorization": `Bearer ${process.env.STRAPI_API_TOKEN}`,
          "Content-Type": "application/json"
        }
      });

      // Handle HTTP response code < 200 or >= 300
      checkStatus(res);

      const data = await res.json();

      // Did Strapi return an error object in its response?
      if (data.error) {
        console.log('Error', data.error)
        throw new Response("Error getting data from Strapi", { status: 500 })
      }

      return data.data;
    }

    export default function Tips() {
      const tips = useLoaderData();

      return (
        <ul>
          {tips.map((tip) => (
            <li key={tip.attributes.Slug}>
              <Link to={tip.attributes.Slug}>{tip.attributes.Name}</Link>
            </li>
          ))}
        </ul>
      );
    }
Before running the application, you need to complete the following steps:
- Open the Strapi dashboard.
- Navigate to Settings --> API Tokens --> Create new API, to create an API token

- Click Save after filling the necessary fields.
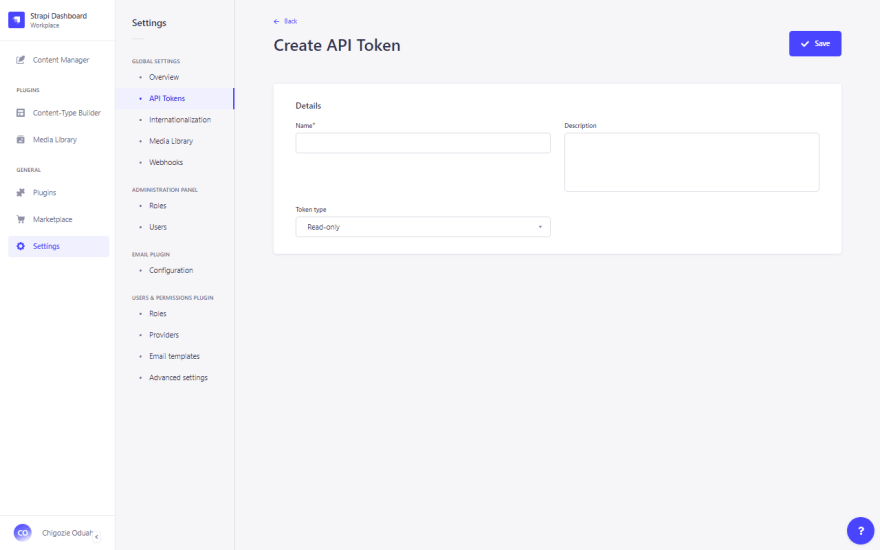
- Copy the generated API token.

- Copy the new contents of the
.env.examplefile to.env.
    STRAPI_URL_BASE=http://localhost:1337
    STRAPI_API_TOKEN=a-secret-token-from-the-strapi-admin-gui
- Replace
a-secret-token-from-the-strapi-admin-guiwith the API token, then click Save. >If you are using windows, you might need to change theSTRAPI_URL_BASE's value tohttp://127.0.0.1:1337.
After running your application with the npm run dev command, the web application should look like the below:


Step 5: Define Dynamic Routes and Style
In this step, the following files are created:
-
app/routes/tips/$tipId.jsx. Remix uses files that begin with a dollar sign to define dynamic URL routes. -
app/styles/tip.css. This file holds contains the styling for the grid of screenshot images
In the $tipId.jsx file, the following is what happens:
- Import the
tip.cssfile into the$tipId.jsxfile.
    import { useLoaderData, Link } from "remix";
    import { checkStatus, checkEnvVars } from "~/utils/errorHandling";

    import stylesUrl from "~/styles/tip.css";

    export function links () {
      return [{ rel: "stylesheet", href: stylesUrl }];
    }


    export function meta ({ data }) {
      return {
        title: data.attributes.Name
      }
    }

    export async function loader ({ params }) {
      ...
- Create the
TipRoutecomponent that is exported by default.
    ...
    export default function TipRoute() {
      const tip = useLoaderData();

      return (
        <div>
          <Link to="/tips" style={{ textDecoration: 'none' }}>← back to list</Link>
          <hgroup>
            <h2>{tip.attributes.Name}</h2>
            <h3>by {tip.attributes.Author.data?.attributes.firstname ?? 'an unknown user'}</h3>
          </hgroup>

          <p>
            {tip.attributes.Description}
          </p>
          <div className="grid">
            {tip.attributes.Screenshots.data.map((s) => (
              <div key={s.attributes.hash}>
                <img
                  src={s.attributes.formats.thumbnail.url}
                  alt={tip.attributes.Name + ' screenshot'}
                />
              </div>
            ))}
          </div>
        </div>
      );
    }
- Create a
loaderfunction foruseLoaderData()hook in the TipRoute component.
    import { useLoaderData, Link } from "remix";
    import { checkStatus, checkEnvVars } from "~/utils/errorHandling";

    import stylesUrl from "~/styles/tip.css";

    export function links () {
      return [{ rel: "stylesheet", href: stylesUrl }];
    }

    export function meta ({ data }) {
      return {
        title: data.attributes.Name
      }
    }

    export async function loader ({ params }) {
      checkEnvVars();

      const res = await fetch(`${process.env.STRAPI_URL_BASE}/api/tips`
        + `?populate=*&filters[Slug]=${params.tipId}`, {
        method: "GET",
        headers: {
          "Authorization": `Bearer ${process.env.STRAPI_API_TOKEN}`,
          "Content-Type": "application/json"
        }
      })

      // Handle HTTP response code < 200 or >= 300
      checkStatus(res);

      const data = await res.json();

      // Did Strapi return an error object in its response?
      if (data.error) {
        console.log('Error', data.error)
        throw new Response("Error getting data from Strapi", { status: 500 })
      }

      // Did Strapi return an empty list?
      if (!data.data || data.data.length === 0) {
        throw new Response("Not Found", { status: 404 });
      }


      const tip = data.data[0];

      // For a Tip with no screenshot, replace API returned null with an empty array
      tip.attributes.Screenshots.data = tip.attributes.Screenshots.data ?? [];

      // Handle image URL being returned as just a path with no scheme and host.
      // When storing media on the filesystem (Strapi's default), media URLs are
      // return as only a URL path. When storing media using Cloudinary, as we do
      // in production, media URLs are returned as full URLs.
      for (const screenshot of tip.attributes.Screenshots.data) {
        if (!screenshot.attributes.formats.thumbnail.url.startsWith('http')) {
          screenshot.attributes.formats.thumbnail.url = process.env.STRAPI_URL_BASE +
            screenshot.attributes.formats.thumbnail.url;
        }
      }
      return tip;
    }
    ...
In the loader function, the following happens:
- Use
checkEnvVars()function to check if all the environment variables needed are present. - Make a request to the
http://localhost:1337/api/tipsroute (The URL contains parameters that Strapi uses to specify the request). - Use the
checkStatus()function to check that the http status is alright ( between 200 to 299 ). - Check if strapi returned an error in its response. Sometimes, Strapi responds with an error object while having an OK http status.
- Check if strapi returned an empty list. If there's no productivity tip at the id, Strapi returns an empty list.
- Handle routing for the images in a tip. Strapi uses the local filesystem when it is storing file uploads, and uses a cloud server. When it is from the development server, Strapi doesn't respond with the URL to the file, it only responds with its local path.
When you run the application at this point, the http://localhost:3000/tips/tip page should look like the below:

Deploy to Render
Before deploying your project to the cloud, you need to follow the below steps:
- Open the
strapiconf2022-workshop-strapirepo. - Change the value of the
repos in the/render.yamlfile to URL of your remote strapi and remix repo ( In your case it might behttps://github.com/your-username/strapiconf2022-workshop-strapiandhttps://github.com/your-username/strapiconf2022-workshop-remix).
    services:
      - type: web
        name: productivity-tips-api
        env: node
        plan: free
        # Update the following line with your Strapi GitHub repo
        repo: https://github.com/render-examples/strapiconf2022-workshop-strapi
        branch: main
        buildCommand: yarn install && yarn build
        startCommand: yarn start
        healthCheckPath: /_health
        envVars:
          - key: NODE_VERSION
            value: ~16.13.0
          - key: NODE_ENV
            value: production
          - key: CLOUDINARY_NAME
            sync: false
          - key: CLOUDINARY_KEY
            sync: false
          - key: CLOUDINARY_SECRET
            sync: false
          - key: DATABASE_URL
            fromDatabase:
              name: strapi
              property: connectionString
          - key: JWT_SECRET
            generateValue: true
          - key: ADMIN_JWT_SECRET
            generateValue: true
          - key: API_TOKEN_SALT
            generateValue: true
          - key: APP_KEYS
            generateValue: true

      - type: web
        name: productivity-tips-web
        env: node
        plan: free
        # Update the following line with your Remix GitHub repo
        repo: https://github.com/render-examples/strapiconf2022-workshop-remix
        branch: step-5
        buildCommand: npm install && npm run build
        startCommand: npm start
        envVars:
          - key: STRAPI_URL_BASE
            fromService:
              type: web
              name: productivity-tips-api
              envVarKey: RENDER_EXTERNAL_URL

    databases:
      - name: strapi
        plan: free # This database will expire 90 days after creation
- Save the changes, and push to the remote repository.
    $ git add render.yaml
    $ git commit
    $ git add
- Login to the Render dashboard.
- Click on New and select Blueprint.
- Add the repository that the render application can find the
render.yamlfile. In this case, thestrapiconf2022-workshop-strapirepo.
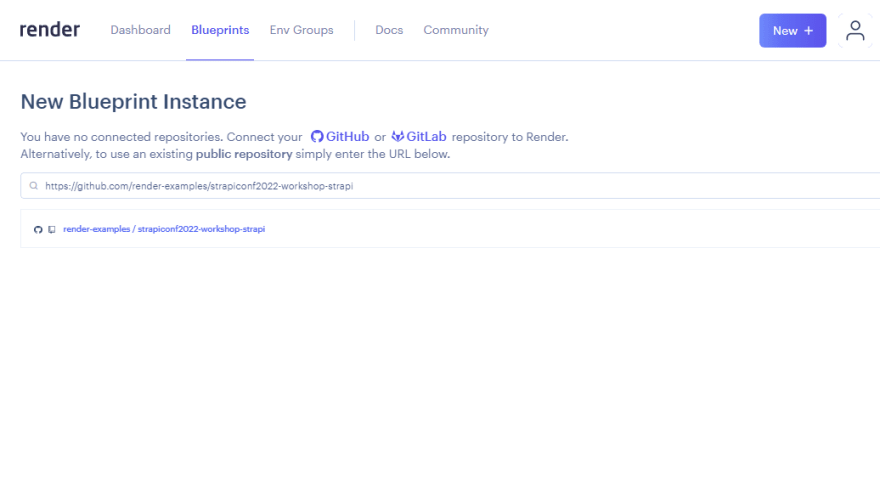
When you select the repo, you will be prompted to add the following details:
- The
Service Group Name. This is a unique name that is used to identify your project within your account. - The
CLOUDINARY_NAME - The
CLOUDINARY_KEY - The
CLOUDINARY_SECRET

To get the value for the last three fields above, you need to do the following:
- Login to the Cloudinary dashboard.

- Click Start configuring.

-
Copy the values of the following fields:
cloud_nameapi_key-
api_secret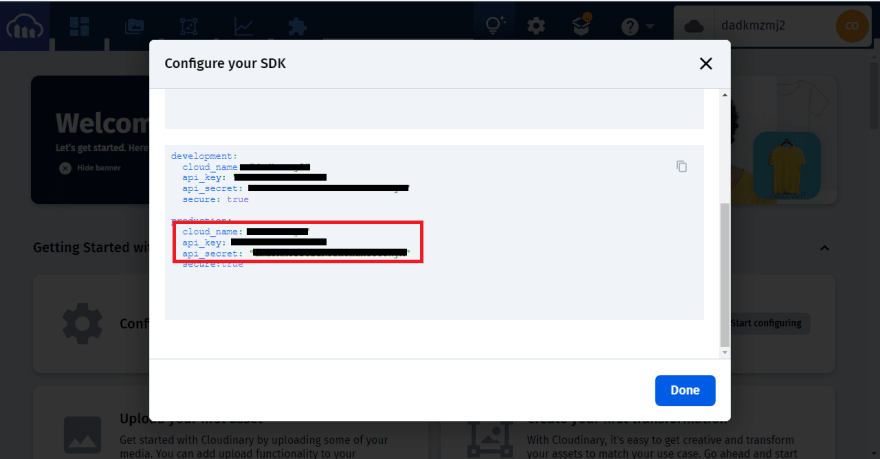
-
Paste the copied values in the following respectively:
- The
CLOUDINARY_NAME - The
CLOUDINARY_KEY - The
CLOUDINARY_SECRET
- The
After filling the fields, click Apply
 Then you wait for Render to deploy your application.
Conclusion
Once your application has been deployed, you can see the address of your deployed application by navigating to the dashboard, then select:
-
productivity-tips-webfor the Remix app -
productivity-tips-apifor the Strapi app
After selecting any of the above, you will see the domain name that anyone can use to access your web application.
To get the application up and running, you need to do the following:
- Navigate to the Strapi application's admin dashboard ( at
/admin). - Navigate to Settings --> API Tokens --> Create new API token
- Copy the generated API token.
- Open the
productivity-tips-webservice - Navigate to Environment and click Add Environment Variables
- Set the key as
STRAPI_API_TOKENand paste the generated API token - Click on Save Changes to redeploy your application.
After setting up your application, you can now add productivity tips to your application from the Strapi backend, and you can now fully use the web application.
To further your knowledge, be sure to check out the following links:

Top comments (0)