
By implementing internationalization (often abbreviated as i18n) on your site, you can gain a competitive advantage by accessing unreached markets first. Internationalization is the practice of designing a product with the intention of bringing it to an international audience. Whether you’re running an online news website, a blog, or an e-course, customers are far more likely to interact with content in their native languages.
In the online world, you’ll quickly find that there’s significant inequality in terms of the content provided. For instance, you’ll find English content on more than 60% of the internet, but native English-speaking users only represent 25% of the online population. On the other hand, 19% of users on the internet are Chinese, but they only have access to 1.3% of the content in their native language. This gives businesses the opportunity to close the gap between demand and offerings.
Thanks to Strapi and its internationalization plug-in, developers can now quickly and easily create content in multiple locales and serve the localized content to their users. In this tutorial, you’ll learn how to set up i18n features in Strapi and Next.js projects using the capabilities offered by both Strapi and Next.js.
What Is Internationalization?
Before you begin the tutorial, it’s important to understand the difference between internationalization and localization (L10n). The two terms are often used interchangeably but are quite different.
Internationalization is the process of developing your software so it can be localized to a particular audience that may vary based on culture, language, or region. For example, it could mean removing all the hard-coded strings in your application and putting them in a JSON file.
Localization, on the other hand, occurs after internationalizing your software and consists of adding support (content, images, etc.) for a particular audience; for example, taking those hard-coded strings in the JSON file and translating them for a French-speaking audience.
In internationalization, developers often refer to the term locale, which represents an audience for a particular region. For example, you could have an en locale that would represent all the English speakers. However, as you can imagine, British English speakers and American English speakers sometimes use different terms (ie soccer vs. football). As a result, two different locales were invented for these two audiences: en-US and en-GB.
The good news is that with internationalization and a tool like Strapi, websites like that of FIFA can offer localized content. On one website, British fans can see the term football and Americans can see soccer. Even within the same country, educators in Switzerland, a country famous for its multilingualism, can internationalize their online courses to offer support for their many audiences, or Canadian food bloggers can use one site with support for both anglophones and French Canadians.
Implementing Internationalization in Strapi
In this tutorial, you’ll create a website listing recipes. Users will be able to change the language of your site, and the localized content will be fetched from your backend Strapi project.
Set Up a Strapi Project
To begin, open a new terminal window and run this command to generate a new project:
    yarn create strapi-app my-project --quickstart
    # or
    npx create-strapi-app my-project --quickstart
With the --quickstart flag, a new browser tab will open, prompting you to set up your new project. Fill out the form with your information and click "Let’s start":
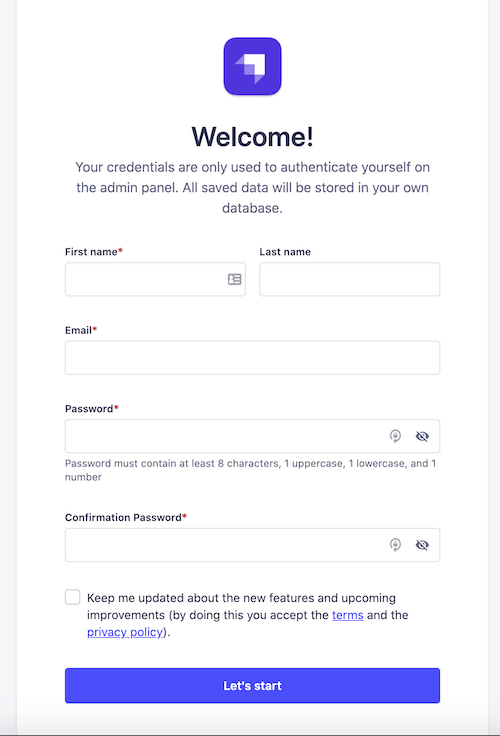
And now you have a shiny new Strapi project!
Set Up a Next.js Project as the Frontend
Creating a Next.js project is very straightforward. In a new terminal tab, run the create command and choose the name of your project:
    npx create-next-app@latest
    # or
    yarn create next-app
Then run yarn dev or npm start to start your server.
Once done, you should have your Strapi backend running on port 1337 and your Next.js frontend on port 3000.
Implement Internationalization in Strapi
Now you need to go back to your Strapi project and make sure that internationalization is enabled. Navigate to General > Plugins and make sure that internationalization appears in the list of installed plug-ins:
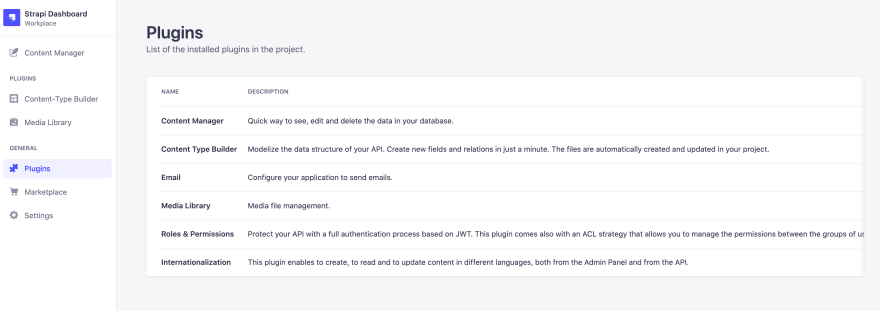
Internationalization is automatically included with Strapi applications running version 3.6.0. If you use an older version and don’t have the internationalization plug-in, you can install it by visiting the Marketplace and running this terminal command:
    yarn strapi install i18n
    # or
    npm run strapi install i18n
If you need more details, don’t hesitate to check Strapi’s documentation.
Once the plug-in is installed, it’s time to set up your new locale. Head to Global Settings > Internationalization and click on "Add new locale". For the sake of this tutorial, you can choose to create a new locale for the French Canadian market by selecting French (Canada) (fr-CA):

Note: You cannot create a custom locale, but the current list (included in the drop-down menu) contains an exhaustive catalog of languages and countries for you to choose from.
If you want to choose a default locale other than English, you can click on "Advanced Settings and check the box to set your new locale as the default one:

Now it’s time to create your content. For your project, you’ll need a Recipe collection type. Head to Plugins > Content-Type Builder.
You might be unfamiliar with the concept of a collection type. They’re like models in a database. They allow developers to define a set of fields and manage several entries of the same type. For example, a blog would have a Post collection type. When retrieving these posts, you would get your content as a list of entries with the same field (title, creation date, etc.).
Click on Create new collection type and enter “Recipe” in the Display name:

Click Continue. And then you’ll be prompted to create a field. This time, click on Text and enter “title” in the input labeled name:

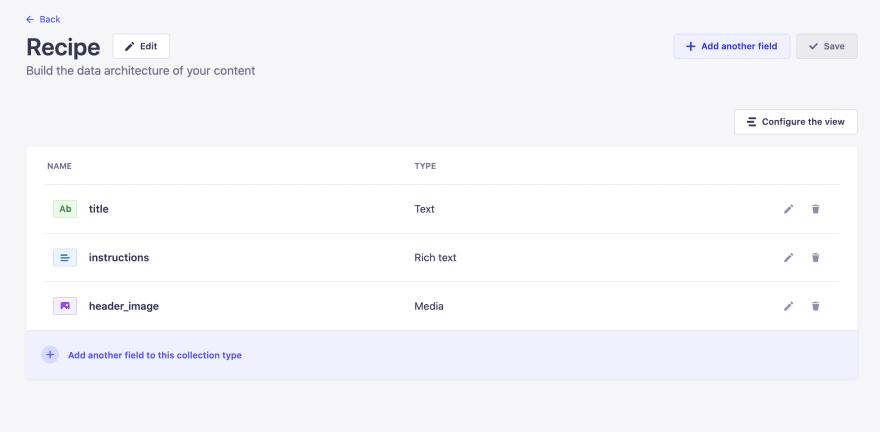
Select Finish. And you’ll be taken to your new Collection Type with your newly created title field. Then click on Add another field and choose Rich text. This time, enter “instructions” as the name. This field will contain all the measurements and steps for your recipe.
You can add as many fields as you want. For this tutorial, you also need to create a media field with a single media type called “header_image” to store an image for your recipes. When done, click Save.
Your newly saved recipe collection type will look like this:
Before you create your new content, you need to enable localization for this collection. In Content-Type Builder > Recipe, click on Edit. Inside the pop-up, click Advanced Settings and check the box labeled Enable localization for this Content-Type:

With your collection type saved and localization enabled, you can begin to create content. Go to Content Manager and click on Create new entry. Choose the necessary locale and enter your content:

Click Save to capture your new entry.
At this point, you can also click on the Locales drop-down and create content for your locale. After selecting your second locale, you’ll be taken to a new page to enter your translated content.
If you would like to import some things, like the header_image, or even numerical fields, like prices, you can click on Fill in from another locale, which will import the content of another locale:

Please note: This will overwrite what you currently have.
Once you’ve created your content, publish it by going into your entry and selecting Publish. When finished, you should have a few published entries with content available in multiple locales:
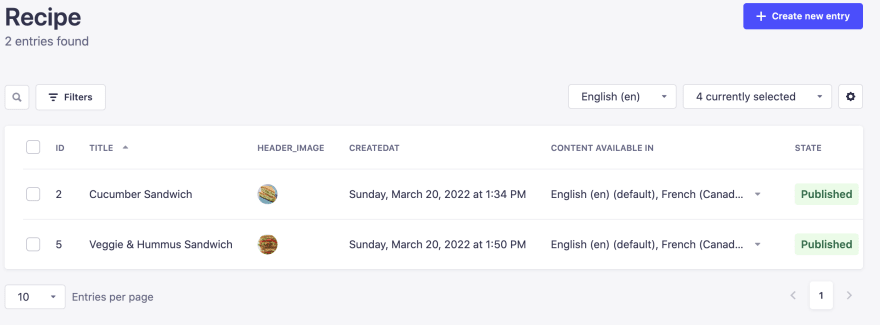
Important: Publishing one locale doesn’t automatically publish all the others in this entry. You need to click Publish for each individual locale.
Implement Internationalization in Next.js
Now that you have internationalization set up for your Strapi project, it’s time to do the same in your Next.js app. For this part of the tutorial, you’ll be using a library called next-i18next. This library is built on i18next, a popular internationalization framework offering support for many frameworks, like React, Next.js, PHP, and .NET.
To begin, install the next-i18next library:
    npm install next-i18next
    # or
    yarn add next-i18next
Then create a next-i18next.config.js file in your root project and add your locales:
    module.exports = {
      i18n: {
        defaultLocale: 'en',
        locales: ['en', 'fr-CA'],
      },
    };
In your next.config.js file, import your new i18next config file and add it to NextConfig:
    /** @type {import('next').NextConfig} */
    const { i18n } = require('./next-i18next.config');

    const nextConfig = {
      i18n,
      reactStrictMode: true,
    }

    module.exports = nextConfig
Then in _app.js, use appWithTranslation from next-i18next. This higher-order component (HOC) will wrap a i18nextProvider around your app. Thanks to the context API, your i18next instance will be passed down to your components. With this instance, you can grab your translation and change your locale:
    import '../styles/globals.css'

    import { appWithTranslation } from 'next-i18next';

    function MyApp({ Component, pageProps }) {
      return <Component {...pageProps} />
    }

    //Wrap appWithTranslation around your app
    export default appWithTranslation(MyApp);
Once that is set up, you can start adding translations for your app. next-i18next expects specific file structures for your translations. They must be divided into their own locales folder in the public folder, like the following:
    .
    └── public
        └── locales
            ├── en
            |   └── common.json
            └── fr-CA
                └── common.json
Inside, you need to add some simple translations that you will try and grab later:
    // locales/en/common.json
    {
      "en": "English",
      "fr-CA": "French Canadian",
      "change_locale": "Change Language",
      "current_locale": "Current locale"
    }
And here is for the French locale:
    //locales/fr-CA/common.json
    {
      "en": "Anglais",
      "fr-CA": "Français (Canadien)",
      "change_locale": "Changement de language",
      "current_locale": "Language actuelle"
    }
With that set up, you need to grab these translations and try to change the locale in your app. To do this, you will need the serverSideTranslations function in your Next.js pages. It works with getStaticProps and getServerProps, and it passes your translations and your configurations as props.
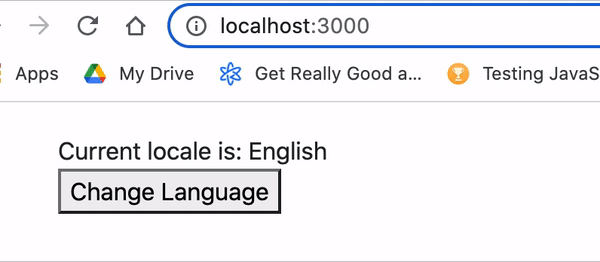
Head to index.js. Inside, you’ll use the serverSideTranslations to pass your translations and useTranslation to retrieve the correct text. The current locale can be grabbed from the Next.js router:
    import Link from 'next/link'
    import { useRouter } from 'next/router'

    import { useTranslation } from 'next-i18next'
    import { serverSideTranslations } from 'next-i18next/serverSideTranslations'

    export default function Home() {
      //Get the current locale from router.locale
      const router = useRouter()
      const { t } = useTranslation('common')
      return (
        <div style={{margin: '20px'}}>
          <div>{t('current_locale')}: {t(router.locale)}</div>
          <div>
            <Link
              href='/'
              locale={router.locale === 'en' ? 'fr-CA' : 'en'}>
              <button>
                {t('change_locale')}
              </button>
            </Link>
          </div>
        </div>

      )
    }

    export const getServerSideProps = async ({ locale }) => ({
      props: {
        ...await serverSideTranslations(locale, ['common']),
      },
    })
After your server reloads, you should see the following:
With the internationalization logic implemented, it’s time to retrieve your content from your Strapi backend.
From your home page, you can retrieve your recipes by making an API call to your backend and passing the result as props in getServerSideProps. The Strapi REST API also comes with a handy locale parameter to specify the locale in which the content should be retrieved. In your index.js, add the API call to fetch your recipes:
    export const getServerSideProps = async ({ locale }) => {
      const res = await fetch(`http://localhost:1337/api/recipes?locale=${locale}`)
      const data = await res.json()
      console.log(data)
      return {
        props: {
          data,
          ...await serverSideTranslations(locale, ['common']),
        },
      }
    }
Now, if you head to your Next.js server log, you’ll see the following error message:

To fix this permission error, head back to your Strapi project and go to Settings > Roles (under the Users & Permissions Plugin) > Public. Then expand the permissions for your Recipe content type. For the sake of this tutorial, just check the box for Select all and click Save:

This will allow unauthenticated users to make API requests for the entries in the recipe collection. If you reload your page, you should finally see some data coming in:

Now you can retrieve your recipes, pass them as props to your page, and display a list.
Your list of custom fields will be available under attributes for each entry. You can grab your title by writing recipe.attributes.title:
    import Link from 'next/link'
    import { useRouter } from 'next/router'

    import { useTranslation } from 'next-i18next'
    import { serverSideTranslations } from 'next-i18next/serverSideTranslations'

    export default function Home({recipes}) {
      const router = useRouter()
      const { t } = useTranslation('common')

      return (
        <div style={{margin: '20px'}}>
          <h2>{t('recipes')}</h2>
          {
            recipes.length > 0 && recipes.map((recipe) => {
              return(
                <div key={`recipe-${recipe.id}`}>
                  {recipe.attributes.title}
                </div>
              )
            })
          }
          <div style={{marginTop: '20px'}}>
            <Link
              href='/'
              locale={router.locale === 'en' ? 'fr-CA' : 'en'}>
                {t('change_locale')}
            </Link>
          </div>
        </div>
      )
    }

    export const getServerSideProps = async ({ locale }) => {
      const res = await fetch(`http://localhost:1337/api/recipes?locale=${locale}`)
      //Get your list of recipes
      const { data } = await res.json()

      return {
        props: {
          recipes: data,
          ...await serverSideTranslations(locale, ['common']),
        },
      }
    }
Add the new translations for recipes to your common.json in both locales:
    //In /public/locales/en/common.json
    {
    ...
      "recipes": "Recipes"
    }

    //In /public/locales/fr-CA/common.json
    {
      ...
      "recipes": "Recettes"
    }
The result will look like this:
Create a Detail Page for Your Recipe
If you want, you can go further and create a page to display your recipe. To do so, change your recipes list to include a link to your recipe Detail page:
<Link href={`/${recipe.id}`} locale={router.locale}>{recipe.attributes.title}</Link>
Then in your pages folder, create a [recipeId].js file to display your recipe with the instructions.
Note: If the file naming confuses you, that’s because the
[recipeId]is a dynamic route. In other words, it will compute to/:recipeId. If you need more information, check out Next.js’s documentation on dynamic routes.
Inside your file, you can grab params in getServerSideProps and retrieve the recipeId. That will allow you to fetch the right content from Strapi.
Note: In Strapi, entries with different locales will have different IDs. This means that for the same recipe, the English version might have
ID 2and the French locale might haveID 3. This is why you don’t need to include the locale in your API call, as it will already grab a specific locale.
However, you do need to add populate=* in order to retrieve your header_image, as this is a relationship, and relations are not populated by default:
    export const getServerSideProps = async ({ locale, params }) => {
      const { recipeId } = params;
      const res = await fetch(`http://localhost:1337/api/recipes/${recipeId}?populate=*`)
      const { data } = await res.json()

      return {
        props: {
          recipe: data,
          ...await serverSideTranslations(locale, ['common']),
        },
      }
    }
In order to display your instructions, you’ll need an extra library because Strapi’s rich text field uses Markdown. The easiest way to render Markdown is by installing the react-markdown library:
    npm install react-markdown
    # or
    yarn add react-markdown
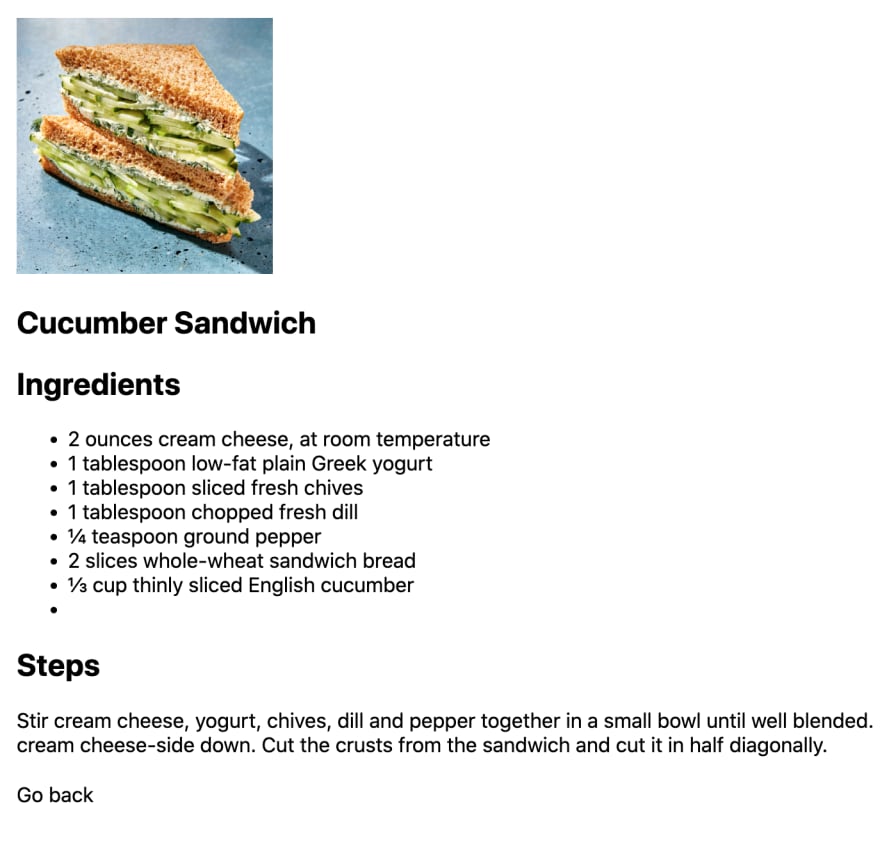
Then in your [recipeId].js, you can retrieve recipe from props and display the title, header_image, and instructions:
    import Link from 'next/link'
    import { useRouter } from 'next/router'

    import { useTranslation } from 'next-i18next'
    import { serverSideTranslations } from 'next-i18next/serverSideTranslations'

    import ReactMarkdown from 'react-markdown'

    export default function RecipeDetail({recipe}) {
      const router = useRouter()
      const { t } = useTranslation('common')
      const {title, instructions, header_image } = recipe.attributes

      return (
        <div style={{margin: '20px'}}>
          {
            recipe && (
              <div>
                <img src={`http://localhost:1337${header_image.data.attributes.url}`} width={200} height={200}/>
                <h2>{title}</h2>
                <ReactMarkdown>{instructions}</ReactMarkdown>
              </div>
            )
          }
          <div style={{marginTop: '20px'}}>
            <Link
               href='/'
               locale={router.locale}>
                 {t('go_back')}
            </Link>
          </div>
        </div>
      )
    }

    export const getServerSideProps = async ({ locale, params }) => {
      const { recipeId } = params;
      const res = await fetch(`http://localhost:1337/api/recipes/${recipeId}?populate=*`)
      const { data } = await res.json()

      return {
        props: {
          recipe: data,
          ...await serverSideTranslations(locale, ['common']),
        },
      }
    }
Don’t forget to add the extra translations to your common.json for both locales:
    //In /public/locales/en/common.json
    {
    ...
      "go_back": "Go back"
    }

    //In /public/locales/fr-CA/common.json
    {
      ...
      "go_back": "Retour"
    }
Here is the final result of your Detail page:
If you want to see the entire project at once, you can clone it from this GitHub repo.
Conclusion
In this article, you learned how to create a Strapi project, set up new locales, and create localized content for each. You also discovered how to implement internationalization in a Next.js application, which allowed you to offer users the option of changing locales and retrieving the correct content from your backend.
Thanks to Strapi’s internationalization plug-in, you now have a full-stack solution to offer more meaningful content to users in different regions of the world.

Top comments (1)
Great article, thank you so much! I think the internet underestimates the importance of i18n :)