
Strapi and Laravel are both powerful tools that are making developers' lives easier. Both are different in their domains.
We will look at these two technologies and see how they can be used together. It would be nice to talk about these technologies independently before we dive into how we can use Strapi and Laravel.
To follow this, here are some requirements:
- Node.js (10 +)
- Yarn
- PHP 7+
- Composer (for laravel installation, this is optional if you are using docker)
What is Laravel
Laravel is a free, open-source PHP web framework intended to develop web applications following the model–view–controller(MVC) architectural pattern. Laravel is used mainly for full-stack web development.
You can learn Laravel using Laravel tutorial: The Ultimate Guide 2021.
What is Strapi
Strapi is based on Node.js( Javascript runtime). It is a headless content management system(CMS). It is 100% Javascript also open-source.
STRAPI VS LARAVEL
First, these two technologies have different approaches:
Strapi is concerned mainly with data management and seamless distribution to any frontend application. While Laravel is usually referred to as The Full-Stack Framework, it can route requests and serve them through its Blade template. However, Laravel is an API Backend for frontend applications.
This is where I personally like Strapi. With Strapi, you can get a secure REST API and GRAPHQL(v4) out of the box without coding because it has been made easy for you.
This article is not a Strapi over Laravel or the other way round. It can never be for me.
I want to talk about the database. Both technologies are powerful. Laravel currently supports MySQL, Postgres, SQLite, and SQL Server, and this is configured after installation of your project, the .env that is copied from .env.example is where this is done.

In Strapi, you get to choose and configure your database during installation.
Now, can they be used together? Yes. Strapi Graphical User Interface for managing content with collections types makes your code less and visually understand your data. There are many more things to explore between these two technologies.
So we are going to install and Laravel and Strapi and connect a Strapi to the Laravel project. That is, Strapi houses and manages data. Laravel will use this data.
Setting up a Strapi Project
To get started, run this:
npx create-strapi-app strapilara --quickstart
We will use strapilara as our folder's name where the Strapi will be installed. The --quickstart flag automatically uses the SQLite database option(That's is fine for this use case).
Navigate to move to strapilara on a successful installation and run:
yarn develop
The command will build the project, and automatically launch it at http://localhost:1337/admin/auth/register-admin, where you can need to register yourself as a super admin.
Creating Strapi Colleaction
Next, we will add data by creating collection types. Let’s say we want to build a blog. We are going to have these as the schema: author's name, blog title, blog post, date.
These are the field we are going to add to the Blog collection that we will create.
On the admin page, Click on Content-Types Builder → Create a new collection type

It will pop up this:
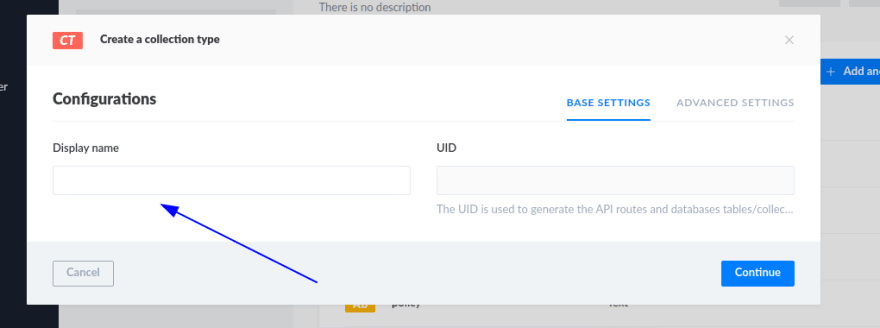
Input Blog as the display name

Next, add your fields.
Click on Text, Input Title as the the Name and click on Add another field, and repeat this step for author

Now the blog post has to be Rich Text


Finally, click on the Date field

Then input date as the Name and select the Type to be date. Click Finish button.

All the fields that we need for our blog schema has been created. It is time save.

Hitting on Save will restart the server.
We now have our collection type Blogs(Strapi uses pluralize) and we can now add new contents.

This is how Strapi folder structure looks like:

All collections created are added in the api folder.
So I will go ahead and two blog posts, save and publish them.

Setting the permission
For security reasons, this blog won't be available to the public. We are going to fix that by making it publicly available. That is, we want the public users to be able to view.
On your admin, click on Settings→Roles→Public

Check the following and Save:

Here we want the public to able to find an item, find all items and even insert item(s).
Setting Up Laravel Project
Now let us set up our Laravel Project that will communicate our Strapi instance soonest.
I will use composer to install mine and run this in a different folder other than your Strapi instance.
composer create-project laravel/laravel lara
Where lara is the project folder’s name. After this is done, change directory
cd lara
then:
php artisan serve
This will serve the application at http://localhost:8000.

This is how Laravel folder structure looks like:

Connecting Laravel and Strapi
Now to interact with Strapi through Laravel, we need to install this package laravel-strapi in our application.
So in the root of our application, stop the Laravel running and run:
composer require dbfx/laravel-strapi
This will install the package.
In the .env file, add this:
    STRAPI_URL=http://localhost:1337
    STRAPI_CACHE_TIME=3600
Add config to your project by creating a strapi.php file inside the config folder and copy and paste this into it.
    //php
    <?php
    return [
        'url' => env('STRAPI_URL'),
        'cacheTime' => env('STRAPI_CACHE_TIME', 3600),
    ];
This file is essential as it points to your URL and cache time. Remember that we defined this in the .env file.
I will go ahead inside the routes folder, in the web.php file, and do the following:
Paste this at the top of the file:
    //php
    use Dbfx\LaravelStrapi\LaravelStrapi;
Then below the home route that displays the welcome.blade.php file in the resources→views, we created another route known as /test.
    //php
    Route::get('/test', function () {
        $strapi = new LaravelStrapi();
        return $blogs = $strapi->collection('blogs');
    });

Notice how we created a variable that instantiated the class LaravelStrapi?
Now, if we run http://127.0.0.1:8000/test in our browser, we will get this:

This is the whole collection of the blog. We can also get an entry of a collection like so:
    //php
    Route::get('/test/{id}', function ($id) {
        $strapi = new LaravelStrapi();
        return $blogs = $strapi->entry('blogs', $id);
    });
Now, if we run http://127.0.0.1:8000/test/1 in our browser, we get just a single entry:

What we did is that we made the id that is unique to every post dynamic in the route. Changing the http://127.0.0.1:8000/test/1 to http://127.0.0.1:8000/test/2 will fetch to the second post and so forth.

Where You Could Go from Here
Laravel is great at web development, and we could do so much more with it. Serving data from Strapi makes sense as you get to easily and visually manage your data. What we have done so far is get the response from the Strapi and displayed it in our Laraval project.
Now, what’s more? We could go ahead and integrate this in an actual view. There are some things one can do with these two techs aside from a blog schema we are using.
I will go ahead and make a controller for the blog. You can stop the project from serving and run this:
php artisan make:controller BlogController
After this, you can serve your project again using:
php artisan serve
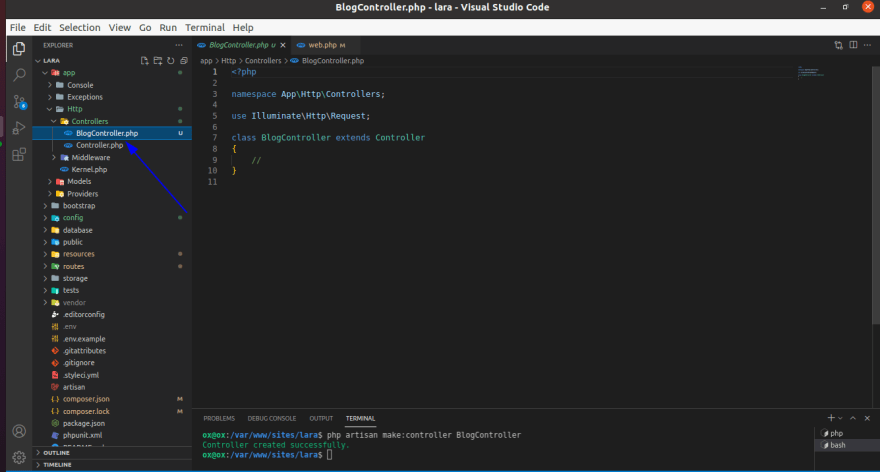
The make controller command that we just ran creates a BlogController.php file inside the app→Http→Controllers folder. This file has a boilerplate code like so:
    <?php
    namespace App\Http\Controllers;
    use Illuminate\Http\Request;
    class BlogController extends Controller
    {
        //
    }
Now, inside the BlogController.php, I will create a function that I can call along with the controller.
    public function blog()
        {
            return view('blog');
        }
This does nothing other than return a view that we will soon create inside the resources→views folder.
Let us create a route inside routes→web.php:
Route::get('/blog', [BlogController::class, 'blog']);
Let us go back to the BlogController to use and instantiate the LaravelStrapi package.
    //php
    <?php
    namespace App\Http\Controllers;
    use Dbfx\LaravelStrapi\LaravelStrapi;
    use Illuminate\Http\Request;
    class BlogController extends Controller
    {
        public function blog()
        {
            $strapi = new LaravelStrapi();
            $blogs = $strapi->collection('blogs');
            return view('blog', compact(['blogs']));
        }
    }
Inside the resources→views folder, create a file blog.blade.php,copy this code, and paste it there.
Go to this route: http://127.0.0.1:8000/blog , you should have this:

You can take it further by styling it to your taste.
Conclusion
We have made it to the end of this tutorial. We have also seen how to connect a Laravel application to Strapi using the Laravel-strapi package.
We explained how to set up Strapi and Laravel projects. They are straightforward to understand because a lot of work has been lifted away from us. We were able to focus on the essential parts of the project without worrying about security issues.

Top comments (0)