
How this post will help?
Learn and build a WordPress application using AWS EC2 instance with Amazon RDS DB instance that is external to AWS Elastic Beanstalk, then how to configure a high-availability environment running a WordPress website to connect to it. Then website uses Amazon EFS as the shared storage for upload files.
Amazon RDS High Availability:
Running a DB instance external to Elastic Beanstalk decouples the database from the lifecycle of your environment. This lets you connect to the same database from multiple environments, swap out one database for another, or perform a blue/green deployment without affecting your database.
Prerequisites:
- Basic Elastic Beanstalk operations and Beanstalk console.
- Command line terminal(Linux or MacOS) or Cloudshell.
- Basics of aws concept.
First, we launch a DB instance in Amazon RDS:
Its completely independent from Elastic Beanstalk Environments and will not be terminated or monitored by Elastic Beanstalk
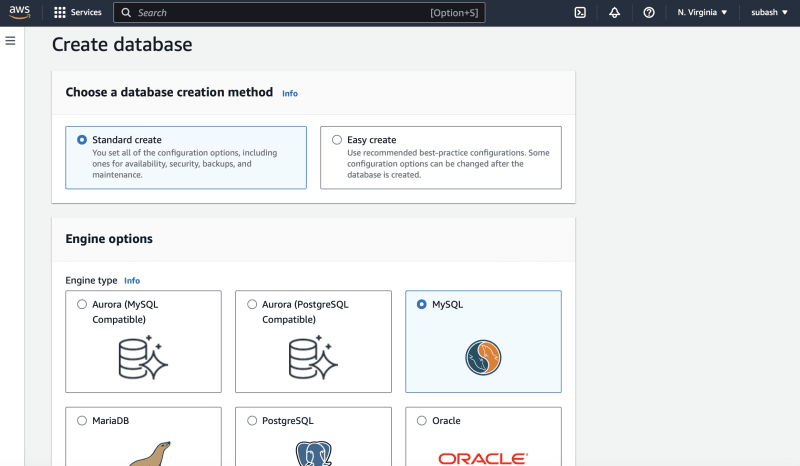
Follow step by step to launch a database with the MySQL engine and enable Multi-AZ deployment
- Open the AWS RDS console and click
Databasesin side navigation pane. - Choose
Create databaseand chooseStandard Create(Don't chooseEasy Create). - In Availability and durability choose
Multi-AZ DB instance(Review the default settings and adjust these settings according to your specific requirements). - Master username and Master password – The database username and password. Make a note of these settings because you will use them later.
- Under Additional configuration, for Initial database name, type
ebdb - Verify the default settings for the remaining options, and then choose
Create database.
We created MySQL database in AWS RDS instance.
Note : Check whether the inbound rules on the security group that's attached to your RDS instance. If not go to inbound and attach the security group.

Download WordPress:
To prepare to deploy WordPress using AWS Elastic Beanstalk, you must copy the WordPress files to your computer and provide the correct configuration information.
To create a WordPress project:
- Download WordPress from wordpress.org
~$ curl https://wordpress.org/wordpress-4.9.5.tar.gz -o wordpress.tar.gz

- Download the configuration files from the sample repository
~$ wget https://github.com/aws-samples/eb-php-wordpress/releases/download/v1.1/eb-php-wordpress-v1.zip
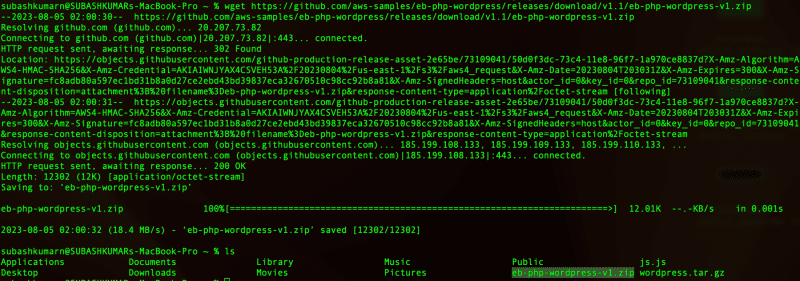
- Extract WordPress and change the name of the folder.
 ~$ tar -xvf wordpress.tar.gz
 ~$ mv wordpress wordpress-beanstalk
 ~$ cd wordpress-beanstalk

- Extract the configuration files over the WordPress installation.
~/wordpress-beanstalk$ unzip ../eb-php-wordpress-v1.zip
Launch an Elastic Beanstalk environment:
Use the Elastic Beanstalk console to create an Elastic Beanstalk environment.
In the following steps, you'll use the Elastic Beanstalk console to:
- Create an Elastic Beanstalk application using the managed PHP platform.
- Accept the default settings and sample code.
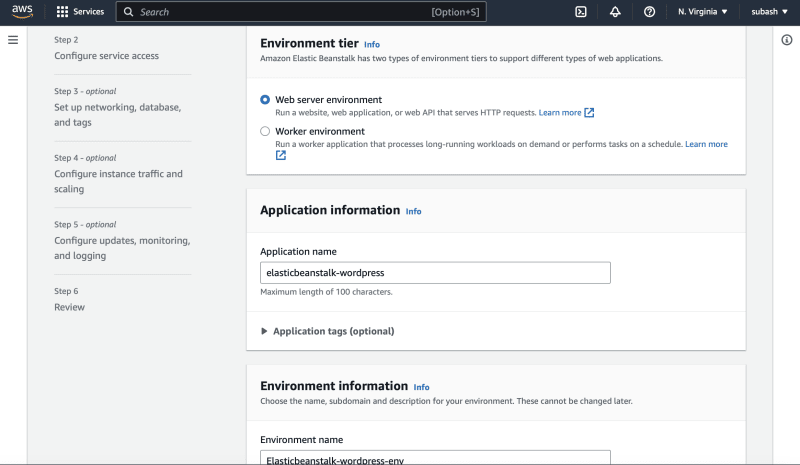
To launch an environment:
Open ElasticBeanstalk console using Pre-Link
and clickCreate applicationFor
Platform, select the platform and platform branch that match the language used by your application.For
Application code, chooseSample application.Choose
Reviewandlaunch.Review the available options. Choose the available option you want to use, and when you're ready, choose
Create app.
We created beanstalk environment successfully.
In Part-2, We will see how to confirm beanstalk environmental ,external AWS RDS and final Wordpress deployment.
Follow and Share for more update

Top comments (0)