
Availability , Flexibility and Scalability are among the few very important features of cloud computing. Simply using a single instance for all the work creates load on the server causing it to fail and various other problems. Distributing the workload with automatic scaling up or down based on the workload is the perfect solution to all the issues. Cloud load balancing is defined as dividing workload and properties in the servers. Auto-Scaling is the technique in which automatically the number of servers can increase or decrease as per demand. This helps to provide a continuous uninterrupted service to the customers.
In Auto-Scaling, we mainly define three threshold values - Desired Capacity , Minimum Capacity and Maximum Capacity.
Desired Capacity refers to the desired number of servers which will start launching by an Auto Scaling Group.
Minimum Capacity refers to the minimum number of instances running at all times.
Maximum Capacity puts a restriction on the maximum number of servers that we can have. This helps to handle DOS attacks where unnecessarily demand increases on the instances which can lead to sudden increase in the number of instances which will lead to no profit.
Here, I have documented all the steps needed for enabling Auto Scaling on your instances.
Step 1 - Launch a EC2 instance.
Launch a EC2 instance specifying all the requirements and host any static site on it. (Refer here)
Step 2 - Create a Image of the instance.
Choose the EC2 instance >> Click on Actions >> Create Image. Then Create the image and provide a suitable name to the image.

Step 3 - Create a Load Balancer.
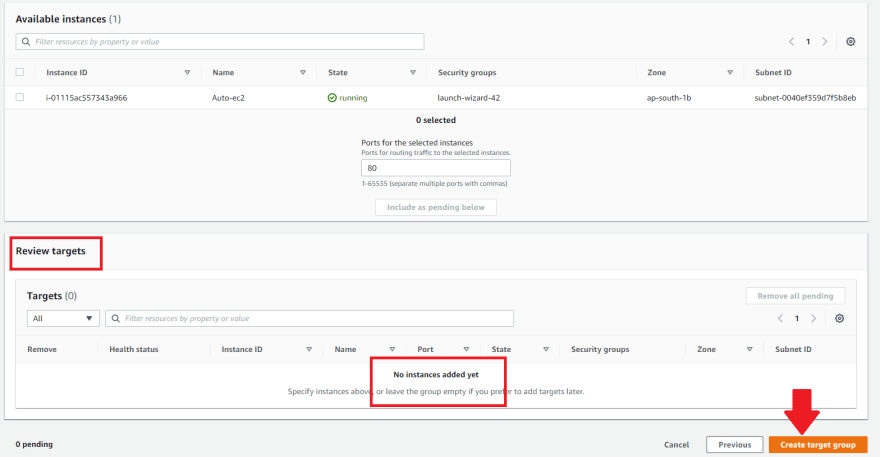
- First of all to have a Load Balancer we need to create a Target Group. First Create the Target group with suitable name, but do not attach or register any target instances for now >> Create Target Group.
Your final page should look like this :
Now select the Target Group created and in Edit attribute decrease the deregistration time to 20sec. (This step is just to faster the scaling down process and can be avoided)

Now, create a Application Load Balancer . Provide a suitable name. Select all the subnets for high availability. While selecting the Security group , create a new security group with preferably the inbound and outbound rules as given below (however you can set the rules as per your need for stronger security)

Now, select your Security group and the Target group created and create the Load Balancer.
Step 4 - Create a Launch Configuration.
Go to the Launch Configuration menu and Launch a configuration.
Give a suitable name >> Choose the Image that you had created >> Choose the instance type. Rest of the options can be left default. But, make sure you Enable the detailed monitoring by Cloud Watch.

Next, Add New Rule , to the Security rules, mentioning the inbound rules as below (however you can set the rules as per your need for stronger security)

Step 5 - Create a Auto Scaling group.
Create a Auto Scaling group with a suitable name. Now select the option of Launch Configuration and select the one just created.

Next choose your networking , preferably choose all the subnets for high availability.
Next attach to an Existing Load Balancer and choose the Target group we just created.

Now, choose the desired , minimum and maximum capacities of instances as your choice.
Finally, Create the Auto Scaling Group.
Step 6 - Create Cloud Watch Alarms.
Search for the Cloud Watch Alarm Service then click on Create Alarm.
In this step we have to create two Alarms - Scale-up and Scale-down.
The Alarms will monitor the Auto Scaling group based on the chosen metrics and thresholds.
For metrics, choose Auto Scaling group and then choose CPU utilization as the metric.

Next, give a name to the alarm and specify the threshold.
There will be two alarms - Scale up and Scale down. Scale up will be used to monitor when the CPU utilization is higher than a threshold that will require to increase the number of instances and Scale down will be used to monitor when the CPU utilization is lower than a threshold that will require to remove some number of instances.
Specify the details as given :

Step 7 - Create Dynamic Auto Scaling policies.
After both the Scale-up and Scale-down alarms are ready , we need to attach them to the Auto Scaling policies specifying how we want the Auto Scaling to act on getting the alarms.
For this, select the Auto Scaling Group, then choose the Automatic Scaling >> Create Dynamic policy.

In policy type choose Simple Scaling and select the alarm created just now, and specify the Actions.
For a Scale-up policy, choose the Scale-up alarm and as Actions select to increase the capacity.

Similarly, create another policy to Scale-down specifying the Actions ie., select to decrease the capacity.

And, your Auto Scaling Setup is ready.
Here are few ways you can check if your Policies are working correctly :
SSH into the Auto Scaling Group instance and increase the CPU utilization by using the command yes > dev/null &
On checking the Cloud alarms you can find the graph increasing. On checking the instances you can find there is addition of the new instances automatically.
To check the Scaling down, use the command <kill #process_id_here> and check the instances. After some time, instances will be shutting down.


Top comments (0)