Overview
This project sets up a multi-tier Java application using Vagrant and VirtualBox. The architecture consists of multiple virtual machines, each serving a specific role in the deployment. Provisioning is automated using shell scripts for each server.
Architecture
The multi-tier setup consists of the following servers:
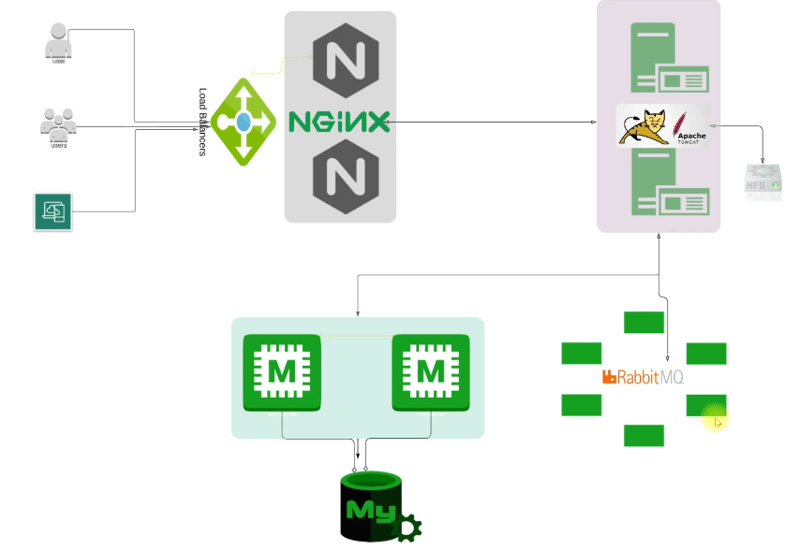
- db01 (Database Server) – Runs MariaDB/MySQL for storing application data.
- mc01 (Memcached Server) – Provides caching to optimize performance.
- rmq01 (RabbitMQ Server) – Handles messaging and queueing.
- app01 (Tomcat Application Server) – Hosts the Java-based application.
- web01 (Nginx Reverse Proxy Server) – Acts as a frontend load balancer.
Prerequisites
Ensure you have the following installed on your machine:
- Vagrant
- VirtualBox
- [vagrant plugin install vagrant-hostmanager]
Setup Instructions
- Clone the repository:
   git clone https://github.com/surendergupta/vprofile_automation.git
   cd vprofile_automation
- Start the environment:
vagrant up
- Verify all machines are running:
vagrant status
-
Use Project repository
git clone https://github.com/surendergupta/vprofile-project.git
Vagrant Configuration
The Vagrantfile defines all virtual machines and their configurations:
- Networking: Private network with static IPs.
-
Provisioning: Automated using shell scripts (
scripts/*.sh). - Resource Allocation: Memory and CPU assigned per VM.
Automation Scripts
Each VM has an automation script located in the scripts/ directory:
-
scripts/db01.sh– Installs and configures MariaDB/MySQL. -
scripts/mc01.sh– Sets up Memcached. -
scripts/rmq01.sh– Configures RabbitMQ. -
scripts/app01.sh– Deploys the Java application on Tomcat. -
scripts/web01.sh– Configures Nginx as a reverse proxy.
Scripts VMs
db01.sh
#!/bin/bash

DATABASE_PASS='admin123'

# echo message installtion start
echo "Starting DB01"

# Update the centos9 server
sudo yum update -y

# Install the epel-release, git, mariadb-server package
sudo yum install epel-release git mariadb-server -y

# start mariadb service
sudo systemctl start mariadb
# enable mariadb service
sudo systemctl enable mariadb

# Going to tmp directory
cd /tmp/

# clone the git project inside tmp directory using local branch
git clone -b local https://github.com/hkhcoder/vprofile-project.git

# run mysql_secure_installation script
sudo mysqladmin -u root password "$DATABASE_PASS"
sudo mysql -u root -p"$DATABASE_PASS" -e "DELETE FROM mysql.user WHERE User='root' AND Host NOT IN ('localhost', '127.0.0.1', '::1')"
sudo mysql -u root -p"$DATABASE_PASS" -e "DELETE FROM mysql.user WHERE User=''"
sudo mysql -u root -p"$DATABASE_PASS" -e "DELETE FROM mysql.db WHERE Db='test' OR Db='test\_%'"
sudo mysql -u root -p"$DATABASE_PASS" -e "FLUSH PRIVILEGES"
sudo mysql -u root -p"$DATABASE_PASS" -e "create database accounts"
sudo mysql -u root -p"$DATABASE_PASS" -e "grant all privileges on accounts.* TO 'admin'@'localhost' identified by 'admin123'"
sudo mysql -u root -p"$DATABASE_PASS" -e "grant all privileges on accounts.* TO 'admin'@'%' identified by 'admin123'"
sudo mysql -u root -p"$DATABASE_PASS" accounts < /tmp/vprofile-project/src/main/resources/db_backup.sql
sudo mysql -u root -p"$DATABASE_PASS" -e "FLUSH PRIVILEGES"

# restart mariadb
sudo systemctl restart mariadb

# start firewalld service and allow port 3306 default port of mysql
sudo systemctl start firewalld
sudo systemctl enable firewalld
sudo firewall-cmd --get-active-zones
sudo firewall-cmd --zone=public --add-port=3306/tcp --permanent
sudo firewall-cmd --reload

# restart mariadb
sudo systemctl restart mariadb

# echo message installtion complete
echo "DB01 bash scriptcompleted"
mc01.sh
#!/bin/bash

# echo message installtion start
echo "Starting MC01"

# Update the centos9 server
sudo yum update -y

# Install the epel-release, memcached package
sudo yum install epel-release  memcached -y

# start memcached service
sudo systemctl start memcached

# enable memcached service
sudo systemctl enable memcached

# check status of memcached service
sudo systemctl status memcached

# allow instead of localhost ip address to global ip address
sed -i 's/127.0.0.1/0.0.0.0/g' /etc/sysconfig/memcached

# restart memcached service
sudo systemctl restart memcached

# start firewalld service
sudo systemctl start firewalld

# enable firewalld service
sudo systemctl enable firewalld

# allow port 11211 and 11111
sudo firewall-cmd --add-port=11211/tcp
sudo firewall-cmd --runtime-to-permanent
sudo firewall-cmd --add-port=11111/udp
sudo firewall-cmd --runtime-to-permanent

# start memcached in background with specific port and username
sudo memcached -p 11211 -U 11111 -u memcached -d
rmq01.sh
#!/bin/bash

# echo message installtion start
echo "Starting RMQ01"

# Update the centos9 server
sudo yum update -y

# Install the epel-release, wget, centos-release-rabbitmq-38 package
sudo yum install wget epel-release centos-release-rabbitmq-38 -y
sudo yum --enablerepo=centos-rabbitmq-38 install rabbitmq-server -y

# enable rabbitmq service
systemctl enable --now rabbitmq-server

# create file rabbitmq.config and put content in it
sudo sh -c 'echo "[{rabbit, [{loopback_users, []}]}]." > /etc/rabbitmq/rabbitmq.config'

# rabbitmqctl add user
sudo rabbitmqctl add_user test test

# rabbitmqctl add tags
sudo rabbitmqctl set_user_tags test administrator

# rabbitmqctl set permissions
sudo rabbitmqctl set_permissions -p / test ".*" ".*" ".*"

# restart rabbitmq server
sudo systemctl restart rabbitmq-server

# start firewalld service and allow port 5672
sudo systemctl start firewalld
sudo systemctl enable firewalld
sudo firewall-cmd --add-port=5672/tcp
sudo firewall-cmd --runtime-to-permanent

# start, enable and status rabbitmq server
sudo systemctl start rabbitmq-server
sudo systemctl enable rabbitmq-server
sudo systemctl status rabbitmq-server

# echo message installtion end
echo "Ending RMQ01"
app01.sh
#!/bin/bash

# echo message installtion tomcat start
echo "Starting App01"

# Update the centos9 server
sudo yum update -y

# Install the epel-release, wget, java-17-openjdk, java-17-openjdk-devel, git, unzip package
sudo yum install epel-release wget java-17-openjdk java-17-openjdk-devel -y
sudo yum install git -y
sudo yum install unzip -y

# Going to tmp directory
cd /tmp/

# download tomcat package
wget https://archive.apache.org/dist/tomcat/tomcat-10/v10.1.26/bin/apache-tomcat-10.1.26.tar.gz

# Extract the tomcat package
tar xzvf apache-tomcat-10.1.26.tar.gz

# Add tomcat user at directory level
sudo useradd --home-dir /usr/local/tomcat --shell /sbin/nologin tomcat

# Copy data form totomcat directory to home directory
sudo cp -r /tmp/apache-tomcat-10.1.26/* /usr/local/tomcat/

# Make tomcat user owner of tomcat home directory
sudo chown -R tomcat:tomcat /usr/local/tomcat

# Create tomcat service file
cat <<EOF | sudo tee /etc/systemd/system/tomcat.service
[Unit]
Description=Tomcat
After=network.target

[Service]
User=tomcat
Group=tomcat
WorkingDirectory=/usr/local/tomcat
Environment=JAVA_HOME=/usr/lib/jvm/jre
Environment=CATALINA_PID=/var/tomcat/%i/run/tomcat.pid
Environment=CATALINA_HOME=/usr/local/tomcat
Environment=CATALINE_BASE=/usr/local/tomcat
ExecStart=/usr/local/tomcat/bin/catalina.sh run
ExecStop=/usr/local/tomcat/bin/shutdown.sh
RestartSec=10
Restart=always

[Install]
WantedBy=multi-user.target
EOF

# Reload systemd files
sudo systemctl daemon-reload

# start & enable tomcat service
sudo systemctl start tomcat
sudo systemctl enable tomcat

# Enabling the firewall and allowing port 8080 to access the tomcat
sudo systemctl start firewalld
sudo systemctl enable firewalld
sudo firewall-cmd --zone=public --add-port=8080/tcp --permanent
sudo firewall-cmd --reload

# download maven package
wget https://archive.apache.org/dist/maven/maven-3/3.9.9/binaries/apache-maven-3.9.9-bin.zip

# Extract the maven package
unzip apache-maven-3.9.9-bin.zip

# copy extracted maven package to maven directory
sudo cp -r apache-maven-3.9.9 /usr/local/maven3.9

# export maven path to environment variable use max memory
export MAVEN_OPTS="-Xmx512m"

# clone the git project inside tmp directory using local branch
git clone -b local https://github.com/hkhcoder/vprofile-project.git

# change the directory to build the project
cd vprofile-project
/usr/local/maven3.9/bin/mvn install

# stop tomcat server
sudo systemctl stop tomcat

# wait 20 second
sleep 20

# remove tomcat webapps all file Start with ROOT
rm -rf /usr/local/tomcat/webapps/ROOT*

# copy new build package war file to tomcat webapps directory
if [ -f target/vprofile-v2.war ]; then
    cp target/vprofile-v2.war /usr/local/tomcat/webapps/ROOT.war
else
    echo "Build failed: WAR file not found"
    exit 1
fi

# start tomcat server
sudo systemctl start tomcat

# wait 20 second
sleep 20

# change the owner of tomcat webapps directory to tomcat user
chown -R tomcat.tomcat /usr/local/tomcat/webapps

# restart tomcat server
sudo systemctl restart tomcat
web01.sh
#!/bin/bash

# echo message installtion start
echo "Starting WEB01"

# Update the ubuntu server
sudo apt-get update && sudo apt-get upgrade -y

# Install the nginx package
sudo apt-get install nginx -y

# Create Nginx conf file
cat <<EOF | sudo tee  /etc/nginx/sites-available/vproapp
upstream vproapp {
    server app01:8080;
}
server {
    listen 80;
    location / {
        proxy_pass http://vproapp;
    }
}
EOF

# Remove default nginx conf
sudo rm -rf /etc/nginx/sites-enabled/default

# Create link to activate website
sudo ln -s /etc/nginx/sites-available/vproapp /etc/nginx/sites-enabled/vproapp

# restart nginx server
sudo systemctl start nginx
sudo systemctl enable nginx
sudo systemctl restart nginx
Managing VMs
- To access a specific VM:
vagrant ssh <vm-name>
- To restart a VM:
vagrant reload <vm-name> --provision
- To destroy all VMs:
vagrant destroy -f
Testing the Application
- After provisioning, access the application via:
http://192.168.56.11
(Replace with the correct IP of web01 if different.)
Troubleshooting
- If provisioning fails, try running:
vagrant reload --provision
- To debug SSH issues:
vagrant ssh-config
Future Enhancements
- Implement in AWS for cloud infrastructure.
- Automate deployment with Ansible.
- Add Docker support.
- Implement Kubernetes for container orchestration.
- Integrate Terraform for infrastructure as code.
- Implement CI/CD pipelines for automated deployments.

Top comments (0)