Vagrant for Local setup
- create vagrant init ubuntu/jammy64
vagrant init ubuntu/jammy64
- Update vagrantfile to uncomment private and public network and private network set as your choice
- Vagrant up (if ask network bridge choose bridge 1 ) wait for successfully up and running
vagrant up
- Vagrant ssh to login in ubuntu server
vagrant ssh
- set hostname using command
sudo hostname jenkins-apache
exec bash
- Create jenkins.sh file and put below command in it
sudo vi jenkins.sh
put in jenkins.sh file
sudo apt-get update
curl -fsSL https://pkg.jenkins.io/debian-stable/jenkins.io-2023.key | sudo tee \
    /usr/share/keyrings/jenkins-keyring.asc > /dev/null
echo deb [signed-by=/usr/share/keyrings/jenkins-keyring.asc] \
    https://pkg.jenkins.io/debian-stable binary/ | sudo tee \
    /etc/apt/sources.list.d/jenkins.list > /dev/null
sudo apt update
sudo apt install openjdk-17-jdk -y
sudo apt install openjdk-17-jre -y
sudo apt-get install jenkins -y
sudo systemctl enable jenkins
sudo systemctl start jenkins
sudo systemctl status jenkins

ADMIN_PASSWORD=$(sudo cat /var/lib/jenkins/secrets/initialAdminPassword)
echo "You jenkins initial admin password is $ADMIN_PASSWORD"
- Give jenkins.sh file executable permission and execute it
sudo chmod +x jenkins.sh
./jenkins.sh
- check if your jenkins status is running and show initial password
- like this 8bf59cb98abe42beafdae2cd5e5b4916
- Check your IP address
hostname -I
- Output: 10.0.2.15 192.168.56.56 192.168.1.108 fd00::e3:d8ff:feeb:2b51
- Go to Browser and hit 192.168.56.56:8080 if jenkins page not show then add port 8080
- First put jenkins initial password show above 8bf59cb98abe42beafdae2cd5e5b4916 and click next
- select standard plugins install and setup to till jnekins dashboard show
- I don't set user and skip this process so first we setup password for admin user
- Jenkin Dashboard Go to right top under the admin select the security and change your password
- After apply and save relogin the jenkin with your new password and username is admin
- Now install docker
sudo apt-get install docker.io -y
sudo usermod -aG docker $USER
sudo chmod 666 /var/run/docker.sock
sudo docker ps
- Now install sonarqube on docker
docker run -d --name sonar -p 9000:9000 sonarqube:lts-community
- If you can't get anything using curl http://192.168.56.56:9000 allow port
sudo ufw enable
sudo ufw allow 9000/tcp
- Now install trivy, create a file named trivy.sh and put below command in it
sudo vi trivy.sh

sudo apt-get install wget apt-transport-https gnupg lsb-release -y
wget -qO - https://aquasecurity.github.io/trivy-repo/deb/public.key | sudo apt-key add -
echo deb https://aquasecurity.github.io/trivy-repo/deb $(lsb_release -sc) main | sudo tee -a /etc/apt/sources.list.d/trivy.list
sudo apt-get update
sudo apt-get install trivy -y
TRIVY_VERSION=$(trivy version)
echo $TRIVY_VERSION
- set executable permission and execute it
sudo chmod +x trivy.sh
./trivy.sh
- Jenkins Install Plugins like JDK, Sonarqube Scanner, Maven, OWASP Dependency Check
- Eclipse Temurin Installer (Install without restart)
- SonarQube Scanner (Install without restart)
- Maven (Install without restart)
- OWASP Dependency Check (Install without restart)
- Docker (Install without restart)
- Docker Commons (Install without restart)
- Docker Pipeline (Install without restart)
- Docker Api (Install without restart)
- pipeline stage view (Install without restart)
- Configure Java and Maven in Global Tool Configuration
- Goto Manage Jenkins → Tools → Install JDK and Maven3 → Click on Apply and Save
-
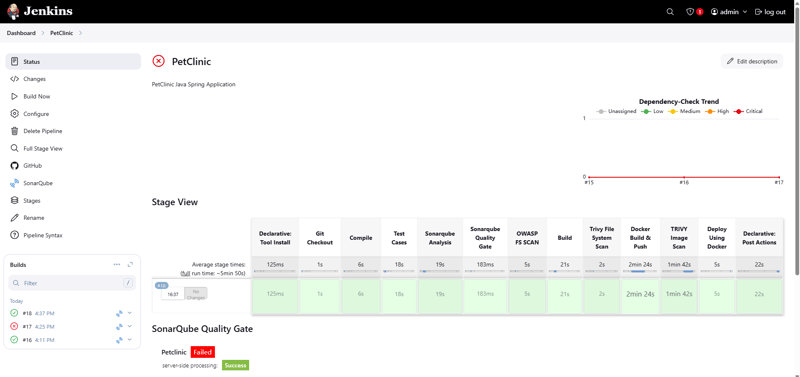
Create a Job
- Label it as PetClinic, click on Pipeline and OK.
- Enter this in Pipeline Script,
pipeline { agent any tools{ jdk 'jdk17' maven 'maven3' } stages{ stage("Git Checkout"){ steps{ git branch: 'local', url: 'https://github.com/surendergupta/petclinic.git' } } stage("Compile"){ steps{ sh "mvn clean compile" } } stage("Test Cases"){ steps{ sh "mvn test" } } } } -
Configure Sonar Server in Manage Jenkins
- On Browser hit URL: :9000
- Fill username and password. After that reset new password
username: admin password: admin- After See Dashboard of sonarqube show
- Click on Administration → Security → Users → Click on Tokens and Update Token → Give it a name → and click on Generate Token
- Copt Token in somewhere otherwise token will be lost or regenrate
squ_XXXXX35ab8c79a2deXXXXXc5a0e140c4fb2XXXXX Goto Dashboard → Manage Jenkins → Credentials → Global → Add Credentials → Kind Secret Text. It should look like this
secret: xxxxxxxxxxxxx
ID: sonar-token
Description: sonar-token
- Create it
- Now, go to Dashboard → Manage Jenkins → System → SonarQube installations → Add SonarQube
Name: sonar-server
Server Url: http://<IP_ADDRESS_SONAR_SERVER>:9000
Server authentication token: last created name sonar-token select
Click on Apply and save
Now, go to Dashboard → Manage Jenkins → Tools → SonarQube Scanner installations → Add SonarQube Scanner
Name: sonar-scanner
check: Install Automatically
Version: latest
Click on Apply and save
On Sonar Server click on Administration → Configuration → webhooks → create
Name: jenkins-sonarqube-webhook
URL: http://172.21.61.204:8080/sonarqube-webhook/
- Now let go to our Pipeline and add the Sonar-qube Stage in our Pipeline Script
environment {
    SCANNER_HOME=tool 'sonar-scanner'
}
stage("Sonarqube Analysis "){
    steps{
        withSonarQubeEnv('sonar-server') {
            sh ''' $SCANNER_HOME/bin/sonar-scanner -Dsonar.projectName=Petclinic \
            -Dsonar.java.binaries=. \
            -Dsonar.projectKey=Petclinic '''
        }
    }
}
stage("Sonarqube Quality Gate"){
    steps {
        waitForQualityGate abortPipeline: false, credentialsId: 'sonar-token'
    }
}
- To see the report, you can go to Sonarqube Server and go to Projects.
- You can see the report has been generated and the status shows as passed. You can see that there are 15K lines. To see a detailed report, you can go to issues.
- Install OWASP Dependency Check Plugins if not installed above step
- Goto Dashboard → Manage Jenkins → Plugins → OWASP Dependency-Check. Click on it and install it without restarting.
- First, we configured the Plugin and next, we had to configure the Tool
- Goto Dashboard → Manage Jenkins → Tools → Dependency-Check installations → Add Dependency-Check
Name: DP-Check
Checked Install automatically
Version: latest
- Click on Apply and save
- Now go configure → Pipeline and add this stage to your pipeline
stage('OWASP FS SCAN') {
    steps {
        <!-- dependencyCheck additionalArguments: '--scan ./ --disableYarnAudit --disableNodeAudit', odcInstallation: 'DP-Check' -->
        dependencyCheck additionalArguments: '--scan pom.xml --enableExperimental --format XML', odcInstallation: 'DP-Check'
        dependencyCheck additionalArguments: '--scan ./ --exclude .settings --exclude target --exclude .git --exclude bin --enableExperimental', odcInstallation: 'DP-Check'
        dependencyCheckPublisher pattern: '**/dependency-check-report.xml'
    }
}
- It will take time to complete at first time take 10 to 15 minutes
- Now create maven build install add pipeline script
stage("Build"){
    steps{
        sh " mvn clean install"
    }
}
-
Email Setup on jenkins
- Install Docker plugin Email Extended Notification
- Now Goto Dashboard -> Manage Jenkins -> system -> E-mail Notification
SMTP server: smtp.gmail.com Advnaced checked Use SMTP Authentication Username: myinrbtc@gmail.com Password: <MY_APP_PASS> checked Use SSL SMTP Port: 465 Reply-To Address: myinrbtc@gmail.com Checked Test configuration by sending test e-mail Test e-mail recipient: gupta.surender.1990@gmail.com Click on Test Configuration on right side button if you see this message Email was successfully sent it means configured- Now Goto Dashboard -> Manage Jenkins -> system -> Extended E-mail Notification
SMTP server: smtp.gmail.com
SMTP Port: 465
Advanced
    Add credential
    - Kind username and password
        - Username: myinrbtc@gmail.com
        - password: <MY_APP_PASS>
        - ID: gmail
        - Description: gmail
        - click on add
    - Credential select your gmail id
    - checked SSL

Default Trigger click
    - checked on Always (Also as per your requirements)
Now scan trivy fs and generate report
stage("Trivy File System Scan"){
    steps{
        sh "trivy fs --format  table -o trivy-fs-report.html ."
    }
}
- EMAIL Trivy Report add below in pipeline script
post {
    always {
    emailext attachLog: true,
        subject: "'${currentBuild.result}'",
        body: "Project: ${env.JOB_NAME}<br/>" +
            "Build Number: ${env.BUILD_NUMBER}<br/>" +
            "URL: ${env.BUILD_URL}<br/>",
        to: 'gupta.surender.1990@gmail.com',
        attachmentsPattern: 'trivy-fs-report.html, trivy_image_report.txt, dependency-check-report.xml'
    }
}
-
Docker Image Build and Push
- We need to install the Docker tool in our system, Goto Dashboard → Manage Plugins → Available plugins → Search for Docker and install these plugins and click on install without restart
- Docker
- Docker Commons
- Docker Pipeline
- Docker API
- Pipeline Stage View
- docker-buid-step (optional)
- Now, goto Dashboard → Manage Jenkins → Tools → Docker installations → Add Docker
Name: docker checked Install automatically (Download from docker.com) Docker Version: latest- Click on Apply and save
- We need to install the Docker tool in our system, Goto Dashboard → Manage Plugins → Available plugins → Search for Docker and install these plugins and click on install without restart
-
Now add docker hub credentials
- Goto dashboard → Manage Jenkins → Credential → global → Add Credential → Kind username and password select
Username: surendergupta password: <MYPASS> ID: docker-hub Description: docker-hub- Click on create
Add this stage to Pipeline Script
stage("Docker Build & Push"){
    steps{
        script{
            withDockerRegistry(credentialsId: 'docker-hub', toolName: 'docker') {
                sh "docker build -t petclinic ."
                sh "docker tag petclinic surendergupta/petclinic:${BUILD_NUMBER} "
                sh "docker tag petclinic surendergupta/petclinic:latest "
                sh "docker push surendergupta/petclinic:${BUILD_NUMBER}"
                sh "docker push surendergupta/petclinic:latest"
                // remove from jenkins server storage increase space
                sh "docker rmi petclinic"
                sh "docker rmi surendergupta/petclinic:${BUILD_NUMBER}"
            }
        }
    }
}
- When you log in to Dockerhub, you will see a new image is created
- Trivy scan image report
- Add this stage to your pipeline syntax
stage("TRIVY Image Scan"){
    steps{
        sh "trivy image surendergupta/petclinic:latest > trivy_image_report.txt"
    }
}
- Deploy the image using Docker Pipeline
- Add this stage to your pipeline syntax
stage("Deploy Using Docker"){
    steps{
        // Stop and remove the container only if it exists
        sh """
        if [ \$(docker ps -q -f name=petclinic) ]; then
            echo "Stopping existing container..."
            docker stop petclinic
        fi

        if [ \$(docker ps -aq -f name=petclinic) ]; then
            echo "Removing existing container..."
            docker rm petclinic
        fi

        echo "Pulling the latest image..."
        docker pull surendergupta/petclinic:latest

        echo "Starting new container..."
        docker run -d --name petclinic -p 8082:8080 --restart always surendergupta/petclinic:latest
        """
    }
}
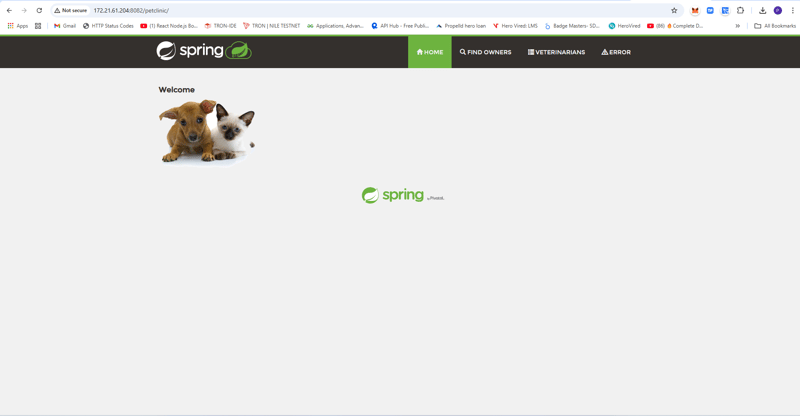
- Now deploy your application using Docker complete
- Running Application on docker screenshot
- Now Phase 1 complete
Phase 2 Running Application on Tomcat Server
-
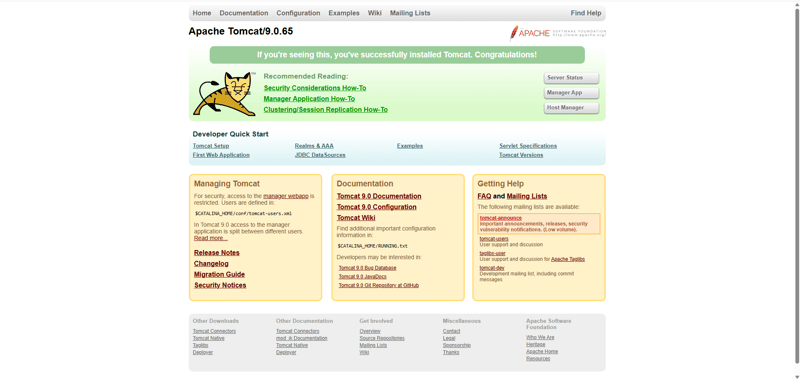
Install Tomcat on Port 8083 and finally deploy on Apache Tomcat
- Before we add Pipeline Script, we need to install and configure Tomcat on our server. Here are the steps to install Tomcat 9
- Change to opt directory
cd /opt- Download the Tomcat file using the wget command
sudo wget https://archive.apache.org/dist/tomcat/tomcat-9/v9.0.65/bin/apache-tomcat-9.0.65.tar.gz- Unzip tar file
sudo tar -xvzf apache-tomcat-9.0.65.tar.gz- Move to the conf directory and change the port in the Tomcat server to another port from the default port
sudo cd apache-tomcat-9.0.65 sudo vi conf/server.xml- Update 8080 to 8083 in Connecter and esc + : + wq and then enter to save file
- Now Update Tomcat users’ XML file for manager app login
sudo vi conf/tomcat-users.xml // Add below line inside <tomcat-users></tomcat-users> tag just before </tomcat-users> tag <user username="admin" password="admin1234" roles="admin-gui, manager-gui"/>- Create a symbolic link for the direct start and stop of Tomcat
sudo ln -s /opt/apache-tomcat-9.0.65/bin/startup.sh /usr/bin/startTomcat sudo ln -s /opt/apache-tomcat-9.0.65/bin/shutdown.sh /usr/bin/stopTomcat- Go to this path and comment below lines in manager and host-manager files
sudo vi webapps/manager/META-INF/context.xml sudo vi webapps/host-manager/META-INF/context.xml // Comment below line both file <!-- Valve className="org.apache.catalina.valves.RemoteAddrValve" allow="127\.\d+\.\d+\.\d+|::1|0:0:0:0:0:0:0:1" /> -->- Now Stop and start tomcat service
sudo stopTomcat sudo startTomcat- Certainly! To allow both ubuntu/vagrant (if use vagrant box) and Jenkins users to copy the petclinic.war file to the /opt/apache-tomcat-9.0.65/webapps/ directory without entering passwords, you can add the appropriate entries to the /etc/sudoers file. Here’s how you can do it: Use the sudo command to edit the sudoers file using a text editor like visudo:
sudo visudo- Scroll down to an appropriate section (e.g., just below the line with %sudo ALL=(ALL:ALL) ALL) and add the following lines:
#after workspace change your job name ubuntu ALL=(ALL) NOPASSWD: /bin/cp /var/lib/jenkins/workspace/PetClinic/target/petclinic.war /opt/apache-tomcat-9.0.65/webapps/ jenkins ALL=(ALL) NOPASSWD: /bin/cp /var/lib/jenkins/workspace/PetClinic/target/petclinic.war /opt/apache-tomcat-9.0.65/webapps/- Save the file and exit the text editor.
- If you see the :8083 running tomcat server
- Add this stage to your Pipeline script
stage("Deploy To Tomcat Server"){
    steps{
        sh "cp  /var/lib/jenkins/workspace/PetClinic/target/petclinic.war /opt/apache-tomcat-9.0.65/webapps/ "
    }
}
- Still if you have permission issue first restart jenkins server and second use alternative way
sudo groupadd tomcat
sudo usermod -aG tomcat $USER
sudo usermod -aG tomcat jenkins
sudo chgrp -R tomcat /opt/apache-tomcat-9.0.65/webapps/
sudo chmod -R g+w /opt/apache-tomcat-9.0.65/webapps/
- And you can access your application on Port 8083. This is a Petclinic Real World Application that has all Functional Tabs.
- Access the Petclinic Real World Application
http://<public-ip>:8083/petclinic


Top comments (0)