This article will test a simple log in page. Consider it the Hello World of testing using two frameworks.
I'll be writing using two different languages.
- Selenium using Java
- Cypress using JavaScript
For the sake of brevity, the article will be divided into three sections
- Setting up and Testing with Cypress
- Testing with Selenium
- Comparison between Cypress and Selenium and use case scenarios
Setting up and Cypress installation
Let’s call the web app we will work on NASS Protector Launch. Anytime there is an alien attack on the planet, we can always login into the web app and click the “Rescue” button to wade off the incoming attacks. As such we need to monitor our login page to ensure it never malfuncions – and even if it does, for us to know on time
Since is a grand app,our engineers need to keep working round the clock to add additional more functionality to save the world but our concern here is to ensure the login always works regardless of the changes being made and for us to detect as fast as possible if any major functionality is broken And this is where automation test comes in
Let's setup the page first before we embark on automating testing
Here is a simple codebase for the login page and the dashboard with plain html, a little css and javascript.
Now that our login and dashboard pages are setup. It is time to move on to Cypress Installation
We start by creating a package.json to manage the cypress dependency that will be installed later.
npm init
I prefer using npm init -y then make any edit from there. Its faster that way. The next thing is to install cypresss. I will be using npm
npm install cypress –only=dev
If you prefer yarn
yarn add cypress
When its done, you will get something like this

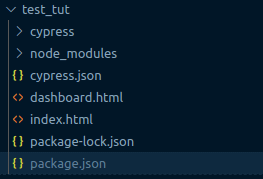
At this stage, your project structure should resemble this

to run cypress, simply run
npx cypress open
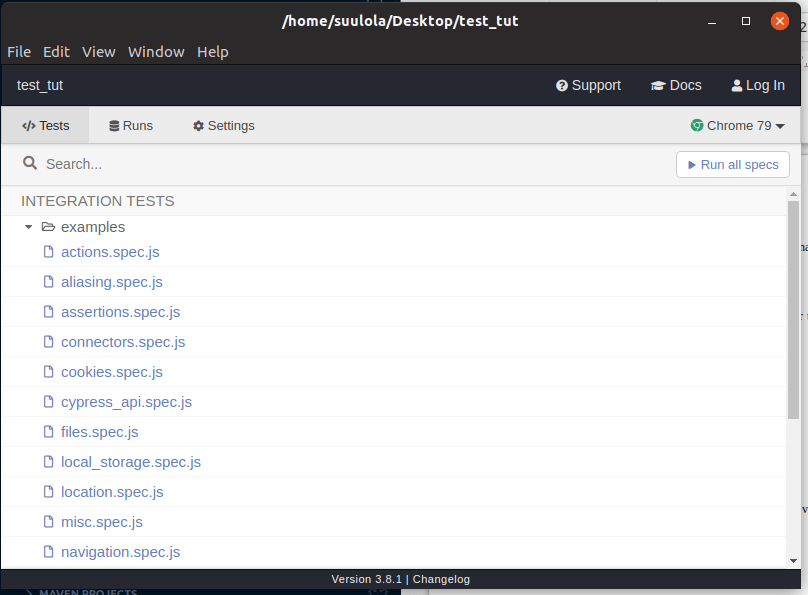
This pops up the above test modal suite you will get very familiar with very soon and if you look closely a folder will be created in your project directory named cypress.
If you got here, you’ve successfully set up cypress and you’re good to start writing code using Cypress. You will be writing most of your test code inside the cypress/integration folder. There are some examples in the example folder to familiarize yourself with Cypress syntax.
I normally delete the example folder but its a good place to start learn the workings of Cypress.
The first thing is to create a file within the integration folder, I will call it protector_launch and it will contain all the tests that has to do with this particular application while deleting the example folder.
Inside the protector_launch, create a test script. I will call mine login.spec.js
the ‘spec’ in-between is to show this is a test file and not a typical JavaScript file.
We start with a basic outline
the first line which is the reference line indicates that this is a cypress file and this aids in bringing auto-suggestion of cypress syntax while typing. Without it, you wont have auto-suggest.
If you’ve ever worked with mocha/chai or similar testing frameworks, you will be familiar with the describe and it syntax used in cypress.
The describe block is a way to group our test.It takes two argument
- a string name describing what the test group is about
- a callback function where we write each of our it statements that execute the test
Inside the describe block callback, let's start writing our test.
  before(() => {
    cy.visit("./../../../index.html")
  })
The first thing we want to do before we run our test is to visit the url. In this case, it is a relative path on the local machine. Assuming, i want to test my facebook login url
cy.visit("https://web.facebook.com/login")
Now, this is where the fun begins. We are set to write our first test here after visiting the web page.
  it("checks that the input fields are visible", () => {
    cy.get('#mail').should('be.visible')
    cy.get('#pass').should('be.visible')
  })
The it block also takes the same arguments as the describe block except that the content of the callback are usually actual tests.
Here we use cy.get() to locate the email input field that has an id of mail. You can use your developer tools to check the selector of the element you want to target. cy.get() in cypress acts like document.querySelector() in javascript. Just specify the selector and it does the magic.
After selecting the elements with id of mail and pass. We use the should method to check if it is visible on the page, if it is visible then the test will pass else the test fails.
  it("a user cannot login with incorrect credentials", () => {
    cy.get('#mail').type('user@alien.com')
    cy.get('#pass').type('frompluto')
    cy.contains('Log').click()
    cy.url().should('include', '/index.html')
    cy.get('#mail').should('be.visible')
    cy.get('p').should('not.have.text', 'Now you can save the world')
  })
The next test is to check if a user can login in with incorrect credentials. type is used to type the details in the input field selected.
cy.contains() searches for an element on the page that contains the text, then .click() clicks on that element.
The assertion here tests that the user is still on the same page with
cy.url().should('include', '/index.html')
A successful login will have changed the page to dashboard.html so if that passes, then the login failed. The other assertions ensures the input field with an id of mail is still present on the page and that the page does not contain the text present on the dashboard.
  it("logins into the application with the correct credentials", () => {
    cy.get('#mail').type('test@test.com')
    cy.get('#pass').type('tester')
    cy.contains('Log').click()
    cy.url().should('include', '/dashboard.html')
    cy.get('p').should('have.text', 'Now you can save the world')
  })
This next test code does the same thing as above except that it checks if a user with the correct credentials is able to login to the application and move to the dashboard where you can save the world.
Apart from web page testing, cypress can also be used for
- API testing
- Performance/Load testing
Using the current application, we can write a simple GET request
  // a simple api request mock
  it("checks if the app is up and running when called", () => {

    // the request body contains the method(whether GET, POST, PUT, DELETE), the endpoint/url and the necessary header options
    cy.request({
      method: 'GET',
      url: './../../../index.html',
      headers: {
        accept: 'text/html',
      }

    })
    .then(response => {
      // this is where the response gotten from the server is tested
      // 200 response means its okay and good
      // when not sure, you can always console.log(response)
      expect(response.status).to.eq(200)
      expect(response.statusText).to.eq("OK")
      expect(response).to.have.property("headers");
      expect(response.body).to.have.length.greaterThan(500);

    })
  })
A simple performance test with the current web page will look like this
  it('check page load time', () => {
    cy.visit('./../../../index.html', {
      onBeforeLoad: win => {
        // marks the start time when the request is launched
        win.performance.mark("start-loading")
      },
      onLoad: win => {
        // marks the time when the page is displayed
        win.performance.mark("end-loading")
      }
    }).its("performance").then(perf => {
      // when not sure, you can always console.log("this is perf",perf)

      // this is where the measure takes place. it subtracts the end-loading from the start-loading and stores it in pageLoad
      perf.measure("pageLoad", "start-loading", "end-loading")
      const load = perf.getEntriesByName("pageLoad")[0]
      // checks if the load duration is more than 10ms
      assert.isAtMost(load.duration, 10)
    })


  })
I added comments to the code to make it explanatory enough to understand.
The full codebase can be found on
Comments, Questions and Observations are welcomed.
Next is writing our Selenium test

Top comments (0)