
Introduction to NuGet
NuGet is a package manager that delivers compiled source code (DLLs) and other files (scripts and images) related to code. A NuGet package takes the form of a zip file with the extension .nupkg. This makes adding, updating, and removing libraries easy in Visual Studio applications. Using NuGet to install and update packages reduces the manual work of configuring third-party libraries in an application by installing a setup or extracting a zip file and adding the required assemblies to references and files.
Configure the NuGet feed
What is the feed link?
The feed link is a URL that is the location of the NuGet package published in the localhost or local directory. You can get a package only through a feed link from the host.
How to configure the feed
By default, Visual Studio is configured with the public NuGet feed link.
To configure the private feed link or a local path in Visual Studio, follow these steps:
- In Visual Studio, go to Tools > Options and then select Package Sources under the NuGet Package Manager.
- Choose the Add icon (+), edit the Name, and then provide the feed link or local path in the Source Click Update after updating the feed link.

NuGet Package Manager
The NuGet Package Managerin Visual Studio on Windows allows you to easily install, uninstall, and update NuGet packages in projects and solutions.
Install a third-party NuGet package
- In Solution Explorer , right-click either Solution , a project , or the References in a project, and then select Manage NuGet Packages.

- The Browse tab displays packages by popularity from the currently selected source. Search for a specific package using the search box at the top-left corner. Select a package from the list to display its information, which also makes the Install button available along with a drop-down for selecting a package version.

- Select the desired version from the drop-down, and then click Install. Now, Visual Studio installs the package and its dependencies into the project. You may be asked to accept license terms and shown the list of NuGet packages, including dependencies, in a Preview Changes When installation is completed, the added packages appear in the Installed tab. Packages are also listed in the References either as assemblies or package references, indicating that you can refer to them in the project using statements.
Install beta NuGet packages
By default, prerelease-versioned packages are not available when searching NuGet. Only stable versions are available. If you want to include prerelease versions in your search, select the Include prerelease option next to the search box.

Install NuGet packages without dependencies
By default, when installing NuGet packages, corresponding package dependencies will also be installed in your project. To avoid the installation of dependent packages, choose the Ignore Dependencies option in the Dependency behavior drop-down in NuGet Package Manager.

Uninstall a NuGet package
- In Solution Explorer , right-click either the Solution , the desired project , or the References in the project, and then select Manage NuGet Packages.
- Select the Installed
- Select the package to uninstall (use search to filter the list if necessary), and then select Uninstall.

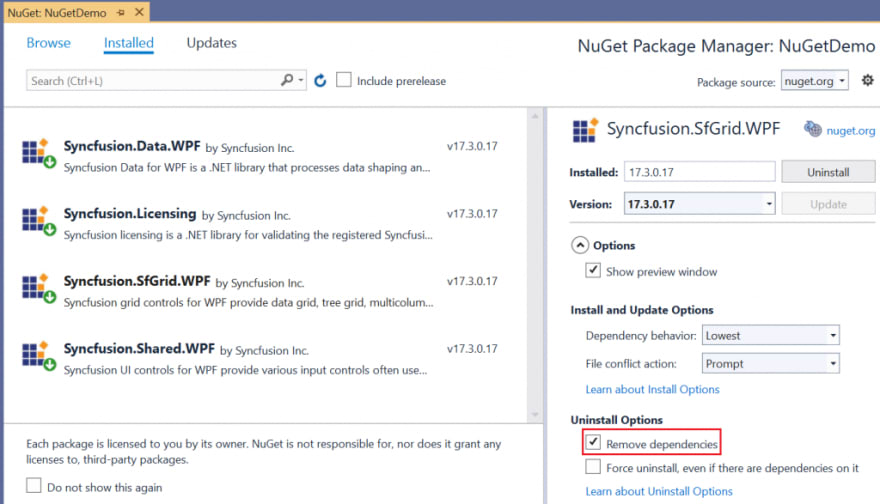
Remove dependencies when uninstalling NuGet packages
To uninstall the dependency packages of a selected NuGet package, choose the Remove Dependencies option from the NuGet Package Manager.
Update NuGet packages
- In Solution Explorer , right-click either the Solution , the desired project , or the References of the project, and then select Manage NuGet Packages.
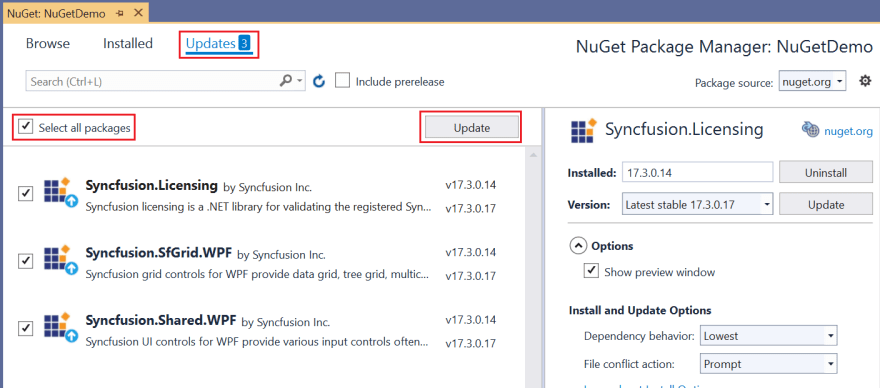
- Select the Updates tab to see the packages that have updates available from the selected package sources. Select the Include prerelease check box if you want to include prerelease package versions.
- You have two options here: If you want to update all the updates that are available, select the Select all packages check box, and then click the Update If you want to update a specific package, select the package and desired version from the drop-down on the right, and then click the Update button.
Restore NuGet packages
Package Restore installs the direct dependencies of a project as needed and then installs any dependencies of these packages throughout the entire dependency graph. When the project is opened or compiled, all the added NuGet packages will be restored. Follow these steps to use this feature:
- Navigate to Tools > Options > NuGet Package Manager > General , and then select the Allow NuGet to download missing packages check box under Package Restore.

- In Solution Explorer , right-click the solution, and then select Restore NuGet Packages.

Clear NuGet packages
Clear NuGet packages is an action that removes already installed NuGet caches from the cache location. Usually the NuGet packages are installed from the cache location if one exists, otherwise it will be downloaded from the corresponding feed in the cache location.
Why do we need to clear NuGet?
If you encounter package installation problems or if you want to ensure that you’re installing packages that have been configured locally (your own packages), clear the NuGet cache in the cache location to resolve the issues.
How to clear NuGet
You can clear NuGet by following one of these ways:
- Manually remove the NuGet cache from this location: (%userprofile%.nuget\packages).
- Clear the cache automatically through Visual Studio by choosing the following option: Go to Tools > NuGet Package Manager > General , and then click Clear All NuGet Cache(s).

Package Manager Console
The NuGet Package Manager Console uses NuGet PowerShell commands to find, install, uninstall, restore, and update NuGet packages. The console is built into Visual Studio on Windows.
- Open your project or solution in Visual Studio, and then open the Package Manager Console in Visual Studio by navigating to Tools > NuGet Package Manager > Package Manager Console.
- By default, console commands operate against a specific package source and project as set in the control at the top of the window. To manage package sources, select the gear icon. This is a shortcut to Tools > Options > NuGet Package Manager > Package Sources.

Install a NuGet package
Install a package using the console by entering the following command:
Install-Package -Version
Example :
PM> Install-Package Syncfusion.SfChart.WPF -Version 17.3.0.14
Install a beta NuGet package
If you want to install a beta (prerelease) NuGet package using the console, include -IncludePrerelease in the command:
Install-Package -Version IncludePrerelease
Example:
PM> Install-Package Syncfusion.SfChart.WPF -Version 17.2.0.28-beta -IncludePrerelease
Install a NuGet package without dependencies
If you want to install a package without dependencies using the console, use -IgnoreDependencies in the command:
Install-Package -Version IgnoreDependencies
Example:
PM> Install-Package Syncfusion.SfChart.WPF -Version 17.2.0.28-beta -IgnoreDependencies
Uninstall a NuGet package
To uninstall a package from the project through the console, use the following command:
Uninstall-Package
Example:
PM> Uninstall-Package Syncfusion.SfChart.WPF
Remove dependencies when uninstalling a NuGet package
To remove the dependencies of a selected package when uninstalling it through the console, use -RemoveDependencies in the uninstall command.
Uninstall-Package -Version -RemoveDependencies
Example:
PM> Uninstall-Package Syncfusion.SfChart.WPF -RemoveDependencies
Update NuGet packages
The Update-Package command is used to upgrade or downgrade an existing package in your project.
Update-Package [Package Name] [-Version] [-IgnoreDependencies]
Example:
PM> Update-Package Syncfusion.SfChart.WPF -Version 17.2.0.40 -ignoreDependencies
Update beta NuGet packages
To update prerelease (beta) packages, use the following command:
Update-Package [Package Name] [-Version] [-IgnoreDependencies] [-IncludePrerelease]
Example:
PM> Update-Package Syncfusion.SfChart.WPF -Version 17.2.0.40 -ignoreDependencies -IncludePrerelease
NuGet CLI
The NuGet CLI tool allows you to easily update and restore NuGet packages in projects and solutions. To execute NuGet CLI commands, you must have the nuget.exe file. You can download it from nuget.org.
The NuGet CLI requires a packages.config file for package references. This should be placed in the project location.
Open the command prompt, and then navigate to the directory that contains the project file to execute the NuGet CLI commands.
Install a package
The install command downloads and installs the package into the project from specified package sources. When installing the package, it is placed in the project’s root directory by default.
Use the following command to install a NuGet package in the packages folder:
nuget install -OutputDirectory
Example
nuget install Syncfusion.Data.WPF -OutputDirectory D:\Sample
Install a package with a specific version
NuGet installs the latest version of a package when using the install command unless you specify the package version. Specify the version in the install command to install a specific version of the package.
nuget install -Version
Example
nuget install Syncfusion.Tools.windows -Version 17.2.0.40
Uninstall a NuGet package
The uninstall-package command removes a NuGet package from the project.
uninstall-package
Example
uninstall-package Syncfusion.Data.WPF
Uninstall dependent NuGet packages
When uninstalling a NuGet package that depends on other packages, use the -Force command.
uninstall-package -Force
Example
uninstall-package Syncfusion.Data.WPF -Force
Nuget Restore
To restore the solution with the help of the NuGet CLI, use the restore command. It will restore all the packages available in the package.config.
nuget restore
Example:
nuget restore D:\NuGet\NuGetDemo.sln
Restore only adds packages to the disk; it does not change a project’s dependencies. To restore a project’s dependencies, modify packages.config and then use the restore command.
dotnet CLI
The dotnet CLI allows you to easily install, uninstall, and update NuGet packages in projects and solutions. It runs on Windows, Mac OS X, and Linux.
Open a command prompt , and then navigate to the directory that contains the project file. Use the following dotnet CLI commands to perform the respective operations:
Install a package
Use the add package command to add a package into the project references:
dotnet add package
Example
dotnet add package Syncfusion.SfGrid.WPF
Install a specific version of a package
If a version is not specified, NuGet installs the latest version of the package. You can also use the dotnet add package command to install a specific version of a NuGet package:
dotnet add package
Example
dotnet add package Syncfusion.SfGrid.WPF 17.2.0.40
Remove a package
The remove package command removes a package reference from a project file:
dotnet remove package
Example
dotnet remove package Syncfusion.SfGrid.WPF
Restore a package
To restore a package, use the dotnet restore command. It restores the project references from the current directory:
dotnet restore [Project|Solution]
Example
dotnet restore D:\NuGetDemo\NuGetDemo.csproj
Conclusion
I hope this blog enriched your knowledge about managing NuGet packages in .NET projects. Try out these different approaches and let us know how they worked out for you in the comments section below.
Syncfusion also makes its components available as NuGet packages on NuGet.org. You can use them when using any Syncfusion components in your projects. Syncfusion has about 1000 components in various platforms such as
If you encounter any issues when using them, please feel free to reach out to us through our support forum, Direct-Trac, or feedback portal. We are happy to assist you!
The post How to Use NuGet Packages appeared first on Syncfusion Blogs.

Top comments (1)
and the main question is: commit or not commit the packages folder?