
Please reach out to me on Twitter @nathangloverAUS if you have follow up questions!
This post was originally written on DevOpStar. Check it out here
I've always been curious as to what my pets get up to when I'm out of the house. This curiosity finally got the best of me this week and I decided to build I wanted to build a dog bark detection system in order to keep track of how often our two dogs bark.
This guide covers the second of three guides around how the Dog Bark Detector was built; specifically focusing on the Frontend. You can see the components highlighted below that are core to this section of the guide.

It covers the following concepts at a high level along with providing all the source code and resources you will need to create your own version.
- AppSync data sourcing from DynamoDB
- Vue Frontend
Research
You're probably noticing a trend now, but I will always start a project by doing some research for existing code bases or samples available that might have already solved what I am trying to do. This was no exception and I went hunting around for good ways to present the data I've started to accrue.
Turns out I didn't need to look very far this time though...
- DynamoDB AppSync data source - Fantastic service that allows you to simply connect an AppSync (GraphQL) API up to an existing DynamoDB database and have all your access patterns created for you.
- Amplify frontend - AWS Amplify is an easy way to integrate your frontend with backend AWS services
- Vue.js - Frontend framework that the amazing Rico Beti knows really well and offered to help me with
I felt really confident based on the quick research that we'd be able to achieve a simple proof of concept fairly easily based on the tech stack above. In the next section we start implementing it all.
Creating AppSync API
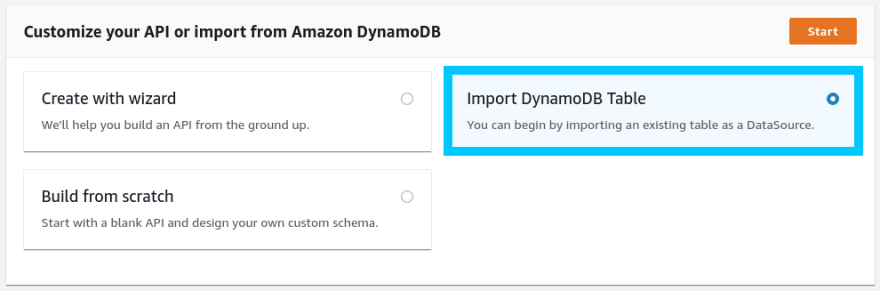
In this section we will start creating our AppSync API. Start by navigating to the AppSync console and click the Create API button. This will start up a launch wizard where you will be selecting Import DynamoDB Table.
Select the region you table is located in and then select your existing table (should auto-fill). You can either use the auto generator for role or if you know what you're doing; select an existing role that will be used by AppSync to connect to the DynamoDB table.

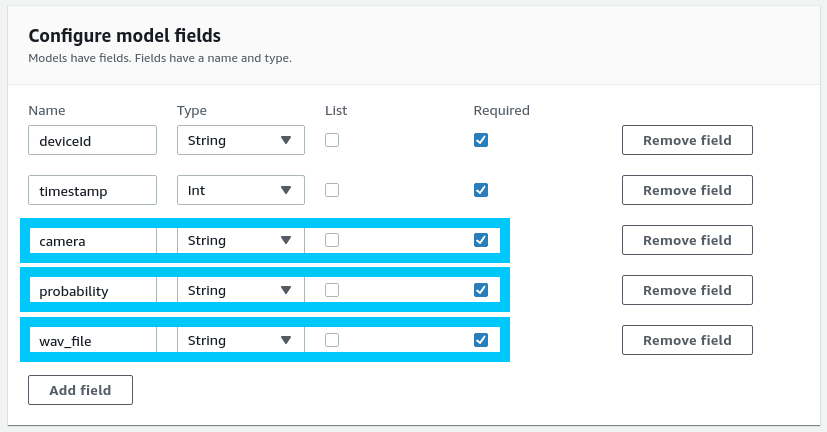
Once you click import you will be prompted to define the extra schema attributes. For the sake of completeness we will add all the required fields to the list so they are generated in the API for us.
Hit complete and you'll be presented back your new AppSync API ready for use. Before we go using it however, we're going make a couple small changes to the schema so that it only allows read access. Navigate to the Schema tab under your new API and comment out the followin sections
// COMMENT THESE
input CreateBarksInput {
    deviceId: String!
    timestamp: Int!
    probability: String!
    camera: String!
    wav_file: String!
}

input UpdateBarksInput {
    deviceId: String!
    timestamp: Int!
    probability: String!
    camera: String!
    wav_file: String!
}

input DeleteBarksInput {
    deviceId: String!
    timestamp: Int!
}

type Mutation {
    createBarks(input: CreateBarksInput!): Barks
    updateBarks(input: UpdateBarksInput!): Barks
    deleteBarks(input: DeleteBarksInput!): Barks
}

Click save and validate that you weren't given any syntax errors when changing the Schema. Next we'll move onto connecting up our API in the Vue.js app.
Connect AppSync API
The next step is to connect the AppSync API to our frontend app by using AWS Amplify. You might have noticed that when you first imported the DynamoDB instance to AppSync you were given a set of commands to run to integrate AWS Amplify. We're going to be following these steps now in order to do just that.
I recommend working with our existing repository t04glover/dog-bark-detector by pulling it down locally
git clone https://github.com/t04glovern/dog-bark-detection.git
cd dog-bark-detection/app
Next remove any existing configuration that we have currently added (this is using our personal API).
rm -rf amplify
rm -rf src/graphql
rm src/API.ts
rm src/aws-exports.js
Next follow the instructions from the AppSync page in regards to configuring this Vue.js app with Amplify. Run the following commands within the app folder of the project.

npm install -g @aws-amplify/cli
amplify init
# ? Enter a name for the project bark-detector
# ? Enter a name for the environment dev
# ? Choose your default editor: Visual Studio Code
# ? Choose the type of app that you're building javascript
# Please tell us about your project
# ? What javascript framework are you using vue
# ? Source Directory Path:  src
# ? Distribution Directory Path: dist
# ? Build Command:  npm run-script build
# ? Start Command: npm run-script serve

amplify add codegen --apiId <API_ID_FROM_YOUR_OWN_PROJECT>
NOTE: When prompted, allow it to generate all the possible API's for you.
Then within the actual Vue.js code in app/src/store/app.ts you are able to see where we are importing the Amplify specific code to setup authentication
...
import Amplify, { API, graphqlOperation } from "aws-amplify";
import { listBarks } from "@/graphql/queries";

const awsconfig = require("@/aws-exports").default;

Amplify.configure(awsconfig);
...
Later on in that same file we call the listBarks GraphQL operation like so in order to pull 500 records and push them into the list of items on the frontend
const allBarks = await API.graphql(graphqlOperation(listBarks, {limit: 500}));
const detections: IDetection[] = (allBarks as any)
    .data.listBarks.items.map((b: any): IDetection => ({
        id: b.deviceId,
        camera: b.camera,
        timestamp: new Date(b.timestamp * 1000),
        certainty: parseFloat(b.probability),
        audioUrl: b.wav_file,
        rating: "unknown",
    }));

this.setDetections({detections});
Run the app by running the following commands within the app folder of the project.
npm install
npm run dev
Open up your browser to http://localhost:8080/ to bask in the glory of the working app

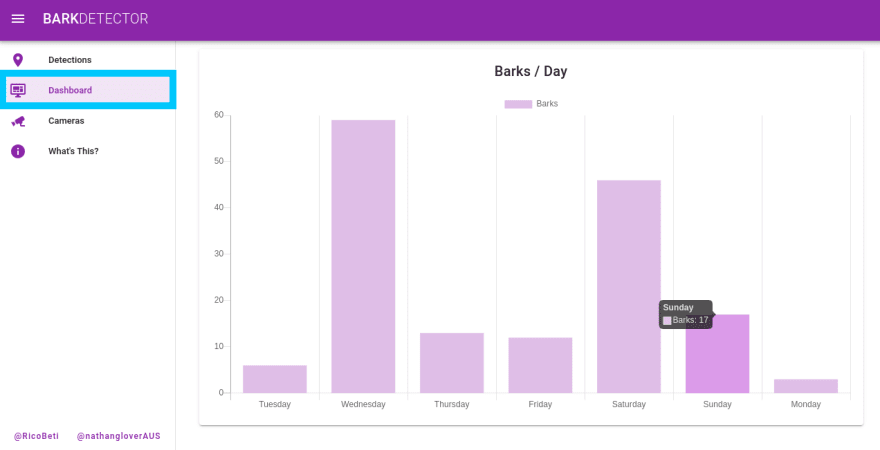
Bonus Graphs
You might have also noticed that there is a Dashboard tab on the left. If you open this up you should be able to see a trend of the last weeks worth of data displayed.
Conclusion
This concludes the final part of this guide where we've achieved our goal of creating a simple Dog Bark frontend using Vue.js, Amazon AppSync and AWS Amplify.
If you have any questions want to show off how you've changed the frontend to be more interesting; please hit me up on Twitter @nathangloverAUS

Top comments (1)
This is definitely a great idea for us pet parents! I do know what my pups, all 13 of them get up to when I leave home, they play, bark and disturb the neighbours. Used to think it was a sign on separation anxiety, shihtzuexpert.com/separation-anxie... but it's not, they just like to be pups, and play and bark.
This setup would definitely help my to maintain peace with my neighbors, who tend to complain a lot about noise, while they themselves are not too quite!
Is there a packaged version of this? where it can easily be setup like an out of the box kind of setup?