
What is an API?
API stands for Application Programming Interface. API allows two computers to communicate under some constraints.
If I want to build a website that displays news for a specific location, I would call a news API for the data.
APIs are generally used to build integrations. You might have used Notion. You have an option of integrations in Notion in which you can integrate Notion with other apps like Github, Slack, Google Drive, and more.
These integrations are made with the help of APIs.
To understand APIs, let's go to GitHub REST API documentation which we will be using in our exercise till the end.

If you scroll down to the left sidebar, they have a lot of documentation for various APIs.

If you navigate under the Repositories, many APIs are documented accordingly. In the image above you can see List Organizations repositories.
So if anyone wants to use data from public repositories of an organization in their project they can do it with the help of APIs.
For example, I wanted to add all of my repositories to my portfolio, so I use GitHub APIs, which I will show you by the end of the blog post.
Apart from integrations, you might want some data from an external website to be added to your website. For that, you can use Fetch API in Javascript.
What is Fetch API?
Javascript provides a method called fetch() to fetch data from a URL.
fetch() takes one mandatory parameter which is the URL you want to fetch from and an optional parameter which is the configuration object.
The URL can be a served website, an API, or a local file.
The configuration object is the option given to manipulate the request for different methods. We will discuss this in brief below.
fetch() returns a promise which resolves into a JSON response.
To understand let us take a simple fetch request.
const URL = 'https://example.com/home';
fetch(URL)
  .then((data) => data.json())
  .then((response) => console.log(response));
Fetch doesn't return a direct JSON response but a promise. We resolve the promise using a .then() method.
Using .json() we convert the data to JSON and that returns a promise.
We resolve it again with .then() into a response object.
Using console.log() we print the data in the console.
In the above code, the Fetch method follows the GET method by default. You can give other methods also. You can give an optional configuration object to fetch with other methods. You can learn more about each method in detail on the official documentation.
Properties
Method
The options are,
- "POST" - insert data
- "PUT" - update data
- "DELETE" - delete data
- "GET" - retrieve data
Headers
This defines the type of data we are using. The sub-properties are:
- 'Content-type' -
- For JSON data, like a JSON file, we use 'application/json'.
- For form data ie., usually JSON but collected from an HTML tag, we use 'application/x-www-form-urlencoded'
- For text data we use 'text/plain'
Body
This property is used to define the data we are using. It can be Form data, Text, or JSON.
The body data type must match the "Content-Type" header. Note that when sending data to a server, you must send it in the form of a string. Therefore, we convert JSON to string using JSON.stringify(object)
// Example POST method implementation:
async function Postdata(url = '', object = {}) {
  const response = await fetch(url, {
    method: 'POST',
    headers: {
      'Content-Type': 'application/json'
    },
    body: JSON.stringify(object)
  });
  return response.json();
}
Postdata('https://example.com/answer', { name: "Riya"})
  .then((data) => {
    console.log(data);
  });
How to use Fetch with Async Await?
Fetch fits great with async await. A simple async function with fetch looks like below.
const URL = 'https://example.com/home';
async function fetchHome() {
  const response = await fetch(URL);
  // waits until the request completes
  console.log(response);
}
In the above function, the await keyword is present. Because of this, the async function is paused until the response is fetched from the URL.
But, we don't get a JSON response.
To get JSON, we will use .json() method on the response variable. It converts the HTTP response to JSON and will return a promise which resolves using .then()
const URL = 'https://example.com/home';
async function fetchHome() {
  const response = await fetch(URL);
  const data = await response.json();
  console.log(data);
}
fetchHome().then(jsonData => {
  jsonData;
});
When use Fetch API?
We have several libraries which we can use to retrieve JSON data from APIs. Sometimes, organizations have their libraries such as GitHub have Octokit library.
Notion has a Notionhq client.
One of the most famous external libraries is Axios.
Axios can be a very efficient and easy approach to fetching JSON data. But if you have to import these libraries into your project to use them.
If you don't want to import external libraries you can use fetch API as it is an inbuilt method.
One downside of using Fetch API can be you have to write the configuration object for methods other than a get request.
Exercise
Fetching from Github APIs
I have been working on my portfolio website lately. I thought to add all my repositories from GitHub programmatically to my portfolio.
To do this I made a simple fetch API request in Node.js.
Prerequisites
- Node.js installed on your system.
- A GitHub account and some repositories in it.
- And a passion to do this exercise.
- What you will learn from the exercise?
- How to use Fetch API to fetch data from a URL?
- How to insert JSON key values in HTML?
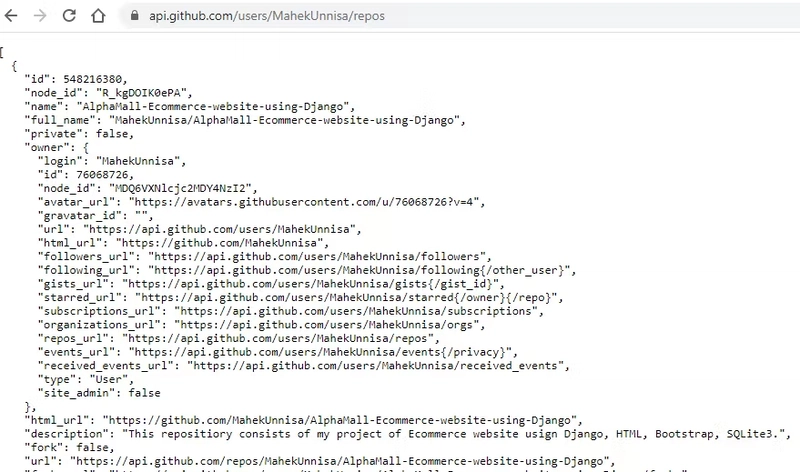
const URL = "https://api.github.com/users/MahekUnnisa/repos"
function listrepos() {
    fetch(URL)
    .then(result => result.json())
    .then(data => console.log(data))
}
listrepos()
To fetch the data from the GitHub account, you can visit GitHub Documentation.
The above code snippets show a simple fetch request to the URL.
The data from GitHub is fetched from the URL https://api.github.com/
To get the repositories for a user, add an endpoint /USERNAME/repos.
As seen above if you fetch from the user you get a resolved JSON response. Now you have the data and you can use it any way you want.
How to manipulate and add JSON to HTML?
To understand this visit the URL mentioned in the Javascript file.
On this page, we have a JSON response that includes all the details of the repositories in my GitHub account.
For this exercise, I only want the Name, URL, Description, and Tags.
Before that let's see what the HTML body looks like.
<body>
    <div class="nav">
        <ul class="nav-list">
            <li class="nav-item"><a href="/">Home</a></li>
            <li class="nav-item"><a href="/about">About</a></li>
            <li class="nav-item"><a href="/contact">Contact</a></li>
            <li class="nav-item"><a href="/blog">Blog</a></li>
            <li class="nav-item"><a href="/github">GitHub</a></li>
        </ul>
    </div>
<!--observe from here-->
    <div id="repo">
        <h1 class="heading">My GitHub</h2>
        <button class="github-profile"><a href="https://github.com/MahekUnnisa">View Profile</a></button>
    </div>
    <script type="text/javascript" src="/static/js/githubapp.js"></script>
</body>
Now the page looks like the image below.

We have a div named repo in the HTML and I want the respective repo details inside the repo div.
So to achieve that, I will have to insert HTML with the help of Javascript.
Firstly, to access key values from JSON, you can put JSON."key".
In this case,
- data.name
- data.description
- data.topics
But for all the repos, I don't want to repeat these steps, so I will use a for loop.
The resultant js file looks like the one below.
const URL = "https://api.github.com/users/MahekUnnisa/repos"
function listrepos() {
    fetch(URL)
    .then(result => result.json())
    .then(data => {
        data.forEach(repo => {
            const markup = `<div id="repo-item">
    <a class ="repo-link "href = "https://github.com/MahekUnnisa/${repo.name}"<h2 id="repo-name">${repo.name}</h2></a>
    <h3 id="repo-desc">${repo.description}</h3>
    <span>${repo.topics}</span>
</div>`;
            let obj = document.getElementById('repo');
            obj.insertAdjacentHTML('beforeEnd', markup);
        })
    })
}
listrepos()
- Fetch the data from the URL.
- Resolve it and store it in the data object.
- Define the HTML you want inside the div and store it in a variable.
- For this, you can use a template string which is keeping a multiline string inside backticks "
". You can use a template string, a multiline string inside backticks "" With this, you can use variables between the string characters. You can put a variable name inside a curly parenthesis followed by a dollar sign. For example ${repo.name} - Get the div by id using getElementById() method and store it in a variable.
- Implement a for loop using the forEach keyword, i.e., for each index in the data array.
- Insert HTML using the insertAdjacentHTML() method.
How does all this work?
In Javascript, the external javascript files get compiled before the HTML page. That is why the HTML is inserted first and then it is rendered on the server.
End of the exercise.
You can anytime visit GitHub REST APIs documentation and build your code or modify this one.
If you completed this exercise, don't forget to tag me on Twitter and share your experience.
Conclusion
We have reached the end of the blog post. I hope you liked my writing and learned something today.
My main motive to write this blog post is not only to share my knowledge on the topic but also to learn more. If you have any suggestions on improving my write-up, feel free to reach out to me on Twitter.
Also, I share so much more on my Twitter, so do check out.
Besides that, if you would like me to write for you or have an opening suitable for me, I will be glad to get involved. This is my GitHub profile. You can also DM me on Twitter.
Happy Reading, Happy Coding!

Top comments (0)