In general, choosing a GUI toolkit for an application can be tricky.
Programmers who use Python (and many languages as well) have a wide variety of GUI toolkits to choose from, and each has its own advantages and disadvantages.
Some are faster than others, some are smaller, some are easy to install, and some are more suitable for cross-platform use (for this, also note that some support specific features you need to meet). Of course, the various libraries have various licenses accordingly.
Python GUI modules
tkinter
For Python programmers, the default GUI choice is Tk (bound via Tkinter) - for obvious reasons. tkinter and the idle IDE were written by Python's founders, and they came about as the default choice for most Python distributions.

The standard Python documentation discusses Tkinter, but does not address any other GUI bindings. It was intentional! To say the least, if Tk and Tkinter weren't so bad, programmers would have no reason to look for alternatives.
PyQt
PyQt has far more advantages than Tkinter (which also has several disadvantages);
PyQt is a Python binding for the Qt framework. Qt and PyQt are completely object-oriented in design; and Qt provides a well-designed collection of window building blocks that are much larger than what Tk provides.
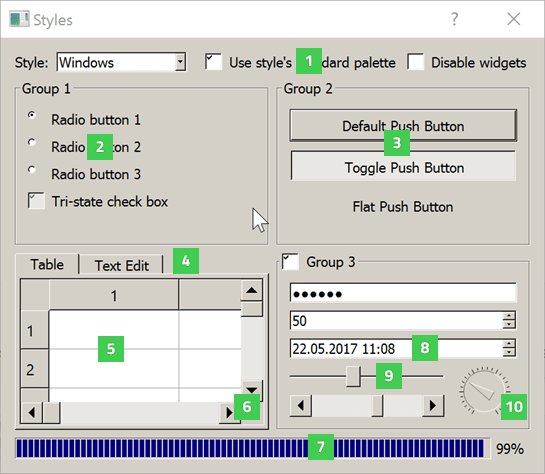
Some of the PyQt widgets are shown below:
If you are new to PyQt, I recommend this book and course.
In terms of its drawbacks, Qt's license is more restricted than many toolkits (at least for non-Linux platforms); Qt is a fairly large library.
PyQt strictly follows Qt's licensing. In particular, it is available for GPL on the UNIX/X11 platform and for commercial purposes there's another license.
Qt uses a mechanism called signals/slots to pass events and messages between window artifacts (and other objects). This mechanism is completely different from the callback mechanism used in most toolkits, including Tkinter.
The larger the application, the more important this advantage of PyQt becomes.
GUI Demo App: log counter
To show the contrast between the signal/slot and the callback, we provide a write-and-play application that uses Tkinter and PyQt.
The application consists of four window components.
- "Quit" button (to quit)
- "Log Timestamp" button (for messages)
- A text area that displays a scrollable list of time stamps for logged logs
- Message window component that displays the number of time stamps for logged
Tkinter example
In Tkinter, we can implement the application like this.
Logger Tkinter application
import sys, time
from tkinter import *

class Logger(Frame):
    def __init__(self):
        Frame.__init__(self)
        self.pack(expand=YES, fill=BOTH)
        self.master.title("Timestamp logging app")
        self.tslist = []
        self.tsdisp = Text(height=6, width=25)
        self.count = StringVar()
        self.cntdisp = Message(font=('Sans',24),
                               textvariable=self.count)
        self.log = Button(text="Log Timestamp",
                          command=self.log_timestamp)
        self.quit = Button(text="Quit", command=sys.exit)
        self.tsdisp.pack(side=LEFT)
        self.cntdisp.pack()
        self.log.pack(side=TOP, expand=YES, fill=BOTH)
        self.quit.pack(side=BOTTOM, fill=BOTH)

    def log_timestamp(self):
        stamp = time.ctime()
        self.tsdisp.insert(END, stamp+"\n")
        self.tsdisp.see(END)
        self.tslist.append(stamp)
        self.count.set("% 3d" % len(self.tslist))

if __name__=='__main__':
    Logger().mainloop()
This Tk version uses the log_timestamp() method as the command= parameter for the button. In tkinter buttons are linked with a callback.
        self.log = Button(text="Log Timestamp",
                          command=self.log_timestamp)
That means on click, it calls that method.

PyQt example
In Python PyQt, you can implement the app like this:
import sys, time
from PyQt5.QtWidgets import QApplication, QWidget, QGridLayout, QTextEdit, QPushButton, QLabel, QHBoxLayout

class Logger(QWidget):
    def __init__(self, *args):
        QWidget.__init__(self, *args)
        self.layout = QGridLayout()
        self.layout.setColumnStretch(2,2)

        self.tsdisp = QTextEdit(self)
        self.tsdisp.setMinimumSize(250, 300)
        self.tscount = QLabel("", self)

        self.log = QPushButton("&Log Timestamp", self)
        self.quit = QPushButton("&Quit", self)

        self.layout.addWidget(self.tsdisp, 0, 0)
        self.layout.addWidget(self.tscount, 0, 1)
        self.layout.addWidget(self.log, 2, 0)
        self.layout.addWidget(self.quit, 2, 1)

        self.log.clicked.connect(self.log_timestamp)
        self.quit.clicked.connect(self.close)
        self.setLayout(self.layout)

    def log_timestamp(self):
        stamp = time.ctime()
        self.tsdisp.append(stamp)
        self.tscount.setText(str(self.tsdisp.toPlainText().count("\n")))

if __name__ == "__main__":
    app = QApplication(sys.argv)
    logger = Logger()
    logger.show()
    sys.exit(app.exec_())

By creating the Layout Manager, the Logger class got to work. A layout manager is a complex topic in any GUI system, but Qt's implementation makes it simple.
In most cases, you will use Qt Designer to create a general GUI design, which can then be used to generate Python or C++ code. You can then make the generated code generate subclasses to add functionality.
But in this example, we choose to create the layout manager manually. The window building blocks are placed in individual cells of the grid layout, or can be placed across multiple cells.
self.layout = QGridLayout()
self.layout.setColumnStretch(2,2)
self.layout.addWidget(self.tsdisp, 0, 0)
...
The most interesting part of the app is where we connect the clicked signal to the function.
One button connects to the log_timestamp method; the other connects to the close method of the QWidget class.
self.log.clicked.connect(self.log_timestamp)
self.quit.clicked.connect(self.close)

Top comments (0)