
Sass is a beautiful tool — it makes your life so much easier when building for the web. That’s why I also wanted to use it in a JavaFX project I was working on.
In case you’re not familiar with it: Sass is a CSS-Preprocessor that can be seen as a superset of CSS. It provides functionality like functions (called “mixings”), variables and other useful features. Sass files can end on
.sass(old, deprecated way) or.scss(modern go-to approach). However, before being able to use the files in a project, they need to be compiled to normal CSS. This video provides a quick and easy introduction.
Ways to compile to CSS
The Sass compiler was originally written in ruby, however, there exists a modern version written in Dart. How you compile to CSS doesn’t really matter — the only important thing is, that the CSS file is included in your application build.
Using a Maven Build-Plugin
The first way would be to configure Maven (or whatever build-tool you are using), so that it compiles the files to CSS while compiling the whole Java-Program. There are multiple librarys for that, the best one (at least from my point of view) being this one . There are other projects, that try to do the same, like described in this blog post.
However, there is a problem with this approach: to make the Scene-Builder work properly, the CSS actually needs to be compiled before runtime. That means, it has to happen on the fly, as soon as we make a change in our files.
Compiling with the help of IntelliJ
Instead of compiling to CSS through Maven or manually, we can let our IDE do this job for us: First of all, we need to install the Sass compiler on our local machine, using Choco, Homebrew, or NPM:
# Homebrew
brew install sass/sass/sass

# NPM
sudo npm install -g sass

# Chocolatey
choco install sass
Next, lets fire up IntelliJ and install these two plugins from the settings-pane:
- Sass (comes bundled with the IDE normally)
- File Watchers
After that, go to Preferences → Tools → File Watchers, click on the “+”-Icon and select “SCSS”. The dialog you’re facing should look like this:
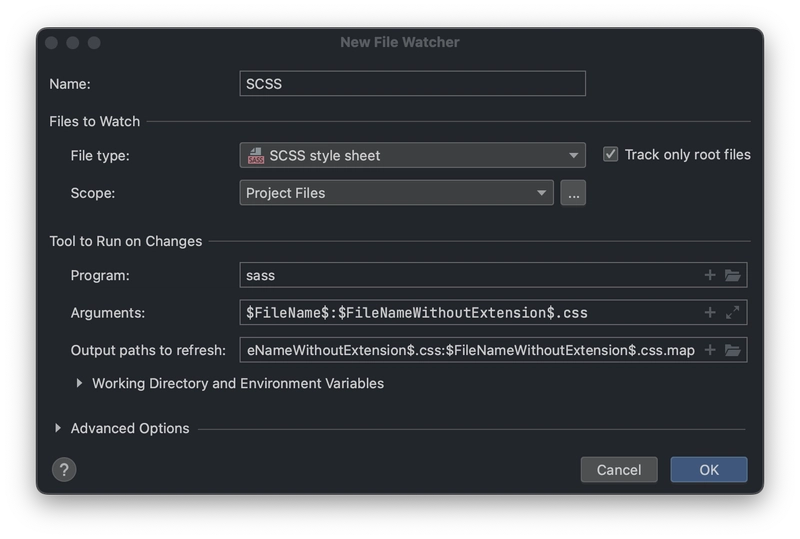
Click on “OK” — congratulations: now every time we make a change in our .scss-files, they are automatically compiled to standard CSS.
Now all there is left to do, is configuring our project, so that the right file is selected. Your structure should look like this:
src/
├─ main/
│ ├─ java/
│ │ ├─ com.company.example/
│ │ │ ├─ HelloApplication.java
│ │ │ ├─ HelloController.java
│ ├─ resources/
│ │ ├─ com.company.example/
│ │ │ ├─ META-INF/
│ │ │ │ ├─ MANIFEST.MF
│ │ │ ├─ sass/
│ │ │ │ ├─ _colors.scss
│ │ │ │ ├─ style.scss
│ │ │ ├─ hello-view.fxml
The style.css will be automatically generated inside of the style.scss (meaning style.scss will become a kind-of folder):
style.scss/
├─ style.css
├─ style.css.map
Last thing to do, is referencing the CSS-File from the .fxml. For that, go to the Top-Level Element (e.g. a Border Pane) and attach stylesheets="@sass/style.css" to it.
Thats it! You can now use Sass to make JavaFXs CSS a bit less painful.

Top comments (0)