Step 1
Go to search bar, Search and Click for Virtual Machine

Step 2
Click on Create

Step 3
Subscription: Select your Subscription
Select: or Create your Resource group
Virtual machine: Give Virtual machine a name (it must be a unique name)
Region: Select your Region (preferable east Us)
Availability Option: must be set at "Availability zone"
Zone: Click on the your Preferred zone(Zone 1)
Security type: standard
img: **windows Server 2019 Datacenter x64 Gen2
**size: Standard

Step 4
*Create a userName and passWord of your choice
*Inbound Port :Allow and choose HTTP(80) and RDP(3389)

Step 5
Select and Click on Review + Create

Step 6
Once Validation has been passed click on Create

Step 7
CLick and Select Go to Resource

Step 8
Select and Click on Connect

Step 9
Select and Download the RDP file

Step 10
Click and Open the downloaded file

Step 11
click and Connect to your vm windows

Step 12
Type in your userName and Password you created in step 4

Step 13
Congratulations You have Successfully Create a VM and RDP into it

**Stage 2**
"How to Install a Webserver into your VM"
Step 1
Go to your Vm Search bar and Search on PowerShell

Step 2
Right click and click on Run As Administrator

Step 3
Once PowerShell has been Opened type the following Cmd click on enter
install-windowsfeature web-server

Step 4
Now Wait till your Webserver has finished installing

Step 5
To truly check if webServer has successfully installed
Go to your Azure Portal on your web browser click on overview

Step 6
On the Networking area Copy the Public IP address

Step 7
open a new web Tab browser, Paste the IP address and click on enter to visit it

Step 8
Congratulations Your Webserver has successfully in Installed

**Stage 3**
How initialize a new usable Data Disk
Step 1
Go to your Azure Portal on your web browser click on Disk

Step 2
click on create a new disk
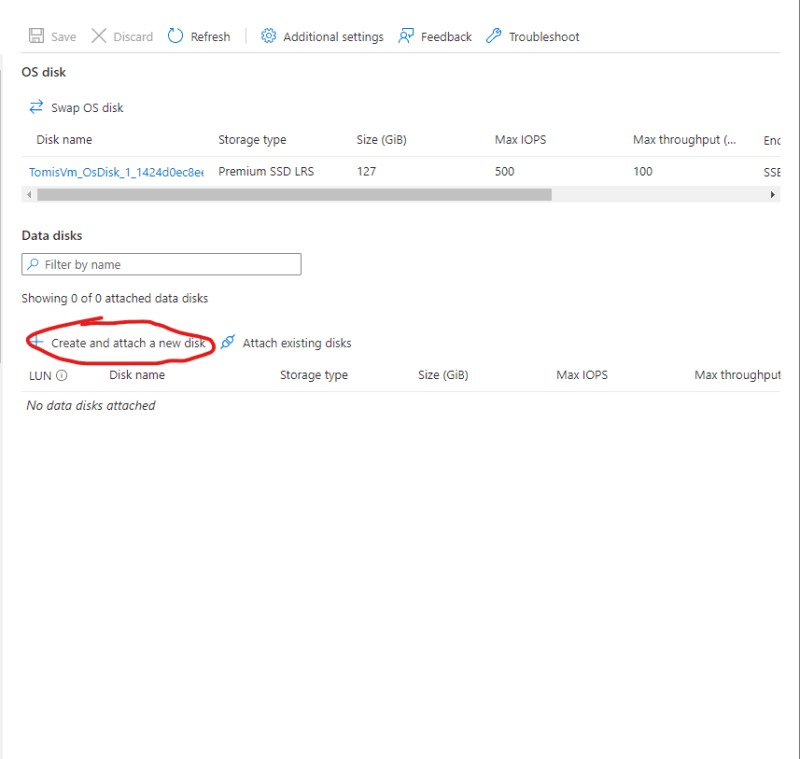
Step 3
Name your disk and select your preferred disk size

Step 4
Select and click on Save

Step 5
Congratulations your Disk as been successfully created

Step 6
To initialize your disk
go to your vM and Search on Disk Management and click on it

Step 7
a pop Up windows is gonna ask to initialize the newly created DISK 2 this click on OK

Step 8
Scroll to Disk 2 and right click on it then select "NEW Simple Volume"

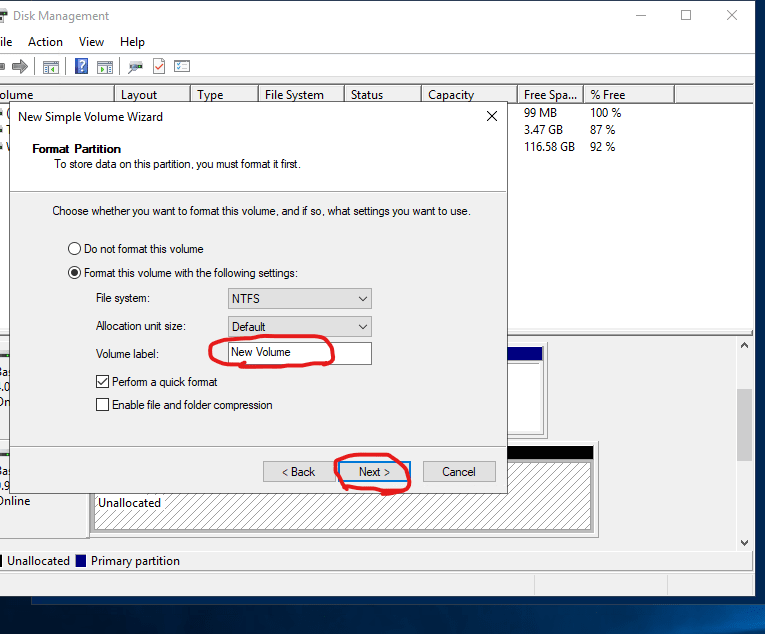
Step 9
Continue to Click on next till you get to Format Partittion

Step 10
Once you get to Format Partittion
Rename Label Volume to your preferred name and Click on Next
Step 11
Click on finish

Step 12
Congratulation you´ve Create and initialized a Disk and can now be used

NOTE:
That will be the end Make sure to always delete Azure Resource when they are not in use

Top comments (0)