Hi!
Recently I've been working on an application framework for building command line interfaces and today I'm happy to say that it's out of pre-release! Its goal is to provide a solid abstraction layer over command line arguments while offering a great experience for your users, so that you can focus all your efforts on the actual business logic of your application.
Here's the link: https://github.com/Tyrrrz/CliFx/
CliFx is a simple to use, yet powerful framework for building command line applications. Its primary goal is to completely take over the user input layer, letting you forget about the infrastructure and instead focus on writing your application. This framework uses a declarative class-first approach for defining commands, avoiding excessive boilerplate code and complex configurations.
An important property of CliFx, when compared to some other libraries, is that it's not just a parser -- it's a complete application framework. The main goal of the library is to provide a consistent and enjoyable development experience when building command line applications. At its core, CliFx is highly opinionated, giving preference to convention over configuration, strictness over extensibility, consistency over ambiguity, and so on.
Features
- Complete application framework, not just an argument parser
- Requires minimal amount of code to get started
- Configuration via attributes
- Handles conversions to various types, including custom types
- Supports multi-level command hierarchies
- Allows graceful command cancellation
- Prints errors and routes exit codes on exceptions
- Provides comprehensive and colorful auto-generated help text
- Highly testable and easy to debug
- Targets .NET Framework 4.5+ and .NET Standard 2.0+
- No external dependencies
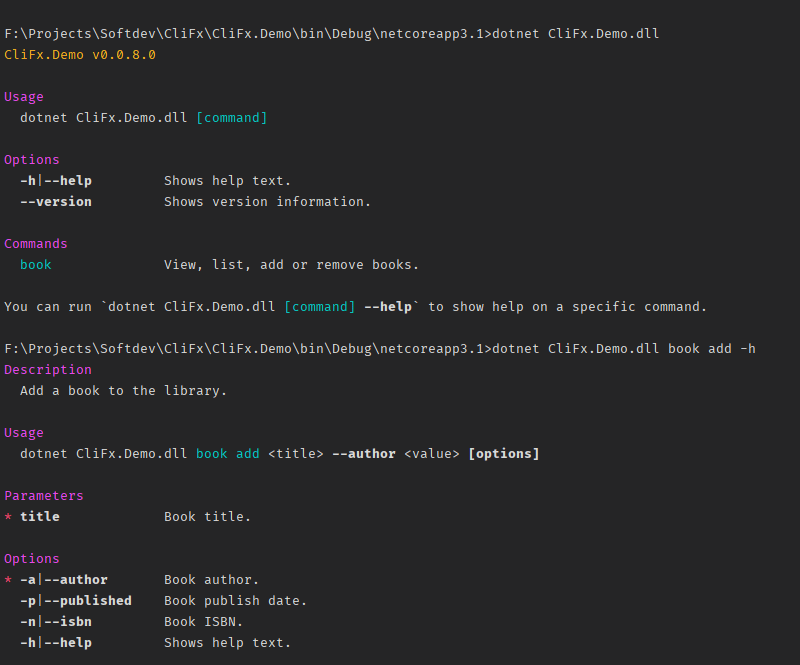
Screenshots
Usage
- Quick start
- Binding arguments
- Argument syntax
- Value conversion
- Multiple commands
- Reporting errors
- Graceful cancellation
- Dependency injection
- Testing
- Debug and preview mode
- Reporting progress
- Environment variables
Quick start
To turn your application into a command line interface you need to change your program's Main method so that it delegates execution to CliApplication.
The following code will create and run a default CliApplication that will resolve commands defined in the calling assembly. Using fluent interface provided by CliApplicationBuilder you can easily configure different aspects of your application.
public static class Program
{
    public static async Task<int> Main() =>
        await new CliApplicationBuilder()
            .AddCommandsFromThisAssembly()
            .Build()
            .RunAsync();
}
In order to add functionality to your application, you need to define at least one command. Commands are essentially entry points through which the user can interact with your application. You can think of them as something similar to controllers in ASP.NET Core.
To define a command, just create a new class that implements the ICommand interface and annotate it with [Command] attribute:
[Command]
public class HelloWorldCommand : ICommand
{
    public ValueTask ExecuteAsync(IConsole console)
    {
        console.Output.WriteLine("Hello world!");

        // Return empty task because our command executes synchronously
        return default;
    }
}
To implement ICommand, the class needs to define the ExecuteAsync method. This is the method that gets called when the user executes the command.
To facilitate both asynchronous and synchronous execution, this method returns a ValueTask. Since the simple command above executes synchronously, we can just put return default at the end. In an asynchronous command, however, we would use the async/await keywords instead.
As a parameter, this method takes an instance of IConsole, an abstraction around the system console. You should use this abstraction in places where you would normally use System.Console, in order to make your command testable.
With this basic setup, the user can execute your application and get a greeting in return:
> myapp.exe

Hello world!
Out of the box, your application now also supports the built-in help and version options:
> myapp.exe --help

MyApp v1.0

Usage
  myapp.exe

Options
  -h|--help         Shows help text.
  --version         Shows version information.
> myapp.exe --version

v1.0
Binding arguments
Commands can be configured to take input from command line arguments. To do that, we need to add properties to the command and annotate them with special attributes.
In CliFx, there are two types of argument bindings: parameters and options. Parameters are positional arguments that are identified by the order they appear in, while options are identified by their names.
Here's an example command that calculates a logarithm of a value, which uses both a parameter and an option:
[Command]
public class LogCommand : ICommand
{
    [CommandParameter(0, Description = "Value whose logarithm is to be found.")]
    public double Value { get; set; }

    [CommandOption("base", 'b', Description = "Logarithm base.")]
    public double Base { get; set; } = 10;

    public ValueTask ExecuteAsync(IConsole console)
    {
        var result = Math.Log(Value, Base);
        console.Output.WriteLine(result);

        return default;
    }
}
The above command has two inputs:
-
Valuewhich is a parameter with order0. -
Basewhich is an option with namebaseand short nameb.
Let's try running --help to see how this command is supposed to be used:
> myapp.exe --help

MyApp v1.0

Usage
  myapp.exe <value> [options]

Parameters
* value             Value whose logarithm is to be found.

Options
  -b|--base         Logarithm base.
  -h|--help         Shows help text.
  --version         Shows version information.
As we can see, in order to execute this command, at a minimum, the user has to supply a value:
> myapp.exe 10000

4
They can also set the base option to override the default logarithm base of 10:
> myapp.exe 729 -b 3

6
> myapp.exe 123 --base 4.5

3.199426017362198
On the other hand, if the user fails to provide the required parameter, they will get an error:
> myapp.exe -b 10

Missing value for parameter <value>.
Differences between parameters and options:
- Parameters are identified by their relative order. Options are identified by two dashes followed by their name, or a single dash followed by their short name (single character).
- Parameters can't be optional. Options are usually optional (as evident by the name), but can be configured to be required as well.
- Parameters technically have a name, but it's only used in the help text.
- Options can be configured to use the value of an environment variable as a fallback.
- Both parameters and options can take multiple values, but such a parameter must be last in order to avoid ambiguity. Options are not limited in this aspect.
As a general guideline, prefer to use parameters for required inputs that the command can't work without. Use options for non-required inputs, or when the command has too many required inputs, or when specifying the option name explicitly provides a better user experience.
Argument syntax
This library supports an argument syntax which is based on the POSIX standard. To be fair, nobody really knows what the standard is about and very few tools actually follow it as they're supposed to, so for the purpose of having dashes and spaces, CliFx is using the "standard command line syntax".
In more detail, the following examples are all valid:
-
myapp --foo barsets option"foo"to value"bar" -
myapp -f barsets option'f'to value"bar" -
myapp --switchsets option"switch"without value -
myapp -ssets option's'without value -
myapp -abcsets options'a','b'and'c'without value -
myapp -xqf barsets options'x'and'q'without value, and option'f'to value"bar" -
myapp -i file1.txt file2.txtsets option'i'to a sequence of values"file1.txt"and"file2.txt" -
myapp -i file1.txt -i file2.txtsets option'i'to a sequence of values"file1.txt"and"file2.txt" -
myapp jar new -o cookiesets option'o'to value"cookie"and retains two unbound arguments"jar"and"new"
Note that CliFx purposely employs a context-free parser when consuming command line arguments. That means that every input is parsed the same way.
This also means that myapp -i file1.txt file2.txt will always be parsed as an option with multiple values, even if the underlying bound property is not enumerable. For the same reason, unseparated arguments such as myapp -ofile will be treated as five distinct options 'o', 'f', 'i', 'l', 'e', instead of 'o' being set to "file".
When it comes to command name and parameters, they must appear in a strict order, before any options. The parser can't distinguish between arguments that make up a part of the command name and arguments that belong to command parameters, which is why the non-option arguments are bound at a later stage. It is done by trying to find a command that matches the longest sequence of arguments starting from the first, binding any remaining arguments to positional parameters.
The above design may seem like a deficiency, but it actually provides value in the fact that it's deterministic -- given a set of command line arguments, the semantics behind them always remain the same. This leads to a more consistent experience for both you as a developer, as well as for the users of your application.
Value conversion
Parameters and options can have different underlying types:
- Standard types
- Primitive types (
int,bool,double,ulong,char, etc) - Date and time types (
DateTime,DateTimeOffset,TimeSpan) - Enum types
- Primitive types (
- String-initializable types
- Types with a constructor that accepts a single
stringparameter (FileInfo,DirectoryInfo, etc) - Types with a static method
Parsethat accepts a singlestringparameter (and optionallyIFormatProvider)
- Types with a constructor that accepts a single
- Nullable versions of all above types (
decimal?,TimeSpan?, etc) - Collections of all above types
- Array types (
T[]) - Types that are assignable from arrays (
IReadOnlyList<T>,ICollection<T>, etc) - Types with a constructor that accepts a single
T[]parameter (HashSet<T>,List<T>, etc)
- Array types (
When defining a parameter of an enumerable type, keep in mind that it has to be the only such parameter and it must be the last in order. Options, on the other hand, don't have this limitation.
Example command with an array-backed parameter:
[Command]
public class FileSizeCalculatorCommand : ICommand
{
    // FileInfo is string-initializable and IReadOnlyList<T> can be assgined from an array,
    // so the value of this property can be mapped from a sequence of arguments.
    [CommandParameter(0)]
    public IReadOnlyList<FileInfo> Files { get; set; }

    public ValueTask ExecuteAsync(IConsole console)
    {
        var totalSize = Files.Sum(f => f.Length);

        console.Output.WriteLine($"Total file size: {totalSize} bytes");

        return default;
    }
}
> myapp.exe file1.bin file2.exe

Total file size: 186368 bytes
Same command, but using an option for the list of files instead:
[Command]
public class FileSizeCalculatorCommand : ICommand
{
    [CommandOption("files")]
    public IReadOnlyList<FileInfo> Files { get; set; }

    public ValueTask ExecuteAsync(IConsole console)
    {
        var totalSize = Files.Sum(f => f.Length);

        console.Output.WriteLine($"Total file size: {totalSize} bytes");

        return default;
    }
}
> myapp.exe --files file1.bin file2.exe

Total file size: 186368 bytes
Multiple commands
Complex command line applications may have more than a single command in order to facilitate different workflows. In even more complex applications there may be multiple levels of commands, forming a hierarchy.
Whichever case it is, CliFx takes care of everything for you. All you need to do is specify appropriate command names in the attributes:
// Default command, i.e. command without a name
[Command]
public class DefaultCommand : ICommand
{
    // ...
}

// Child of default command
[Command("cmd1")]
public class FirstCommand : ICommand
{
    // ...
}

// Child of default command
[Command("cmd2")]
public class SecondCommand : ICommand
{
    // ...
}

// Child of FirstCommand
[Command("cmd1 sub")]
public class SubCommand : ICommand
{
    // ...
}
The user can access other commands by specifying the name before any other arguments, e.g. myapp.exe cmd1 arg1 -p 42.
In a multi-command application you may also choose to not have a default command, in which case executing your application without any arguments will just show the help text.
Requesting help on the application above will show:
> myapp.exe --help

MyApp v1.0

Usage
  myapp.exe [command]

Options
  -h|--help         Shows help text.
  --version         Shows version information.

Commands
  cmd1
  cmd2

You can run `myapp.exe [command] --help` to show help on a specific command.
As you can see, only two commands are listed here because cmd1 sub is not an immediate child of the default command. We can further refine our help query to get information on cmd1:
> myapp.exe cmd1 --help

Usage
  myapp.exe cmd1 [command]

Options
  -h|--help         Shows help text.

Commands
  sub

You can run `myapp.exe cmd1 [command] --help` to show help on a specific command.
Reporting errors
You may have noticed that commands in CliFx don't return exit codes. This is by design as exit codes are considered a higher-level concern and thus handled by CliApplication, not by individual commands.
Commands can report execution failure simply by throwing exceptions just like any other C# code. When an exception is thrown, CliApplication will catch it, print the error, and return an appropriate exit code to the calling process.
If you want to communicate a specific error through exit code, you can instead throw an instance of CommandException which takes an exit code as a parameter. When a command throws an exception of type CommandException, it is assumed that this was a result of a handled error and, as such, only the exception message will be printed to the error stream. If a command throws an exception of any other type, the full stack trace will be printed as well.
[Command]
public class DivideCommand : ICommand
{
    [CommandOption("dividend", IsRequired = true)]
    public double Dividend { get; set; }

    [CommandOption("divisor", IsRequired = true)]
    public double Divisor { get; set; }

    public ValueTask ExecuteAsync(IConsole console)
    {
        if (Math.Abs(Divisor) < double.Epsilon)
        {
            // This will print the error and set exit code to 1337
            throw new CommandException("Division by zero is not supported.", 1337);
        }

        var result = Dividend / Divisor;
        console.Output.WriteLine(result);

        return default;
    }
}
> myapp.exe --dividend 10 --divisor 0

Division by zero is not supported.


> echo Exit code was %errorlevel%

Exit code was 1337
Graceful cancellation
It is possible to gracefully cancel execution of a command and preform any necessary cleanup. By default an app gets forcefully killed when it receives an interrupt signal (Ctrl+C or Ctrl+Break), but you can easily override this behavior.
In order to make a command cancellation-aware, you need to call console.GetCancellationToken(). This method returns a CancellationToken that will trigger when the user issues an interrupt signal. Note that any code that comes before the first call to GetCancellationToken() will not be cancellation-aware and as such will terminate instantly. Any subsequent calls to this method will return the same token.
[Command("cancel")]
public class CancellableCommand : ICommand
{
    public async ValueTask ExecuteAsync(IConsole console)
    {
        console.Output.WriteLine("Printed");

        // Long-running cancellable operation that throws when canceled
        await Task.Delay(Timeout.InfiniteTimeSpan, console.GetCancellationToken());

        console.Output.WriteLine("Never printed");
    }
}
Keep in mind that a command may delay cancellation only once. If the user decides to press Ctrl+C again after the first time, the execution will be forcefully terminated.
Dependency injection
CliFx uses an implementation of ITypeActivator to initialize commands and by default it only works with types that have parameterless constructors.
In real-life scenarios, however, your commands will most likely have dependencies that need to be injected. CliFx doesn't come with its own dependency container but it makes it really easy to integrate any container of your choice.
For example, here is how you would configure your application to use Microsoft.Extensions.DependencyInjection (aka the built-in dependency container in ASP.NET Core).
public static class Program
{
    public static async Task<int> Main()
    {
        var services = new ServiceCollection();

        // Register services
        services.AddSingleton<MyService>();

        // Register commands
        services.AddTransient<MyCommand>();

        var serviceProvider = services.BuildServiceProvider();

        return await new CliApplicationBuilder()
            .AddCommandsFromThisAssembly()
            .UseTypeActivator(serviceProvider.GetService)
            .Build()
            .RunAsync();
    }
}
Testing
CliFx provides an easy way to write functional tests for your commands thanks to the IConsole interface.
You can use VirtualConsole to replace the application's stdin, stdout and stderr with your own streams. It has multiple constructor overloads allowing you to specify the exact set of streams that you want. Streams that are not provided are replaced with stubs, i.e. VirtualConsole doesn't leak to System.Console in any way.
Let's assume you want to test a simple command such as this one.
[Command]
public class ConcatCommand : ICommand
{
    [CommandOption("left")]
    public string Left { get; set; } = "Hello";

    [CommandOption("right")]
    public string Right { get; set; } = "world";

    public ValueTask ExecuteAsync(IConsole console)
    {
        console.Output.Write(Left);
        console.Output.Write(' ');
        console.Output.Write(Right);

        return default;
    }
}
By substituting IConsole you can write your test cases like this:
[Test]
public async Task ConcatCommand_Test()
{
    // Arrange
    using var stdout = new StringWriter();
    var console = new VirtualConsole(stdout);

    var command = new ConcatCommand
    {
        Left = "foo",
        Right = "bar"
    };

    // Act
    await command.ExecuteAsync(console);

    // Assert
    Assert.That(stdout.ToString(), Is.EqualTo("foo bar"));
}
And if you want, you can also test the whole application in a similar fashion:
[Test]
public async Task ConcatCommand_Test()
{
    // Arrange
    using var stdout = new StringWriter();
    var console = new VirtualConsole(stdout);

    var app = new CliApplicationBuilder()
        .AddCommand(typeof(ConcatCommand))
        .UseConsole(console)
        .Build();

    var args = new[] {"--left", "foo", "--right", "bar"};
    var envVars = new Dictionary<string, string>();

    // Act
    await app.RunAsync(args, envVars);

    // Assert
    Assert.That(stdout.ToString(), Is.EqualTo("foo bar"));
}
Generally, the first approach is more preferable as it's less verbose and lets you test a specific command in complete isolation.
Debug and preview mode
When troubleshooting issues, you may find it useful to run your app in debug or preview mode. To do it, simply pass the corresponding directive to your app along with other command line arguments.
If your application is ran in debug mode (using the [debug] directive), it will wait for debugger to be attached before proceeding. This is useful for debugging apps that were ran outside of the IDE.
> myapp.exe [debug] cmd -o

Attach debugger to PID 3148 to continue.
If preview mode is specified (using the [preview] directive), the app will short-circuit by printing consumed command line arguments as they were parsed. This is useful when troubleshooting issues related to command routing and argument binding.
> myapp.exe [preview] cmd arg1 arg2 -o foo --option bar1 bar2

Parser preview:
cmd <arg1> <arg2> [-o foo] [--option bar1 bar2]
You can also disallow these directives, e.g. when running in production, by calling AllowDebugMode and AllowPreviewMode methods on CliApplicationBuilder.
var app = new CliApplicationBuilder()
    .AddCommandsFromThisAssembly()
    .AllowDebugMode(true) // allow debug mode
    .AllowPreviewMode(false) // disallow preview mode
    .Build();
Reporting progress
CliFx comes with a simple utility for reporting progress to the console, ProgressTicker, which renders progress in-place on every tick.
It implements a well-known IProgress<double> interface so you can pass it to methods that are aware of this abstraction.
To avoid polluting output when it's not bound to a console, ProgressTicker will simply no-op if stdout is redirected.
var progressTicker = console.CreateProgressTicker();

for (var i = 0.0; i <= 1; i += 0.01)
    progressTicker.Report(i);
Environment variables
An option can be configured to use the value of a specific environment variable as a fallback.
[Command]
public class AuthCommand : ICommand
{
    [CommandOption("token", IsRequired = true, EnvironmentVariableName = "AUTH_TOKEN")]
    public string AuthToken { get; set; }

    public ValueTask ExecuteAsync(IConsole console)
    {
        console.Output.WriteLine(AuthToken);

        return default;
    }
}
> $env:AUTH_TOKEN="test"

> myapp.exe

test
Environment variables can be used as fallback for options of enumerable types too. In this case, the value of the variable will be split by Path.PathSeparator (which is ; on Windows, : on Linux).
Link to GitHub repo: https://github.com/Tyrrrz/CliFx/

Top comments (0)