In JMeter, Logic Controllers are essential elements that enable you to control the flow and execution of samplers within a Thread Group. They play a crucial role in creating dynamic and conditional test scenarios, allowing for more realistic and versatile load-testing simulations. This blog will provide an overview of Logic Controllers, explaining their purpose and discussing why they are necessary for JMeter test plans.
As a Senior QA Automation professional at Luxoft, I have had the opportunity to work extensively on projects using logic controllers in JMeter. Through this comprehensive guide, I aim to provide beginners and individuals seeking a deeper understanding with valuable insights into leveraging logic controllers in JMeter

What is a Logic Controller?
A Logic Controller in JMeter is a configuration element that provides the ability to define the logical flow and conditions for executing samplers. It allows you to control the order, repetition, and selection of samplers, based on specified conditions or logic.
Why Use Logic Controllers?
Conditional Execution: Logic Controllers enable the execution of samplers based on specific conditions. For example, the If Controller allows you to execute samplers only if a given condition evaluates to true. This is useful when you want to simulate different scenarios based on dynamic data or specific criteria.
Looping and Iterations: Logic Controllers such as the Loop Controller or While Controller provide the capability to repeat the execution of samplers. This is valuable when you need to simulate multiple iterations of a particular test scenario or perform actions until a certain condition is met.
Dynamic Test Scenarios: Logic Controllers allow you to create dynamic test scenarios by selectively executing samplers based on variables or functions. The Switch Controller, for instance, lets you choose different paths based on the value of a variable, facilitating the simulation of varied user behavior or application responses.
Randomization: Logic Controllers like the Random Controller enable the random selection and execution of samplers. This is useful for simulating user interactions with different functionalities or performing random load distribution across various components.
Let's see different types of loop controllers in JMeter
- Critical Section Controller
- ForEach Controller
- If Controller
- Include Controller
- Interleave Controller
- Loop Controller
- Module controller
- Once Only Controller
- Random Controller
- Random Order Controller
- Recording Controller
- Runtime Controller
- Simple Controller
- Switch Controller
- Throughput Controller!
- Transaction Controller
- While Controller
Note : In this blog, I will be covering only 8 controllers and the remaining 9 will be covered in the next blog.
*How to add any controller in Jmeter ? *
Under the test plan, add a Thread Group > Logic controller > Add any desired controller

Critical Section Controller
The Critical Section Controller ensures that its children elements (samplers/controllers, etc) will be executed by only one thread as a named lock will be taken before executing children of the controller.
For example, if one script has 2 Critical Section Controllers with requests DS3-${threadNum} and DS4-${threadNum} respectively. Then it ensures that:
DS3-${threadNum} is executed only by one thread at a time
DS4-${threadNum} is executed only by one thread at a time
Or you just want to make sure one thread run at a time ,below is an example of a global lock.

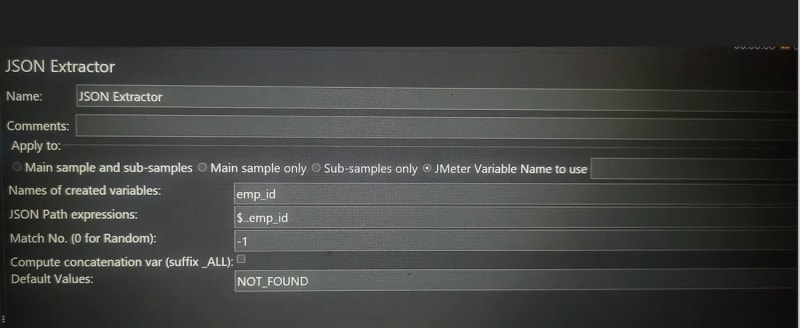
ForEach Controller
This controller is one of the many built-in controllers used to design and control the flow of a test script. It allows you to iterate over elements of a variable, such as an array or a list, and execute the samplers or other elements inside the controller for each element in the variable.
The ForEach Controller is useful when you need to perform an action multiple times, with each iteration using a different value from a set of values. It is commonly used in scenarios where you want to test different data inputs or perform actions on multiple items.
To use the ForEach Controller:
Right-click on the Thread Group or any other logical controller in the test plan.
- From the context menu, go to “Add” > “Logic Controller” > “ForEach Controller”.
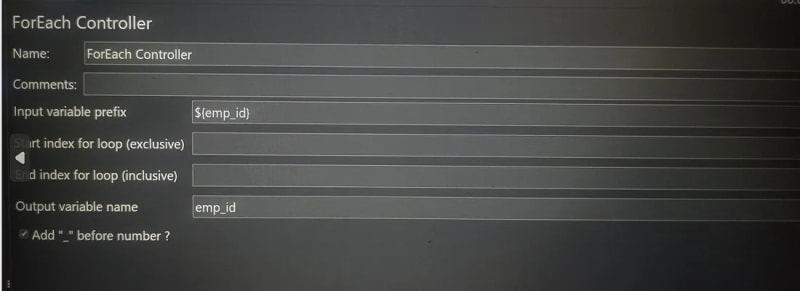
Once added, you need to set up the ForEach Controller using the following properties:
Input variable prefix: The prefix of the variable name containing the set of values you want to iterate over. For example, if you have a variable named “data” that contains an array of values, you would enter “data” as the input variable prefix.
Output variable name: The name of the variable that will be used to store each element of the input variable during each iteration. This variable can be referenced in samplers or other elements within the ForEach Controller. For example, you can set it to “currentData” to use “currentData” as the variable that holds each value during iteration.
Value to iterate: The delimiter-separated list of values you want to iterate over. The ForEach Controller will split this list using the specified delimiter and use each value in the iterations.
Delimiter: The character used to separate the values in the “Value to iterate” field. By default, it is set to “,” (comma).
If Controller
The If Controller is a logic controller in JMeter that allows you to control the execution of elements i.e samplers ,other controllers based on a specified condition. It evaluates an expression and executes the elements inside it only if the expression evaluates to “true.”
JMeter if controller Usage
Now let’s see the uses of the if controller as follows.
If we need to execute elements of the Thread Group based on their state at that time, we can use if controller.
- Using the if controller, we provide control over the test execution per our requirement.
- Using the if controller, we can check the Interpret condition.
- We can also evaluate the runnable elements from the controller.
- It allows us to implement the Boolean operator per our requirements. Step 1: Set up the Test Plan Create a new Test Plan and add a Thread Group to it.
Step 2: Add User-Defined Variables configuration element under the Thread Group. Here, we’ll define a variable named “company” and set its value to “Luxoft.” This variable will represent the company name for this example.
Name: Company Value: Luxoft
Step 3: Add If Controller Now, add an “If Controller” under the Thread Group. We’ll configure the If Controller to check if the company is “Luxoft” or not.
In the If Controller, set the following properties:
Condition: ${__groovy(vars.get(“company”) == “Luxoft”)}
The above condition uses a Groovy script to check if the value of the “company” variable is equal to “Luxoft” If it’s true, the elements inside the If Controller will be executed; otherwise, they will be skipped.

Include Controller
The “Include Controller” is a special type of logic controller that allows you to include other test fragments or external JMX files within your main test plan. This controller is useful when you want to reuse certain test elements across multiple test plans, making test maintenance and organization more efficient.
Here’s how you can use the Include Controller with an example:
Step 1: Create and save the Test Components that we want to reuse in your main test plan i.e PerformanceTesting.jmx
Step 2: Create the Main Test Plan
Create a new test plan e.g Employee where you want to include the components. This main test plan will call the components using the Include Controller.
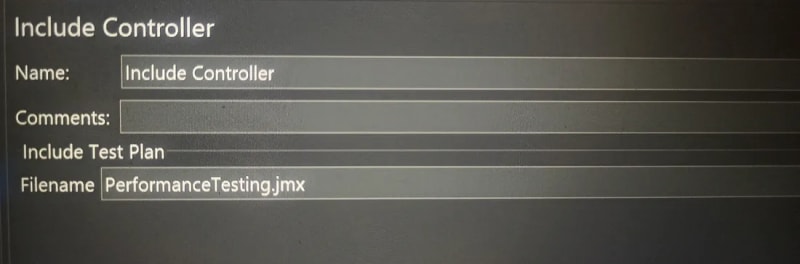
Step 3: Add Include Controller Under the main test plan, add an “Include Controller” by right-clicking on the test plan > Add > Logic Controller > Include Controller.
Step 4: Configure the Include Controller In the Include Controller, specify the path to the JMX files of the components you want to include. Provide the relative or absolute path to the JMX files.
PerformanceTesting .jmx
Step 5: Run the test plan
Benefits of using Include Controller:
Code Reusability: The Include Controller promotes code reusability by allowing you to create modular test components and include them in multiple places, reducing redundancy and maintenance efforts.
Organization: It helps in organizing your test plan by breaking it into smaller components, making it easier to manage and maintain.
Collaboration: Multiple team members can work on separate components concurrently and later integrate them into the main test plan using the Include Controller.
Interleave Controller
Interleave Controller will select only one samplers/requests stored in it, to run in each loop of the thread. It will execute the samplers sequentially.
You can give a descriptive name for the controller (optional)
If the checkbox is selected, the interleave controller will consider sub-controllers as single request elements and permit only one request per controller at a time (optional)
Let’s consider an example of Interleave Controller, where Thread Group contains “Number of Threads” to “1”, “Loop Count” to 10, and a total of “4” Samplers (Http requests).
Total 1 * 10* 4 = 40 requests will be sent to web server under test without using any Logic Controller.
Loop Controller
The Loop Controller in JMeter is a logic controller that allows you to repeat the execution of its child elements (samplers or other controllers) a specified number of times. It’s a built-in feature of JMeter that facilitates creating loops in your test plan, where a specific set of elements is executed repeatedly.
Let’s go through an example of how to use the Loop Controller in JMeter
Test Plan
Thread Group
Loop Controller (Loop Count: 100)

HTTP Request Sampler (Executed 100times)
The HTTP Request sampler will be executed in a loop for a hundred times, simulating a hundred requests to the specified server.
The Loop Controller is commonly used to simulate multiple iterations of the same actions, such as:
Load Testing: Repeating HTTP requests to simulate multiple users accessing a website or API.
Stress Testing: Repeatedly executing test scenarios to assess system performance under high load.
Functional Testing: Running the same test steps multiple times to verify the consistency and reliability of the application.
Key features of the Loop Controller:
Loop Count: You can specify the number of times you want the child elements to be executed in the loop.
Independent Iterations: Each iteration of the Loop Controller is independent, meaning the variables and states are reset at the beginning of each iteration. This allows you to perform isolated test scenarios without interference between iterations.
Dynamic Loop Count: You can use variables or functions in the “Loop Count” field to dynamically control the number of iterations during the test run.
Nested Loops: You can nest Loop Controllers within each other to create complex looping patterns, simulating more intricate user behavior.
Module controller
The Module Controller is a logic controller in JMeter that allows you to include reusable components or modules from other parts of your test plan. It helps in organizing and reusing test elements, making it easier to manage complex test scripts.
When you use a Module Controller, it acts as a placeholder for another element, like a Sampler or a group of elements. The actual content of the Module Controller comes from an existing Test Fragment, which can be located anywhere in your test plan.
Here’s how you can use the Module Controller:
Step 1: Create a Test Plan Create a new Test Plan in JMeter.
Step 2: Add Elements to Be Reused Create the components that you want to reuse in your test plan as modules. These could be samplers, controllers, or other elements.
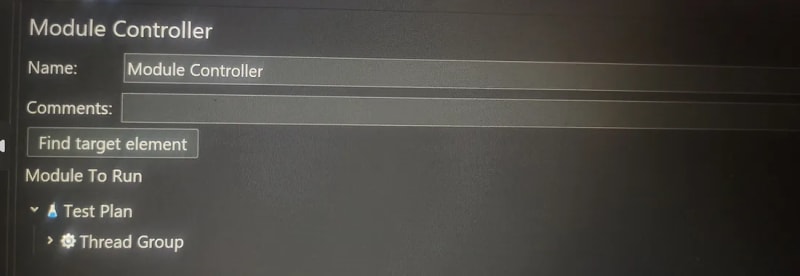
Step 3: Add a Module Controller Right-click on the location where you want to include the module, go to “Add” > “Logic Controller” > “Module Controller.”
Step 4: Select the Module to Include In the Module Controller, you need to specify the name of the module you want to include. The module name is the same as the name of the element you want to reuse. You can also use the “Browse” button to select the module directly.
Step 5: Run the Test Run the test, and JMeter will include the specified module at the location of the Module Controller during test execution.
The Module Controller is useful when you want to reuse specific test elements or group them into logical components without duplicating code. It promotes modularity, making your test plan more organized and easier to manage.
Once Only Controller
the Once Only Controller is a logic controller that ensures the elements (samplers or other controllers) inside it are executed only once per thread during the test execution. It is particularly useful for setting up configurations or initialization tasks that should be performed just once, regardless of the number of iterations in a Thread Group.
Here is an example of how to use the Once Only Controller in JMeter:
Step 1: Create a Test Plan in JMeter.
Step 2: Add a Thread Group to the Test Plan.
Step 3: Add a Once Only Controller under the Thread Group.

Step 4: Add an HTTP Request sampler under the Once Only Controller.
Step 5: Configure the HTTP Request sampler with the URL of the website you want to test.
Step 6: Run the Test.
For example, if you have 10 iterations in your Thread Group and the Once Only Controller contains an HTTP Request sampler, that HTTP request will be executed only once for each thread, and the result of that request will be reused for all iterations.

Top comments (0)