
OAuth Authentication: Google, Facebook, GitHub Login
OAuth (Open Authorization) is a standard that allows users to log in to your website using third-party accounts like Google, Facebook, or GitHub. It eliminates the need for users to create new accounts, making authentication seamless and secure.
Diagram :
OAuth architecture in Node.js with diagrams and flow
How is perplexity made and its architecture?
Draw architecture of node based authentication using jwt
OAuth is an open-standard authorization framework that enables secure, delegated access to protected resources geeksforgeeks.org. Let's explore its architecture and implementation in Node.js, starting with the core concepts and visualizing the flow.
Why Use OAuth?
- No need to store passwords: Users authenticate via trusted providers.
- Faster login: No signup form, just a few clicks.
- Secure: Reduces risk of password leaks.
Setting Up OAuth in a Node.js Application
We'll set up OAuth authentication using Passport.js, a popular authentication middleware for Node.js.
1. Install Dependencies
npm init -y  # Initialize package.json
npm install express passport passport-google-oauth20 passport-facebook passport-github2 express-session dotenv
2. Project Structure
project-folder/
|-- config/
|   |-- passportSetup.js
|-- .env
|-- server.js
3. Configure Environment Variables
Create a .env file to store OAuth credentials (replace with actual keys from the provider's developer console).
GOOGLE_CLIENT_ID=your_google_client_id
GOOGLE_CLIENT_SECRET=your_google_client_secret
FACEBOOK_CLIENT_ID=your_facebook_client_id
FACEBOOK_CLIENT_SECRET=your_facebook_client_secret
GITHUB_CLIENT_ID=your_github_client_id
GITHUB_CLIENT_SECRET=your_github_client_secret
SESSION_SECRET=your_session_secret
4. Setting Up Passport Strategies
Create config/passportSetup.js:
const passport = require('passport');
const GoogleStrategy = require('passport-google-oauth20').Strategy;
const FacebookStrategy = require('passport-facebook').Strategy;
const GitHubStrategy = require('passport-github2').Strategy;
require('dotenv').config();

const callbackHandler = (accessToken, refreshToken, profile, done) => {
    return done(null, profile);
};

passport.use(new GoogleStrategy({
    clientID: process.env.GOOGLE_CLIENT_ID,
    clientSecret: process.env.GOOGLE_CLIENT_SECRET,
    callbackURL: '/auth/google/callback'
}, callbackHandler));

passport.use(new FacebookStrategy({
    clientID: process.env.FACEBOOK_CLIENT_ID,
    clientSecret: process.env.FACEBOOK_CLIENT_SECRET,
    callbackURL: '/auth/facebook/callback',
    profileFields: ['id', 'displayName', 'emails']
}, callbackHandler));

passport.use(new GitHubStrategy({
    clientID: process.env.GITHUB_CLIENT_ID,
    clientSecret: process.env.GITHUB_CLIENT_SECRET,
    callbackURL: '/auth/github/callback'
}, callbackHandler));

passport.serializeUser((user, done) => {
    done(null, user);
});

passport.deserializeUser((user, done) => {
    done(null, user);
});
5. Setting Up Express Server
Create server.js:
const express = require('express');
const passport = require('passport');
const session = require('express-session');
require('./config/passportSetup');
require('dotenv').config();

const app = express();

app.use(session({ secret: process.env.SESSION_SECRET, resave: false, saveUninitialized: true }));
app.use(passport.initialize());
app.use(passport.session());

// Google Auth Routes
app.get('/auth/google', passport.authenticate('google', { scope: ['profile', 'email'] }));
app.get('/auth/google/callback', passport.authenticate('google', { successRedirect: '/dashboard', failureRedirect: '/' }));

// Facebook Auth Routes
app.get('/auth/facebook', passport.authenticate('facebook'));
app.get('/auth/facebook/callback', passport.authenticate('facebook', { successRedirect: '/dashboard', failureRedirect: '/' }));

// GitHub Auth Routes
app.get('/auth/github', passport.authenticate('github', { scope: ['user:email'] }));
app.get('/auth/github/callback', passport.authenticate('github', { successRedirect: '/dashboard', failureRedirect: '/' }));

// Dashboard Route
app.get('/dashboard', (req, res) => {
    res.send(`Hello, ${req.user.displayName}`);
});

// Logout Route
app.get('/logout', (req, res) => {
    req.logout(err => {
        if (err) return next(err);
        res.redirect('/');
    });
});

app.listen(3000, () => console.log('Server running on http://localhost:3000'));
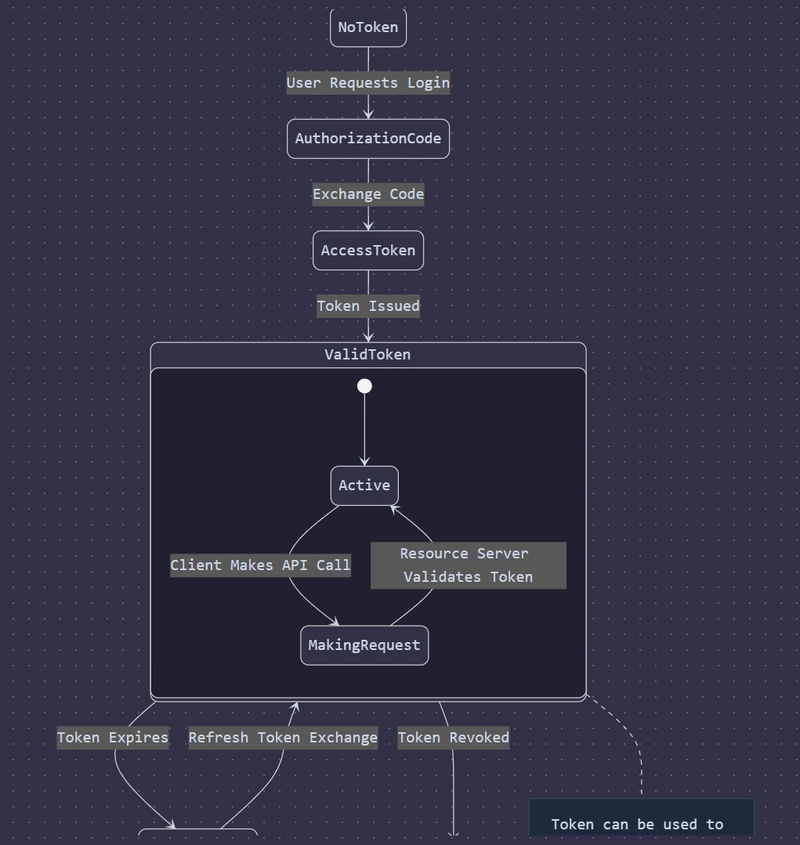
Architecture is :
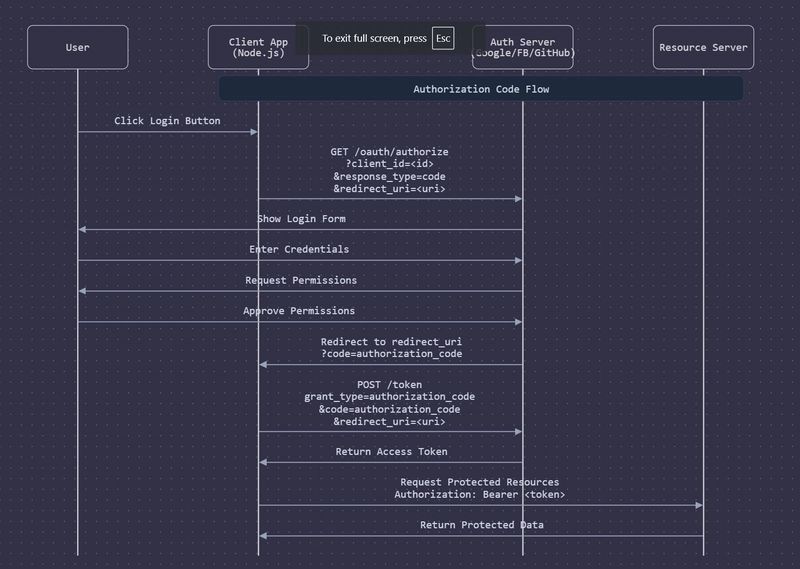
Understanding OAuth Architecture
OAuth authentication follows a structured flow involving key components:
Core Components:
Resource Owner: The user who owns the protected resources (e.g., Google account holder).
Resource Server: The server hosting the protected resources (e.g., Google's servers).
Client: Your Node.js application requesting access.
Authorization Server: The server that authenticates the user and issues tokens.
Key Elements of Authorization Flow:
Initial Redirect:
When the user clicks the login button, your Node.js app redirects them to the authorization server with:
client_id: Identifies your application.
response_type=code: Requests an authorization code.
redirect_uri: Where the auth server will send the user back after authorization.
Token Exchange:
After receiving the authorization code, your app makes a POST request to exchange it for an access token.
This happens server-side, keeping your credentials secure.
Resource Access:
The final step uses the Bearer token format, meaning the token itself serves as proof of authorization.
Token Expiration: Implement proper token refresh logic
State Validation: Always validate the state parameter to prevent CSRF attacks
Callback URLs: Ensure callback URLs match exactly what's configured in provider settings
Error Handling: Implement proper error handling for failed authentications
This implementation provides secure authentication with Google, Facebook, and GitHub while maintaining proper security practices and token management. Remember to handle errors appropriately and implement proper logging for debugging purposes.
6. Run the Application
node server.js
Visit http://localhost:3000/auth/google to test Google login.
Visit http://localhost:3000/auth/facebook to test Facebook login.
Visit http://localhost:3000/auth/github to test GitHub login.
Conclusion
OAuth authentication simplifies user login and improves security. Using Passport.js, we easily integrated Google, Facebook, and GitHub login into our Node.js application.
Feel free to ask if you have any questions!

Top comments (0)