
Getting acquainted with the Bottom Sheet.
How to create, how to modify and what are the possibilities. We have a project, it has several ViewControllers, one you see right now, and the other opens as a Bottom Sheet when you click on the corresponding button. Prior to iOS 15, there was no native Bottom Sheet.
To implement such a modal representation, it was necessary to put a lot of effort or use third-party libraries.
Now we have a sheetPresentationController, let's see what it can do.
First, we create an instance of our ViewController class.
import UIKit

class ViewController: UIViewController {

    @IBAction func showTablePressed() {
        let tableVC = TableViewController()
        if let sheet = tableVC.sheetPresentationController {
        }
        present(tableVC, animated: true)
    }
}
Then we retrieve the sheetPresentationController instance and work with it further. Let's start with the detents property. This is an array with which we can pass in the dimensions of our view.
sheet.detents = [.medium(), .large()]

Now there is .medium, which means exactly half the screen. We can open it, but we cannot stretch it to full screen, since it is an array, we can use several values at the same time. Let's add another .large here.
sheet.detents = [.medium(), .large()]
Now we can change the height by simply dragging it. There are a couple of interesting points here. The value of detents is important to arrange in ascending order.
sheet.detents = [.large(), .medium()]
If you call .large first and then .medium, then the user will probably not even notice the presence of the .medium position, but the effect of the stack of screens will disappear. Let's compile our project and look, it opens in full screen, and behind the View is not animated and nothing happens to it. Let's return everything as it was and see the difference.
sheet.detents = [.medium(), .large()]

Look - the back View drives off beautifully, it turns out such a pile. The second important point is that when the keyboard appears, the view automatically increases to a .large height, without any additional methods and efforts, everything works right out of the box. Also very convenient. Yes, that's sorted out. Move on.
Here we have a TableViewController in which there are several dozen cells. You have to scroll a little to get to the bottom. The detents value now accepts both possible positions, medium and large. In this case, changing the height of the curtain will always take precedence over scrolling. We can change this with prefersScrollingExpandsWhenScrolledToEdge set it to false and see what happens.
sheet.prefersScrollingExpandsWhenScrolledToEdge = false
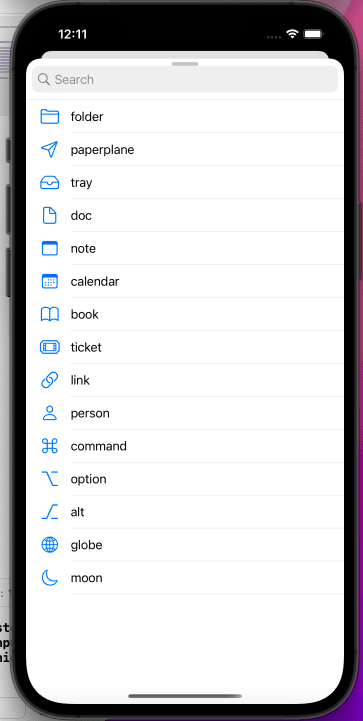
Cool. We can scroll, open, close the view, but we cannot bring it to the .large position. Some kind of reverse situation compared to what it was. The tablet occupies the entire area of the view, we have nothing to grab and pull, so we are in such an awkward position. This is where Grabber comes to the rescue. This is such an interface element for which we can pull and interact with our view. We call prefersGrabberVisible and pass it the value true and check.
sheet.prefersGrabberVisible = true
Here he is. Now you can grab it, drag it back and forth, convert it to .large or .medium, or close it. This is such a handy thing. It's also a great way to remind your users that this window is interactive, there's something to tackle, something to play with and all that.
Move on.
sheet.largestUndimmedDetentIdentifier = .medium
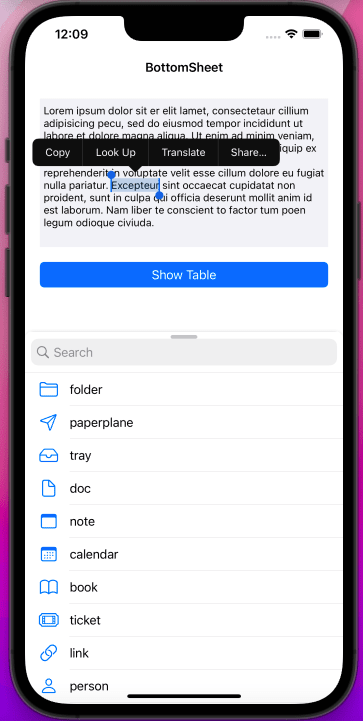
When the curtain is opened, the back view is darkened, and we cannot interact with it in any way. In general, this behavior is quite logical and predictable. If we click on the background, then the view just closes, but we have the opportunity to compose an interaction with the background of the view. We can choose something here, pull the text, copy it, interact with it somehow and our View also remains working, we can scroll our table, open it. All our elements are preserved and working. Very cool and comfortable.
What else is interesting? There is also an option to change the CornerRadius. We can put for example 20 and our view will become a little rounder.
sheet.preferredCornerRadius = 20
Look, the edges have become more rounded. Fine. Finally, let's take a look at the landscape mode. By default, the curtain opens to full screen and all our previous efforts just go to waste. We're back in a position where we can't do anything. To correct this misunderstanding, the prefersEdgeAttachedInCompactHeight property will help us.
sheet.prefersEdgeAttachedInCompactHeight = true
Now everything has become as beautiful as in portrait mode, but it has only one position, it always opens in full screen.

import UIKit

class ViewController: UIViewController {

    @IBAction func showTablePressed() {
        let tableVC = TableViewController()
        if let sheet = tableVC.sheetPresentationController {
           sheet.detents = [.medium(), .large()]
            sheet.prefersScrollingExpandsWhenScrolledToEdge = false
            sheet.prefersGrabberVisible = true
            sheet.largestUndimmedDetentIdentifier = .medium
            sheet.preferredCornerRadius = 20
          sheet.prefersEdgeAttachedInCompactHeight = true
        }
        present(tableVC, animated: true)
    }
}

Top comments (0)