
Abstract
Since the DevOps was new trending for billion of veteran IT guys. We must heard about CI/CD and other tips/tricks around DevOPS story. This repository tends to talk with you about another relevant story where our goal is : Build Up Jenkins Master & Slave automatically. Sound great, right ?
Description
We embrace the cloud platform where We will use to set up Infrastructure. Nowadays, We have several Cloud Hosting Provider where you usually used to work with them such as Google Cloud - AWS - Digital Ocean - Rackspace. In this article, We will choose Google as a friendly guy who helps us hosting infrastructure.
Otherwise, the explanation of word automatic in DevOps is not really simple like this word. The automation is the art where We have build thousand of script for each job We want to implement. You likely have to install OS 100 times for 100 Instances everyday, configure their own applications 100 times. System Administrator also takes responsibility for tweaking/tunning a tons of improvements every day. Thus, the question is How can we repeat all daily tasks with new strategy where It can be run automatically ?
We also get familiar with one tool like a backbone to help us solve this issue. Terraform
The goal will be : Using Terraform for automation all Jenkins configurations to boot up 1 Cluster Jenkins Master-Slave architecture
How to run the code
- Configure your own Google secret JSON & Project file
- Change your SSH public key
- Terraform plan - Terraform apply
- Waiting
- Accessing to the IP address under port 8080
File Configuration
provider.tf
# Specify the provider (GCP, AWS, Azure)
provider "google" {
credentials = "${file("ilawyerlive.json")}"
project = "ilawyer-live"
region = "us-central1"
}
So basically, this is the file where you will put the authentication key to interact with Google Cloud Platform.
We have several ways to interact with GCP through command line, mine is one of them. Using JSON
To authenticate with Google Cloud services a JSON file is required. This credentials file can be downloaded via the Google Developers Console as follows:
- Log in to the Google Developers Console and select the project you would like to obtain the credentials file for
- Go to the “API Manager” through the hamburger menu on the left-side
- Go to the “Credentials” overview by clicking on “Credentials” on the left-side
- Click the blue “Create credentials” button and select “Service account key” and choose “JSON” as the format.
- Click on “Create” to generate and download the key
After all, please change to your own location where json file was downloaded. Create your own project to replace for the current one ilawyer-live. The region is also really important. If you was stay in Singapore, I would recommend to change it to asia central. SSH action will be faster
compute.tf
These are 3 parts of configuration which need to focus
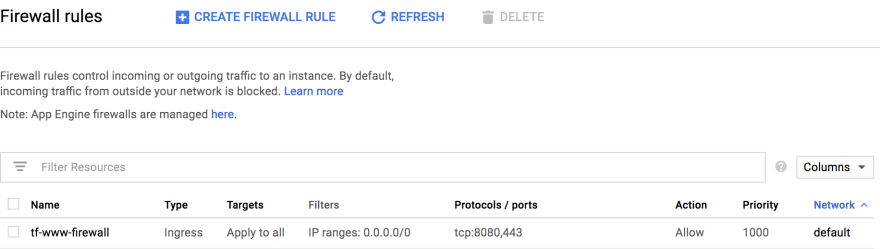
### To Provision FireWall rule ###

resource "google_compute_firewall" "www" {
  name = "tf-www-firewall"
  network = "default"

  allow {
    protocol = "tcp"
    ports = ["8080", "443"]
  }

  source_ranges = ["0.0.0.0/0"]
}
Basically, This section will be used to provision a rule for GCP where We only allow 2 ports 8080 & 443. Once you have run it, You will see the new rule will be appeared on your GCP web console
### To provision Jenkins Master ###

resource "google_compute_instance" "jenkins-master-1" {
   name = "jenkins-master-1"
   machine_type = "f1-micro"
   zone = "us-west1-a"
   tags = ["jenkins"]
   boot_disk {
      initialize_params {
      image = "ubuntu-1604-lts"
   }
}
network_interface {
   network = "default"
   access_config {}
}
service_account {
   scopes = ["userinfo-email", "compute-ro", "storage-ro"]
   }

 metadata_startup_script = <<SCRIPT
apt install -y update
apt install -y docker.io
systemctl enable docker
systemctl start docker
docker pull toanc/jenkins-master:latest
docker run -d -p 8080:8080 -p 50000:50000 --name master-1 toanc/jenkins-master
wget https://raw.githubusercontent.com/eficode/wait-for/master/wait-for -P /tmp
chmod +x /tmp/wait-for
/bin/sh /tmp/wait-for localhost:8080 -t 90
sleep 90
i=`hostname --ip-address`
f=`docker exec -i master-1 bash -c 'java -jar /tmp/jenkins-cli.jar -s http://localhost:8080 -remoting groovy /tmp/findkey --username admin --password admin'`

echo $f > /tmp/checkf
curl -X POST https://api.keyvalue.xyz/[HIDED]/--data ' ip: '$i' secret: '$f' '
SCRIPT

 metadata {
    sshKeys = "ubuntu:${file("~/.ssh/id_rsa.pub")}"
   }
}
The most important thing in this script is provision machine task. As you can see with these basic tags like name - machine_type - zone & image, It was used to provision a virtual machine with all own information as we want. Really straight, right ?
Another beautiful thing is metadata_startup_script where we apply several commands during provisioning time. These commands will help us provide our stuff automatically. So You can see I am creating another Docker image, then pull to docker images and re-use to start 1 docker instance. The last thing is, how can I register these some important information which will be used to setup Slave node?
I know if you were veteran of micro-services architecture. You will hear about Key-Value system. That was the shinny storage where we use to put all the important thing for re-using, storing purposes. In our situation, these were 2 important values We need to store. IPADDRESS for master-slave communication & TOKEN-SECRET key to validate the slave with the master.
Firstly, my idea is using some Key Value system like ETCD or CONSUL. But the main problem is not every one want it in their stack. If they really need it, they can implement by themselves. Hence We do find something more simple like application provided as a Service. So I decided to use https://keyvalue.xyz. We use POST method to put it into an existing link once we got the information.
sleep - If you had experience with Jenkins you will know the initial setup progress is not really fast. Depend on how many plugins & configurations integrated, the Jenkins will take few seconds to few minutes for completion. To make sure that the process already finished, I will set 90 seconds for waiting before switch to another command
metadata - Please don't forget to change ~/.ssh/id_rsa.pub location to your SSH public key. This is important to allow you access to your virtual machine
Similarly, the slave machine will be created in the meantime with master node. But It will be waited for 2 minutes to fetch the correct Key - IP Address from KeyValue.xyz. Once it has enough information, 1 container instance will be provisioned with the information which received from KeyValue and you can see both of them up from Jenkins master dashboard.

You probably will receive the IP address of all nodes once it was finished
"outputs": {
                "public_ip": {
                    "sensitive": false,
                    "type": "list",
                    "value": [
                        "35.199.162.152"
                    ]
                },
                "public_ip_master": {
                    "sensitive": false,
                    "type": "list",
                    "value": [
                        "35.199.162.152"
                    ]
                },
                "public_ip_slave": {
                    "sensitive": false,
                    "type": "list",
                    "value": [
                        "35.185.243.191"
                    ]
                }
            },
FAQ
What was inside my docker image ?
You can find more details what was inside :) from here https://hub.docker.com/r/toanc/jenkins-master/. I was using Groovy to do several useful things like
- First initial setup
- Adding new Slave node
- Getting Slave key
without GUI for all of them
Happy Hacking !

Top comments (0)