If you are a beginner in the field of Data Science (DS), or you just want to learn how to handle large sets of data using SQL, you are in the right place. I am about to take you through the basics of SQL, some background info on DS and then teach you how to handle large sets of data (from CSV file) using SQL.
What exactly is Data Science?
Data Science involves deriving useful insights (using statistics, scientific methods, algorithms and systems) from data to solve real world problems (by analysis, preparation of data for analysis, exploration and visualization of the data).
Why SQL?
First, a brief introduction to what exactly SQL is.
SQL stands for Standard Query Language. It is a standard language for storing, manipulating and retrieving data in databases. Basically, SQL is a language used for communicating with a database.
The data is normally stored in a Relational Database Management System (RDMS). Examples of RDMS include:
MySQL,
Oracle
PostgreSQL
SQLite
So, to the question Why SQL?:
- SQL is quite easy to understand
- SQL is opensource meaning you will find a lot of devs working to maintain it.
- SQL is highly scalable
- It is platform independent, and can work with almost, if not all the OS systems (like Windows, Linux, Mac etc)
- It is considered to be fast, at least according to most of the benchmarks done.
- It has features that can help to increase the developer's productivity, like stored procedures and views.
What are the various datatypes in SQL?
Here are the various datatypes, click on them to learn more about them:
-Numeric - [int, smallint, float, real, decimal, double and precision]
-Character Strings - [char, varchar]
-Boolean - [True, false, unknown]
-Bit-Strings -[bit, bitvarying]
-Date/ Time -[date, time]
-Timestamps and intervals
Basic Commands
Why don't we dive into the main topic by first looking at the basic commands used. Before we do that though, I would like to point out a few best practices, that is
- always use capital letters when writing commands to distinguish them with the variable names-names of columns, tables and values.
- Always terminate each commands with a semi-colon
CREATE DATABASE COMMAND
this is the command used to create a new database. Here is a format:
CREATE DATABASE databasename
USE DATABASE COMMAND
This command is used to activate an existing database for use. The command:
USE databasename
CREATE TABLE COMMAND
This command creates a table in a selected database.
The command:
CREATE TABLE IF NOT EXISTS `table_name`
(
  id INT(10) PRIMARY KEY,
  column_name datatype(length_in_characters) NOT NULL,
);
for example, this command will create a table called users, with a firstname, lastname and phone number fields.
CREATE TABLE `users`
(
  id INT(10) PRIMARY KEY,
  firstname VARCHAR(100) NOT NULL,
  laststname VARCHAR(100) NOT NULL,
  number int(15) NOT NULL,
);
CREATE USER COMMAND
This creates a new user for the database.
CREATE USER 'newuser'@'%' IDENTIFIED BY 'user_password';
To grand privilledges to the user, we use:
GRANT ALL PRIVILEGES ON *.* TO 'newuser'@'%';
You can show the privilledges assigned by using:
SHOW GRANTS FOR 'newuser'@'%';
or just remove the privilledges using
FLUSH PRIVILEGES;
INSERT COMMAND
This will insert new records to an existing table.
INSERT INTO tbl_name (col1,col2) VALUES(15,col1*2);
or
INSERT INTO tbl_name (col1,col2) VALUES(val1,val2);
INSTALLING MYSQL WORKBENCH
According to mysql.com,
MySQL Workbench is a visual database design tool that integrates SQL development, administration, database design, creation and maintenance into a single integrated development environment for the MySQL database system.
It can be found here
After downloading, follow the usual steps of installation. You may be required to add the sql path to the environment variables on windows system.
IMPORTING CSV DATA TO MYSQL WORKBENCH
Tis is a fairly easy process. First, launch the workbench. It may prompt you for a password, if you had previously set one, use it. If not, just hit enter to proceed to the dashboard.
On the dashboard, you may create a database using the previous commands, then activate the database by using the USE command.
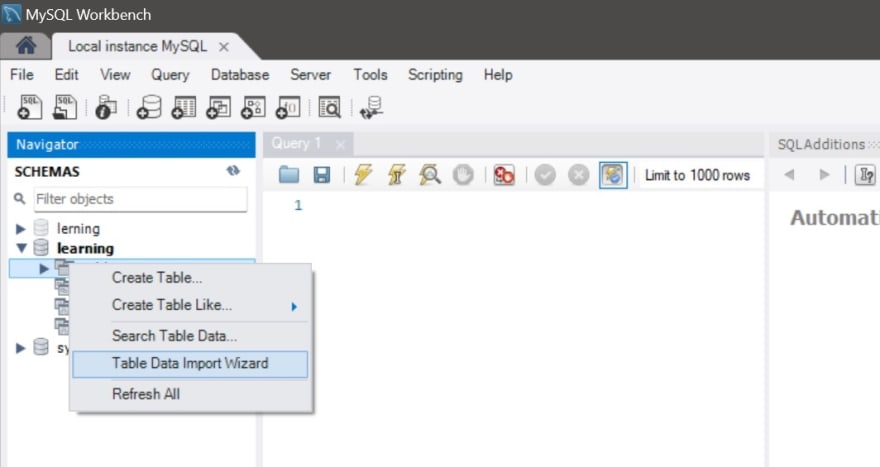
On the navigator panel, on the left, select the database, then right click on the tables. Select the > Table Data Import Wizard
as shown below:
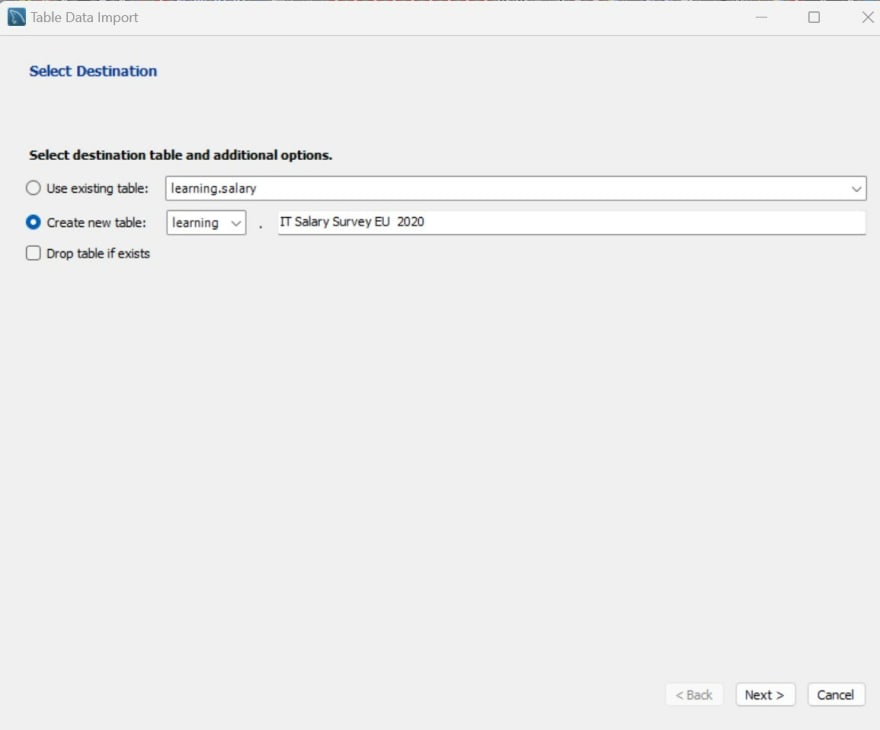
Next, select the CSV file then click next. Choose the database (by default it may choose the database in use) then give the table a name and click next.
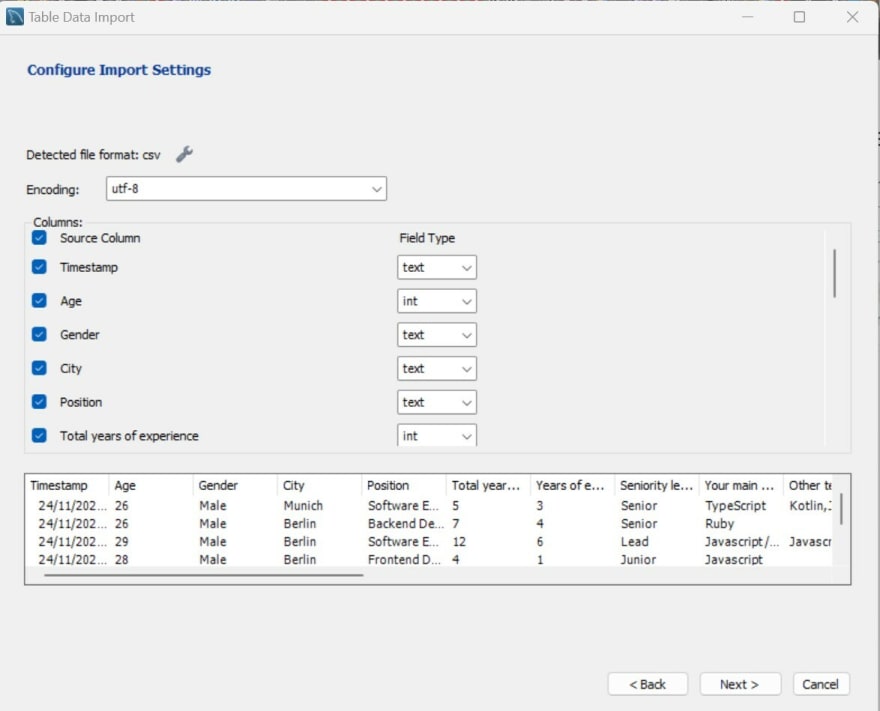
At this point, all the columns will be automatically added. If the column name is too long, you may run into some issues while importing. You may need to shorten the names.
Finally, click next to import. The data will e imported into your newly created database in the selected table.


Top comments (0)