This article was inspired by a Microsoft article on the same subject. I would highly recommend reviewing the original. What follows is an attempt to simplify the process and focus only on pausing the dedicated pool.
Step 1: Create a New Pipeline in Synapse Studio
- Navigate to your workspace and open Synapse Studio.
- Click the Integrate icon, then select the + sign to create a new pipeline.
- Name your pipeline PausePool.
Step 2: Create Pipeline Parameters
- Select the Parameters tab near the bottom of the pipeline screen.
- Select +New to create each of the following parameters:
| Name | Type | Default Values |
|---|---|---|
| ResourceGroup | string | Name of your resource group |
| SubscriptionID | string | Subscription Id of your resource group |
| WorkspaceName | string | Name of your workspace |
| SQLPoolName | string | Name of your dedicated SQL pool |
Step 3: Check the Dedicated Pool State
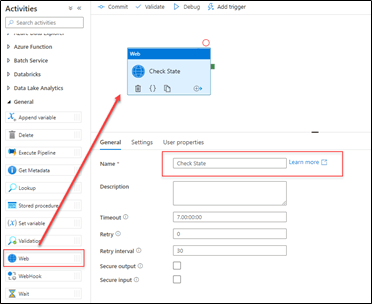
- Under Activities > General drag a Web activity to the pipeline canvas as the first stage of your pipeline.
- In the General tab, name this stage Check State.

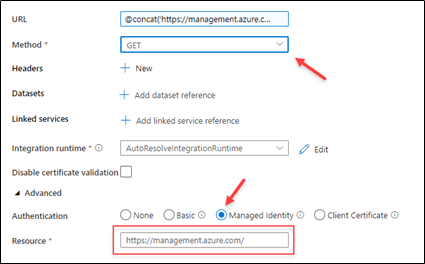
- Select the Settings tab then click in the URL entry space, then select Add dynamic content.

- Copy and paste the GET request that has been parameterized using the @concat string function below into the dynamic content box. Select Finish. The following code is a simple GET request:
@concat('https://management.azure.com/subscriptions/',pipeline().parameters.SubscriptionID,'/resourceGroups/',pipeline().parameters.ResourceGroup,'/providers/Microsoft.Synapse/workspaces/',pipeline().parameters.WorkspaceName,'/sqlPools/',pipeline().parameters.SQLPoolName,'?api-version=2021-03-01') - Select the drop-down for Method and select GET.
- Select Advanced to expand the content. Select Managed Identity as the Authentication type. For Resource enter
https://management.azure.com/
Step 4: Add an If Condition to Pause
- Under Activities > Iteration & conditionals drag an If condition activity to the pipeline canvas as the second stage of your pipeline.
- In the General tab, name this stage Pause If Online.

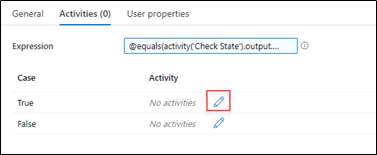
- Select the Activates tab then click in the Expression entry space, then select Add dynamic content.

- Copy and paste the expression below into the dynamic content box. Select Finish. The following code is an expression which returns True if the status is Online:
@equals(activity('Check State').output.properties.status,'Online') - On the Activities tab, select the edit icon for the True case.

- Under Activities > General drag a Web activity to the True activities canvas.
- In the General tab, name this stage Pause

- Copy and paste the POST request that has been parameterized using the @concat string function below into the dynamic content box. Select Finish. The following code is a simple Get request:
@concat('https://management.azure.com/subscriptions/',pipeline().parameters.SubscriptionID,'/resourceGroups/',pipeline().parameters.ResourceGroup,'/providers/Microsoft.Synapse/workspaces/',pipeline().parameters.WorkspaceName,'/sqlPools/',pipeline().parameters.SQLPoolName,'/pause?api-version=2021-03-01') - Select the drop-down for Method and select POST.
- In the Body section type Pause.
- Select Advanced to expand the content. Select Managed Identity as the Authentication type. For Resource enter
https://management.azure.com/
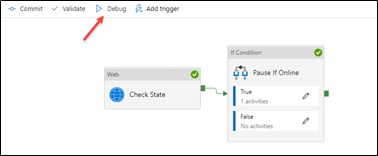
- You can run your pipeline by selecting Debug mode. After your debug is successful, you can add a trigger to schedule the pipeline execution.

Closing
I hope you found this article helpful. Would you mind letting me know of any comments or questions you have below?


Top comments (0)
Some comments may only be visible to logged-in visitors. Sign in to view all comments.