In the previous post, we have created a custom menu that allows restaurant owners to easily change the menu dishes. However, this is the way for websites that use the Elementor page builder only. In case you don't want to spend money to buy this plugin, you can use Gutenberg instead. It's free, but you need to use a few lines of code. Let's read detailed instructions in this article.
Preparation
In this post, instead of using a theme for Restaurant as in the previous one, I switch to another theme that strongly supports Gutenberg, eStar, to be able to customize the appearance more flexibly. This theme is completely free so you can try it too.
In addition, I still use WooCommerce to create food as a product as in the previous post.
Step 1: Create Dishes
First, create dishes as products using WooCommerce as in part 1. Here, I still have the same list of dishes.
Step 2: Create the Menu Page
Just as simple as creating a normal page, go to Pages > Add New and fill in the page's information.
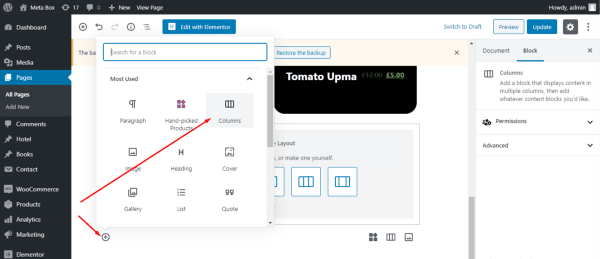
With the Gutenberg editor, we will be supported to create blocks right in the page editor. Here, I chose the Columns block and set it in two columns for the menu layout.
Chose the Columns block
Set it in two columns for the menu layout.
To add dishes to the menu page, choose to add the Hand-picked Products block as below.
This block allows you to choose any dish from the "Products" list you create in step 1. Note that in this block, I set it in one column for a beautiful display.
Finally, click Done to save the menu.
Now, you'll see the appearance of your menu page with the dishes displayed as follows:
However, I think you should customize a little bit to get the nicest look. You should use the CSS as in the next step to do this.
Step 3: Customize the Menu Page's Appearance with CSS
Since I'm using Gutenberg, I need to add the following CSS code to both style.css and style-editor.css files. Specifically:
- Adding code to the
style.cssfile helps edit the display in the frontend; - Adding code to the
style-editor.cssfile helps edit the display in the backend (page editor).
.wc-block-handpicked-products .wc-block-grid__product-image,

.wc-block-handpicked-products .wc-block-grid__products .wc-block-grid__product .wc-block-grid__product-onsale {

display: none;

}

.wc-block-handpicked-products .wc-block-grid__product {

display: flex;

justify-content: space-between;

}

.wc-block-handpicked-products .wc-block-grid__product .wc-block-grid__product-link {

flex: 1;

text-align: left;

}

.wc-block-handpicked-products .wc-block-grid__product-title {

font-size: 24px;

Color: #fff;

}

.wc-block-handpicked-products .wc-block-grid__products {

background-color: # 000;

border-radius: 25px;

padding: 20px;

}

.handpicked-products__title {

margin-bottom: 10px;

}
After that, go back to the menu page, you'll see the list of dishes displayed as the following:
Here is the result of menu page's appearance:
Now, to change the list of dishes, the restaurant owner just goes to the Menu page editor and follows the actions here:
Wrap Up
As you can see, creating a custom menu is quite easy. In case you use Gutenberg, you just need some lines of CSS code to customize your Menu to get a beautiful look. You can also create your own layout by adding any other Gutenberg blocks to make the menu more vivid and creative.
Hopefully, with these two tutorials on creating custom menus using Elementor and Gutenberg, you have already chosen for yourself the proper way. If you have any other ideas, do not hesitate to share with us in the comment section below.
--- --- ---
The publication at Meta Box.


Top comments (1)
Some comments may only be visible to logged-in visitors. Sign in to view all comments.