Jupyter notebooks are an increasingly popular way to write, execute, document, and share code and communicate the results, especially in the Python ecosystem. This article will cover four ways to run Jupyter notebooks. It will also talk about some of the advantages and disadvantages of each. The notebook ecosystem is expanding and there are a lot of options, so let’s dig in.
First, what is a notebook?
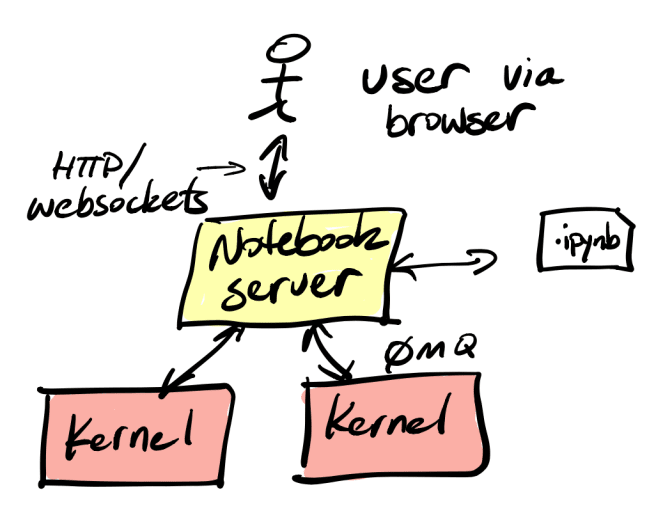
Before we look at the options, let’s review what a Jupyter notebook is. A notebook is a combination of code, documentation, and output. It’s essentially a captured interactive session with an interpreter. It contains cells that contain code or descriptive text, along with the output of executing the code. Since a cell can be executed multiple times in an interactive session, the notebook will contain the most recent execution and results. A notebook file is usually created via an interactive process by the author using a web application for authoring the notebook document. As you can see in the architecture diagram below, the notebook server can communicate to multiple kernels. The kernel is the process where the notebook runs, and each is independent of the other.
Jupyter supports other languages, but for now, we’ll assume we’re talking about Python. However, nothing in this article requires that Python be the language of choice for the kernel.
A user interacts with a notebook server (usually, but not always via a web browser as you’ll soon see) to edit cells in the notebook. The cells can contain code or documentation, like markdown. The server ensures that all user edits and actions are executed in the kernel. When a cell is executed, the output from the kernel is captured. The notebook server persists the output in a file, ending in .ipynb. The file format is JSON. You can open it in a text editor and save it via version control (although it’s not very clean and can be messy and hard to diff, especially for large outputs like images or graphs). You can also send it to others to open or use.
How you do you view a notebook?
First, let’s separate the concept of viewing a notebook from actually executing it. Since a notebook file contains all the data from an interpreter session, it can be rendered into a human readable format to show that data, without re-executing the code. So viewing a notebook is a lot easier than executing it, since you don’t need a kernel. You can just take the input json and convert it as whichever output you desire. This is a good way to share your code and output with others, and if they only want to view it, this is all they will need. Executed notebooks can be shared via a number of tools.
nbconvert
The nbconvert tool will convert a notebook into various output formats. Depending on which software packages are installed in the environment, notebooks can be rendered in html, PDF, LaTeX, and other formats. It can also execute a notebook from the command line, without a server running, but it isn’t intended for interactive use. The resulting converted notebooks can be sent to others for viewing using whichever tool they prefer, like a web browser or PDF viewer.
nbviewer
The nbviewer web site is another option for sharing notebooks. Think of it as a web based nbconvert tool.
Other services (like GitHub)
A number of services support rendering notebooks as web pages. For example, GitHub will render your notebooks for you if a .ipynb file is a part of a repository that you are browsing. For example, I put many of my articles in GitHub, and some of them render right in the browser.
How do you run or execute a Jupyter notebook?
OK, enough about viewing notebooks, if we want to actually create new notebooks or execute already created notebooks, what are our options? To work with a notebook, you need a notebook server running. The notebook server will launch the necessary kernel, provide you with a user interface via your web browser (or other authoring tool), and send data back and forth to the kernel for execution.
Let’s look at four different options for executing notebooks.
Standard Jupyter servers
Your first option is to run one of the standard Juypyter notebooks servers. You can do this by installing the server in your Python environment, and then running the server and connecting to it via a browser.
Jupyter notebook
The standard Jupyter notebook is a reliable and simple way to execute notebooks, and is what I tend to use most of the time. You can install it using either pip or Anaconda using conda. I’d recommend using something like pyenv and a virtual environment to setup and run a newer version of Python if you don’t choose conda. The Jupyter project recommends using Anaconda in their docs.
Note that the Jupyter notebook is fairly configurable, so you can checkout the extensions once you’re comfortable with the basic setup.
JupyterLab
A second option from the Jupyter project is JupyterLab, the next generation notebook server. It provides a more sophisticated front end and may be a lot easier for beginning users to understand. It also supports extensions.
Both Jupyter notebook and JupyterLab are supported as part of JupyterHub, a way to serve up Jupyter notebooks for multiple users. You might consider this if you are planning on having multiple users in a class or workgroup run notebooks at the same time, and you don’t want users to have to run their own Jupyter notebook or JupyterLab instance.
IDE integration
A second way to execute notebooks is via your Integrated Development Environment (IDE). Many IDEs support Jupyter notebooks, sometimes via a plugin. For example, Pycharm supports notebooks in the professional version. If you use Microsoft Visual Studio Code, Jupyter support is also available. For other IDEs, check for Jupyter support. If it lacks support, you might be very interested in the next option.
Hosted services
A third popular way to execute notebooks is via hosted services. With a hosted service, you don’t have to maintain a server. You can access your notebook from anywhere. Sharing code with others can be easier, especially with some of the services offering collaborative editing of the same notebook file. Some of these are free or offer a free version. Some support advanced features like enhanced visualizations, easier environment setup, GPU support, and other IDE-like functionality. With these environments, you can create a notebook from scratch or upload an existing .ipynb file, so you can take work from one environment (or your own setup) and move it to the service. If you are using source code control (I hope you are), then you can easily add your notebooks by cloning your repository.
- DeepNote – a data science notebook with a free version. Supports collaboration with other users and a number of advanced integrations.
- Cocalc – a service that targets classroom settings, supports a wide variety of languages and environments
- Replit – online IDE with collaborative tools, supports over 50 languages, free version available.
- Datalore (from JetBrains) – a Jupyter notebook implementation with PyCharm functionality, free version available.
- Google Colab – free Jupyter notebooks from Google, Pro version available.
This appears to be a competitive space with new options appearing all the time.
The command line
Last but not least, you may be a command line nerd wondering if you have to use a browser or fancy IDE. It turns out you also have an option. The nbterm project allows you to interactively run Jupyter notebooks from the command line.
Conclusion
As you can see, there are a number of ways to execute Jupyter notebooks. Depending on your needs, you should be able to find a solution that works well for you. I’d encourage you to try a couple out and see if they help you be more productive.
The post 4 ways to run Jupyter notebooks appeared first on wrighters.io.

Top comments (1)
This was informative.Thanks!