Original post on Medium see here, code example see my Github page
UK weather isn’t that great, if you want to be prepared and find out what weather is like in the UK, you may have 3 choices:
- The easy way: look up in the sky
- The intermediate choice: use BBC weather
- The hard mode: build you own weather app!
In this article I will demo the hard mode here, yeah, why not ✌️.
The app is built using React JS as frontend and Node JS as backend. It also involves fetching weather data from Openweathermap API and UK geological data from Postcodes.io, so make sure you have both API ready. FYI Openweathermap API requires an API key and Postcodes.io does not.
Basic idea
- Add a React component
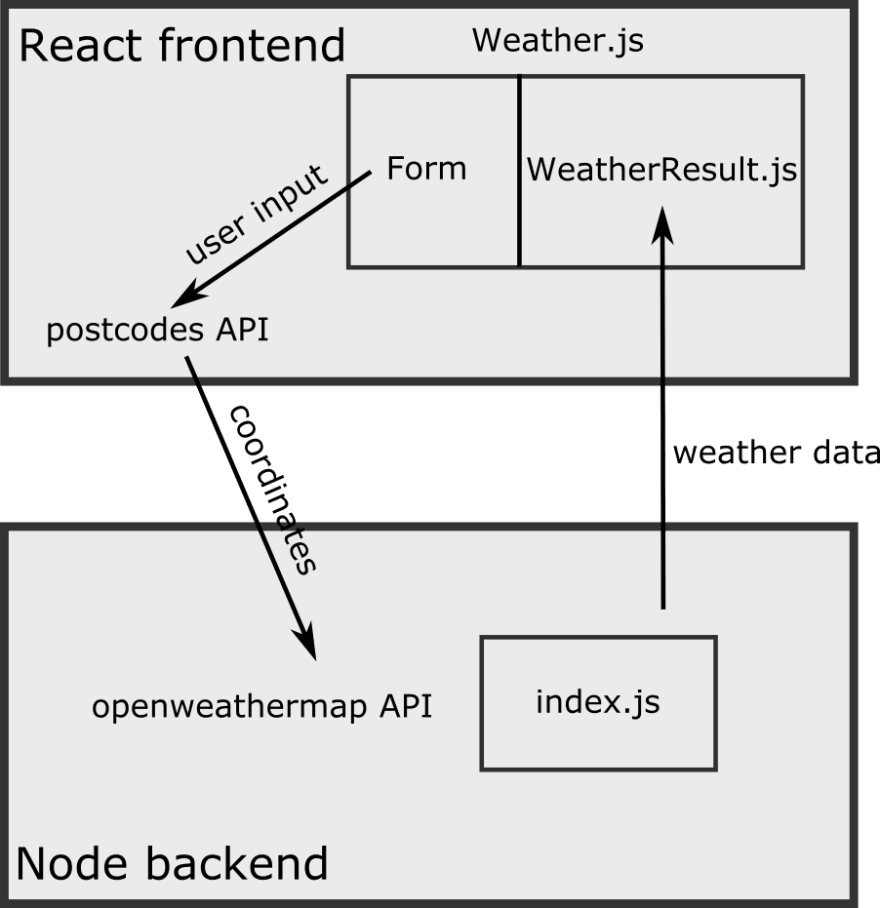
Weather.jscontains a form element which allows user to input UK postcode.Weather.jsshould also contain a sub componentWeatherResult.jswhich is only rendered when weather data is successfully fetched. -
Weather.jspasses the input postcode to Postcodes API and get the geological coordinates. The coordinates are then sent to Openweathermap API in the backend. The reason of sending coordinates rather than directly sending postcode to Openweathermap API is: we will be able to save the effort of regulating the user input to meet Openweathermap API requirements. - The Openweathermap API receives these coordinates. Node then gets the response and sends it back to
WeatherResult.js. -
WeatherResult.jsrenders the data and presents to the user. # File structure The main file structure is as follows (some less important files are ignored, such as node_modules):
full-stack-weather-app
├── backend
│ ├── index.js
.
.
.
├── frontend
│ ├── public
│ ├── src
│ │ ├── components
│ │ │ ├── Weather.js
│ │ │ ├── WeatherResult.js
│ ├── App.css
│ ├── App.js
.
.
.
where frontend folder is created via create-react-app: npx create-react-app frontend.
Frontend: set up Weather.js
We are going to render the application from App.js, so change default App.js to:
we could see that only Weather.js component is rendered. Let’s take a look at it:
Weather.js is quite long so we will take a look at getCoord method separately. Also let’s not worry about the CSS classes in the render method for the time being. Currently the component renders a plain form with no styling. There are several states: addressData is used to store the complete address data fetched from Postcodes API, coordinates are then extracted and stored in coordinate state. postcodeInput is used to store the input postcode when form input updates. Finally displayResult is a Boolean value which renders/hides WeatherResult component.
As user inputs postcode, the onChange event in form <input> element picks up the use input and invokes the handleInputChange method. postcodeInput state then receives and stores the postcode input. displayResult state is set to false such that when user inputs changes, weatherResult component is hidden (see the demo at the end).
Now let’s take a look at getCoord method:
The Postcodes API is open source and does not require an API key to use, thus we could directly use it in Weather.js. Variable postcodeAPI receives the postcode input and completes the API. Weather data is then fetched and coordinates are passed into coordinate state. A post request is sent to http://localhost:4001/search-location, here we specify the full endpoint, otherwise if using /search-location only, the post request would be sent to http://localhost:3000/search-location. Meanwhile we set state displayResult to true, such that the weatherResult component will only be rendered if a response is returned successfully.
Backend: wrap all in index.js
For backend, we will only have an index.js file for all functionalities. Let’s take a look at the file:
A global variable apiUrl is defined here to store the Openweathermap API, which follows the format: http://api.openweathermap.org/data/2.5/weather?lat=123&lon=321&appid=12345qwerty.
index.js does 3 jobs:
- line 8–19: set the application to listen on port 4001,
- line 21–38: send a post request to
http://localhost:4001/search-locationto obtain coordinates, - line 40–49: send a get request to
http://localhost:4001/weatherso the endpoint could receive the weather data.
So far you might ask a question: Why do we have to pass coord to Node? Wouldn’t it be easier to fetch weather data in React immediately follows user input?
The reason is that an API key should never be stored in frontend as it might be exposed to users through DevTools. As a result, user input needs to be passed to Node.
How did we do it? Remember in getCoord method we used an axios.post method to post object coord to http://localhost:4001/search-location? Here in index.js we fetch coord from it and insert into the Openweathermap API. Plus the API key is stored in .env file and never pushed to version control, so the potential issue of exposing API key to users is eliminated. For securely store API key in .env file and fetch it in Node, see my other article here.
Frontend: display weather in WeatherResult.js
On line 40 of index.js, the weather data has been sent to http://localhost:4001/weather, thus in WeatherResult.js we fetch weather data and display it as follows:
Recall in Weather.js line 56 we conditionally render WeatherResult component based on displayResult state, and fetchWeather method is only called on componentDidMount, thus no request is sent if WeatherResult component is not mounted. Open a terminal in ./frontend and type npm start, we get the React app running. Let’s give it a go:
It works!
Until now we have scaffolded a full stack weather app using Node as backend and React as front end. For me the most important thing to take home is how to send React state to Node. I think this is fairly useful if your website needs to take a user input and embed it into an API, and this API must be stored in Node.
In part 2 and part 3 we will deal with some error handling and HTML + SCSS to make the app prettier. Thanks for reading, see you later. 😁

Top comments (0)