
During the pandemic everyone needed to stay home, even the people who commuted to work every day, were left at home. Because of this, companies couldn’t organise team building activities. This made us think about the possibilities of other ways of organising these kinds of events. We found an opportunity in the Virtual Reality space, which is becoming more and more popular over the last couple of years. It would be an awesome project to be able to assume that most consumers have a Virtual Reality headset at home, but sadly this is not the case yet. This is why we decided to make our project a combination of Virtual Reality and a web interface. This will make it possible for everyone to enjoy our application, no matter what their preferred/available device is.
A question you might be asking yourself right now, might be: "What did these guys actually build that combines VR and Web?". To answer your question very briefly (because we will be discussing this in depth later on), we made a team building application that puts both players inside of a maze. The VR player will be spawned inside the maze, whereas the Web player will be spawned above the maze as a little drone. Both players will need to collaborate with one another to get to the end of the maze by finding quizzes with questions (potentially about each other or about the company). The VR player will need to answer these questions, by asking the Web player about the possible answers and which he/she thinks is the correct one. The Web player can help him/her with this by using their base knowledge or by searching on the world wide web for the right answer. When the answer is correct, you will get a piece of the code to open the door. The door can be opened by entering the correct code on the keypad next to it.
But that is not everything, what is a game without some competition. During the game a timer will constantly be running, so all the employees could play the maze to compete with each other to reach the best possible time. When you answer a question correctly it’ll bring you to the exit at a fast pace, but when you answer it incorrectly you will be punished by getting some extra time added to your timer. So be fast and be smart!

How do you start with a project like this? We were with a team of three people and only one had a basic knowledge of Unity. Therefore two of us needed to learn Unity and help build this project within seven weeks. In the beginning we didn’t even know where to start but after a while, we figured it out. We have three major projects: Unity, React and Spring. Among which Unity has two different parts: VR and WebGL. To give an image of this take a look at the following pictures. One includes the VR build, the other one contains the WebGL build.


Now we will explain each part of this architecture in more detail. Let’s begin with our main project Unity.
Unity
This project is divided into two parts: a VR part and a WebGL part.
We started our Unity project by generating a random maze using an algorithm we found on the World Wide Web. The following steps are the core principles of the algorithm:
- Select a random cell. This is the current cell. Add it to the visited list
- Randomly pick a cell adjacent to the current cell that is not in the visited list. This becomes the current cell.
- Remove the edge between the previous cell and the current cell. Add the current cell to the visited list.
- Repeat 2 and 3 until travel is no longer possible
- Scan the grid top to bottom, left to right
- If a non-visited cell is found
- The cell becomes the current cell
- Go to 2
- Else
- The algorithm is complete
- If a non-visited cell is found

After that we build a prefab quiz setup with a question on a sign and some answer stations with buttons, these are invisible. On the sign is a big red button which will need to be pressed to show the question of the quiz setup. When pressed the question will be sent to the web player and the buttons of the answer stations will become visible. Every answer station contains 1 answer, when a button is pushed with your hands you will answer the question. When the answer is correct the station will turn green. When it’s incorrect it will turn red.
To be able to actually use these buttons, a physics system is needed on our hands. The basic VR hand implementation by Oculus does not include Physics, so this is where our application starts to divert from the standard VR application. To be able to collide with other objects our hands needed a Rigidbody component, as well as a new model that had the proper colliders setup. These could not be applied to the standard Oculus setup but would actually be mirrored to it. Using this technique, we could allow the player to physically keep moving their hand whilst the in-game hand got stuck on the virtual environment. The movement used for the Physics based hands is done using something called PID formula's. This is something that goes way out of scope for this project and is something for you to look up if it were to interest you.

Finally we built a door with a keypad which is the finish of the game. It basically checks if the code entered matches the code of the room. When it is correct the door opens.
But what about those two parts?
Because we work with two different parts in our Unity project, we needed to use conditional compilation. We have to use this because there are sections that are specific to the VR player whereas others should only be used by the Web player. Below you can see an example of Unity conditionally turning off specific GameObjects based on the type of player you are.
#if UNITY_WEBGL
   GameObject.Find("XR Origin/Camera Offset/Main
   Camera").SetActive(false);
   GameObject.Find("Physics XR Rig").SetActive(false);
#else
   GameObject.Find("Web Origin/Camera").SetActive(false);
   GameObject.Find("OverlayCanvas").SetActive(false);
#endif
And what about my friends?
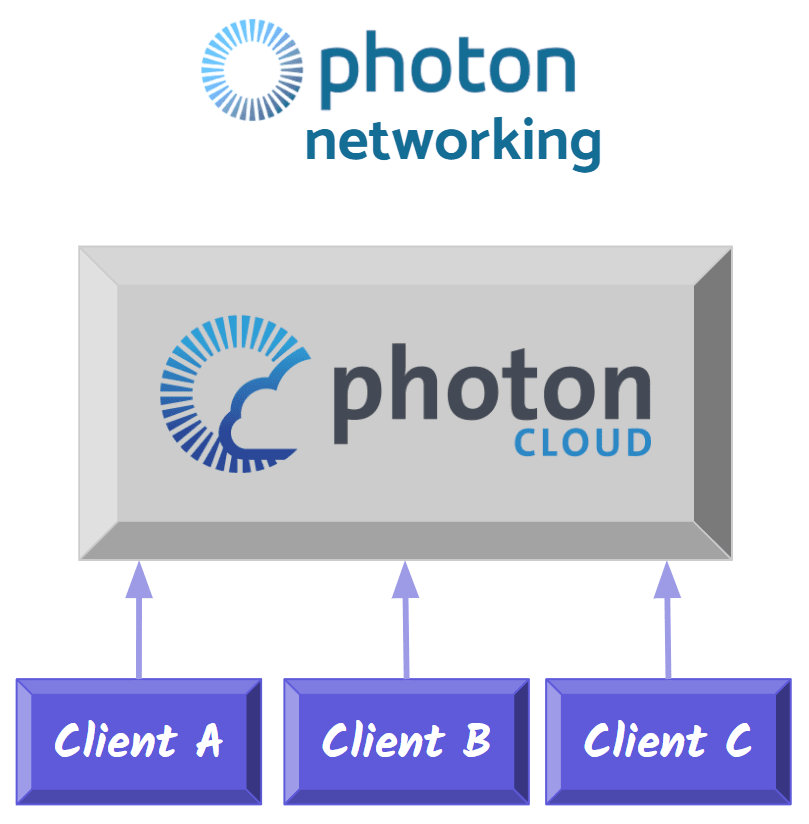
Now we have a VR and a WebGL build but at this moment it’s a singleplayer game. As a result the two players will not see each other nor be able to help each other out. Therefore we needed to look for a multiplayer solution which brought us to Photon Network. Photon is an engine specialising in multiplayer game development.
It is important to know that there is an alternative to Photon in Unity Networking. This would allow you to have full control over the networking setup of your game. Allow me to explain the core difference between both parties and why we chose to use Photon over Unity Networking.
Unity Networking uses a Host/Client system where one player is the designated host of the session. This player will be needed for every action formed by anyone on the network. If any Client connected to the network wants to send a message, this will be sent by going through the following path: Sender-> Relay Server -> Host > Receiver. This means that when the Host leaves the network, for whatever reason, the whole network is disbanded.

Photon uses the same Host/Client system, but differs when the Clients try to send messages to each other. Using Photon, there is no need for the Host to be involved in the proces. The message will be sent by passing through the Relay Server to the correct receiving client or even directly from client to client. In this ecosystem it is possible to disconnect from the network as a host and still keep the network up and running. This can be done by migrating the hosting privileges to another client.

To not make our clients have to bother with all of this hosting and connecting, we decided to use Photons Cloud solution. What this allows us to do is create a system where all things that are needed to keep the server running, are hosted for us on the cloud. Lobby’s, Room’s, … are created on demand and in this way, we removed a big failure possibility from our game.
You might not know what these lobby’s and room’s are, but let me give a quick explanation of both concepts. Every player has to start somewhere, and for our application that place is the “Lobby”. It is a centralised location, used to distribute players over the Rooms that are available on your network. These rooms are created separately from the Maze’s used in our game, as the maze can be reused every time. Photon rooms are a virtual space where players can find each other, created at runtime when players decide to join one of our mazes. If a room for that maze exists, you will be connected to the already existing room, otherwise a new room will be initiated.
To actually start using Photon inside of our project, we needed to import an asset available on the Unity Asset Store. Furthermore we created a script called the NetworkManager which would arrange our rooms and organise the lobby and Photon Server. When a player wants to join a room, Photon will initialise this room using our own custom properties and options.
private void InitializeRoom(int roomId)
{
   roomSettings = photonRooms.Find(room => room.id == roomId);
   PhotonNetwork.LoadLevel(roomSettings.sceneIndex);
   Hashtable props = new Hashtable
   {
      { "roomId", roomId},
      { "questions", JsonConvert.SerializeObject(roomSettings.Questions) },
      { "mazeKey", roomSettings.mazeKey },
      { "rows", roomSettings.rows },
      { "columns", roomSettings.columns },
      { "doorLocation", JsonConvert.SerializeObject(roomSettings.doorLocation) },
      { "signLocations", JsonConvert.SerializeObject(roomSettings.signLocations) },
      { "factLocations", JsonConvert.SerializeObject(roomSettings.factLocations) },
      { "facts", JsonConvert.SerializeObject(roomSettings.facts)},
      { "finalDoorCode", roomSettings.finalDoorCode }
   };

   RoomOptions roomOptions = new RoomOptions
   {
      MaxPlayers = (byte)roomSettings.maxPlayer,
      IsVisible = true,
      IsOpen = true,
      CustomRoomProperties = props
   };

   PhotonNetwork.JoinOrCreateRoom(roomSettings.Name, roomOptions, TypedLobby.Default);
}
Where is our data processed?
In our Spring back-end we created a small database containing companies with their own mazes (including settings) and their questions. Basically this will be your standard small CRUD application. Furthermore it is used as a gateway between the VR and WebGL build. But why do we need a back-end when we already use Photon?
To give an easy example: Every Photon room contains a maze. At first, Photon created this maze for the two players based on a key. The problem is that these two keys were different for both players which caused both players to have a different maze. This happened because, at the time, the key was randomly generated at runtime. When the VR player walks through the maze there’s a possibility that he walks through a wall in the Web player's maze, so we needed to fix this issue. Otherwise it would be impossible to help each other out.
For this reason we created a back-end where we store a randomly generated key, which is generated by Spring, inside the settings of the maze. When Photon creates the room in Unity it will receive settings from the back-end that will be stored inside of the room properties. As a result the two players will use the same key, causing their mazes to be exactly the same. The maze itself is not shared over the network but we do share the key that is used to create the same maze.
public class PhotonRoom
{
   [FormerlySerializedAs("defaultRoomIndex")]
   public long id;
   public string Name;
   public int sceneIndex;
   public int maxPlayer;
   public string mazeKey;
   public string finalDoorCode;
   public int rows;
   public int columns;
   public List<Question> Questions;
   public Coordinate doorLocation;
   public List<Coordinate> signLocations;
   public List<Coordinate> factLocations;
   public List<Fact> facts;
}
We encountered the same issue at our quiz setups. If we did not put their location in the back-end they would have been located differently throughout the maze for both players. By receiving the quiz locations from the back-end, both players will have the quiz setups they need on the same location. These will not be shared over the Photon Network, but will instead be instantiated locally using the exact same coordinates. As a result when the VR player clicks on the right answer, the Web player won’t see any difference at the setup but he will get a piece of the code. At the time, we knew this was not the most optimal solution, but it was the best solution we were able to find.
On the other hand the Spring application is not only used as a means of storage but also as a gateway. The events that are happening on the VR side need to be sent to the WebGL side. In short, when the VR player triggers an event, for example by clicking on the correct answer. A combination of REST API POST and GET requests could happen, depending on the event, which will allow us to manipulate the data saved on the back-end. It could also trigger a websocket message to be sent to the front-end which will include information so that it knows what to do. But more on that topic later.
Introducing the Cloud
For our deployment, we chose to create a Gitlab pipeline. This creates a container image which we could then use to deploy with Cloud Run.
Gitlab CI with Google Cloud Container
In Gitlab, we had to create a Dockerfile and a pipeline which will create a container image. The pipeline is contained in a gitlab-ci.yml file. The container image will be published on Google Cloud Registry. For this, we had to create a Service Account to create a variable in Gitlab. This variable could then be inserted into the gitlab-ci.yml file. This file will go through two stages. In its first stage, a build image will be created that contains the container image. Once we have a container, the next stage will be the publishing stage. It will ensure that the image will be published to the Cloud Registry. In this way, our container image will be on Google Cloud and available for Cloud Run.
Google Cloud MySQL Database
Because we are working with a database, we have to create instances. To do this, we first had to create a Google Cloud SQL Instance with MySQL Database Engine. This is the service on which the database will run. Once this instance is created we can add a database. Subsequently, we also create a user to be able to log into the database.
To connect from the back-end, we also had to create a new Service Account for the database connection. This is a json file that we have to put in our application.properties file in our Spring Boot application. Some other variables that had to be defined in the application.properties file were the database name, the SQL instance connection name and the username with its corresponding password.
#db name
spring.cloud.gcp.sql.database-name={db-name}
#connection name
spring.cloud.gcp.sql.instance-connection-name={instance-connection-name}
#db name - connection name - user - password
spring.datasource.url=jdbc:mysql://google/{db-name}?cloudSqlInstance={instance-name}&socketFactory=com.google.cloud.sql.mysql.SocketFactory&useSSL=false&user={username}&password={password}
spring.cloud.gcp.credentials.location=file:src/main/resources/{db-json}
spring.jpa.generate-ddl=true
spring.datasource.username={username}
spring.datasource.password={password}
Google Cloud Run
After going through the steps above, we now have a Google Cloud SQL Instance with a database whose container image has been created. This database setting is also in the back-end so that the connection with the database runs smoothly. Once these steps are completed, we can create a Cloud Run Service. Here we can choose the container image that has been created in the pipeline and can be found on the Cloud Registry. Once this Service is created, our project is officially deployed. Now we can make calls from and to the database in our Unity and React project.
WebGL in React
After creating a WebGL build, we want it to be shown in a web browser. In React there are no specific requirements for a WebGL build. We only needed to install the react-unity-webgl@8.x package, note that this must correspond to your Unity version. Once we have downloaded this package we can create a new Unity Context object. This will be a Unity Context Model. It contains all of the configuration, event listeners and references of the build. We can pass our paths of the WebGL build to this new object, after which we can assign our Unity Context to the Unity component.
const unityContext = new UnityContext({
   loaderUrl: "/build/WebGLBuild.loader.js",
   dataUrl: "/build/webgl.data",
   frameworkUrl: "/build/build.framework.js",
   codeUrl: "/build/build.wasm",
});
<Unity unityContext={unityContext}/>
Note, if WebGL build won’t load in Chrome, you might need to adjust your chrome flags at chrome://flags/. The WebGL Developer Extensions and the WebGL Draft Extensions must be set to enabled.
At this moment we can see our game in a web browser, but what about communication?
Well, it is possible to communicate between Unity and React. This communication is necessary for us to know what maze you are in and to invoke methods where necessary.
Communication between Unity and React
For the communication from Unity to React, to know in which maze you are in, we have to create the following file structure inside of the Unity project: “/Plugins/WebGL/file.jslib”. In this new file we create a new function ‘InfoMaze’. In the body of our function, we’ll emit our event listener by invoking a method on the ‘ReactUnityWebGL’ object that is exposed by the module. All of our event listeners will be available as a property using the event name on the object giving you the possibility to pass along a parameter.
mergeInto(LibraryManager.library, {
   InfoMaze: function (mazeId) {
      ReactUnityWebGL.InfoMaze(mazeId);
   },
});
When we wanted to use this event listener, we had to import the JSLib by using Unity's DllImport. Because this is used for WebGL and WebGL methods are unavailable in the Unity Editor as well as the Android build, we again used conditional compilation.
#if UNITY_WEBGL && !UNITY_EDITOR
   [DllImport("__Internal")]
   private static extern void InfoMaze(long mazeId);
#endif
When the name of the imported method matches with the method name in the JSLib file, it will be available for you to invoke wherever you like.
#if UNITY_WEBGL && !UNITY_EDITOR
   InfoMaze(id);
#endif
Now to use the event listener we just created, we can register our event listener using the ‘on’ method of the Unity Context. Here we had to name the eventName of the on-method after our created method name.
unityContext.on("InfoMaze", (mazeId) => {
   setMazeId(mazeId);
});
Next up we will be discussing the communication from React to Unity. In general it is less complicated to call methods from React to Unity then it is to receive a message about an event happening the other way around. A basic example of this is the AddExtraTime function. To call a Unity method from React, we can use the ‘send’ method which is available via the Unity Context. This method will invoke a public method on an active GameObject in your Scene, in this example we will be using the GameManager GameObject. Inside of this GameObject a C# script is located with a method called AddExtraTime. This method will then add a set amount of time to the timer in the game.
function addExtraTime() {
   unityContext.send("GameManager", "AddExtraTime");
}
Result of websockets
As previously mentioned the Spring application is also used as a gateway between the two Unity builds. When the VR player for example answers a question incorrectly a REST API POST will be triggered in Spring, which will send a websocket to React. Through these websockets we can then call functions from Unity, as explained above.
simpMessagingTemplate.convertAndSend(
   "/room/addExtraTime/queue/" + roomId,
   "WRONG_ANSWER"
);
useSubscription("/room/addExtraTime/queue/" + roomId, (message: any) => {
   if (message === "WRONG_ANSWER")
      addExtraTime();
});
Hit and Miss
Voice Chat
What we really wanted was voice chat in our game. Unfortunately, WebGL does not support the Microphone API. Therefore, WebGL does not support the voice chat of Photon. We did try some platforms like Agora. Agora is a platform that offers voice and video chat. Once we implemented this, it was test time. Here we could effectively register sound in the console, but unluckily the sound did not reach the other player.
Due to covid, companies have become more digital because they had to work from home. As a consequence, they are probably working with a platform like Microsoft Teams. This would be a solution to our voice chat part. Since we work with a timer we didn’t find it convenient to have text chat.
Hand Tracking
One of the new features Oculus released is Hand Tracking. It is still experimental but we wanted to try this out. Instead of chat we wanted to let players do gestures to show and pass on the question to each other. Afterwards it turned out hand tracking was not a good idea. First of all walking with hand tracking is impossible. Secondly Putting your controllers down, showing your hands to do the gesture and picking your controller back up is not user friendly. For these reasons we removed hand tracking and placed a button on the sign instead.

The End
Wow! You really read all of that?
Congrats!👏🏼👏🏼
If you'd like, you can always try out the game at the TI Student Conference Days at KdG College, Antwerp on Wednesday the 30th of May 2022.
This project was made possible by our coaches Bart and Hans Vochten, as well as KdG College in general and all of it's other co-workers.
We hope to see you soon!
The Rise of the Git Poes team,
Elien Vansingel
Marnick Hens
Yannick Craens

Top comments (0)