In this article, we will explore how to debug PostgreSQL using Visual Studio Code (VS Code). We will assume that you have a client machine (macOS) and a remote Linux environment where PostgreSQL is built and running. Please refer to this article for how to build PostgreSQL from source code in a Linux environment.
When doing remote development in Visual Studio, it's common to use SSH public key authentication instead of password authentication. An SSH key consists of a pair of public and private keys, where you keep the private key in a safe place and register the public key with the remote host, allowing you to connect securely without entering a password.
Step 1: Set up SSH keys
First, we need to create an SSH key. We will do it on the client machine (macOS). We can use the ssh-keygen command to generate a new key pair. The -C option specifies the comment for the key, which can be any string (e.g., an email address). The location where the generated key is saved is specified with the -f option. In this article, we save the key in the ~/.ssh directory with the name id_rasp5, but you can specify a different location and/or name.
ssh-keygen -t ed25519 -C "<YOUR_COMMENT>" -f ~/.ssh/id_rasp5
Next, we need to copy the public key to the remote host's ~/.ssh/authorized_keys file.
ssh-copy-id -i ~/.ssh/id_rasp5.pub yuyash@<REMOTE_HOST_IP_ADDRESS>
If you cannot access the remote host via SSH, manually add the contents of ~/.ssh/id_rasp5.pub to the ~/.ssh/authorized_keys file on the remote host.
Step 2: Configure SSH
We need to configure our SSH client to connect to the remote host. We can do this by adding an entry to our ~/.ssh/config file.
Host rasp5
  HostName <REMOTE_HOST_IP_ADDRESS>
  User <USERNAME>
  IdentityFile ~/.ssh/id_rasp5
Replace and with your remote host IP address and username. This configuration tells SSH to connect to the remote host with the specified hostname, username, and identity file.
Step 3: Install VS Code and extensions
Install VS Code. You can either download the package from the website or use the brew command to install it.
brew install --cask visual-studio-code
We also need to install VS Code extension: Remote - SSH into your client. This extension allows us to connect to a remote host using SSH.
To install these extensions, open the Extensions view in VS Code by clicking on the Extensions icon in the left sidebar or pressing Cmd+Shift+X (macOS). Search for the extensions and click the Install button to install them.
Step 4: Connect to the remote host
Once we have installed the Remote - SSH extension, we can connect to our remote host. Open the Command Palette in VS Code by pressing Cmd+Shift+P (macOS) and type "Connect to Host..." in the input field. Select the host we configured earlier.
Step 5: Install C/C++ extensions on the remote host
After connecting to the remote host, we need to install the C/C++ extension pack on the remote host as well. Follow the same step to open Extensions view and install C/C++ extension. This extension provides C/C++ language support for VS Code.
Step 6: Create a launch configuration
To debug PostgreSQL, we need to create a launch configuration. Open the Run view in VS Code by clicking on the Run icon in the left sidebar or pressing Cmd+Shift+D (macOS). Click on the "create a launch.json file" link.
In the launch.json file, add the following configuration:
{
    "version": "0.2.0",
    "configurations": [
        {
            "name": "(gdb) Attach",
            "type": "cppdbg",
            "request": "attach",
            "program": "${workspaceFolder}/../build/pgsql/master/bin/postgres",
            "MIMode": "gdb",
            "setupCommands": [
                {
                    "description": "Enable pretty-printing for gdb",
                    "text": "-enable-pretty-printing",
                    "ignoreFailures": true
                },
                {
                    "description": "Set Disassembly Flavor to Intel",
                    "text": "-gdb-set disassembly-flavor intel",
                    "ignoreFailures": true
                }
            ]
        }
    ]
}
This configuration tells VS Code to attach to the PostgreSQL process using GDB.
Step 7: Start PostgreSQL
Start PostgreSQL on the remote host. The location of the pg_ctl command depends on the --prefix setting when you built it. This article specifies the same location as in this setup steps.
export PG_DIR_PREFIX=${HOME}/Workplace/build/pgsql/master
${PG_DIR_PREFIX}/bin/pg_ctl -D ${PG_DIR_PREFIX}/data -l logfile start
Step 8: Create a backend process
In this article we will debug a PostgreSQL session. Since PostgreSQL forks a new process for each session, we first make a connection and identify the session's process. Create a backend process by running psql on the remote host:
export LD_LIBRARY_PATH=${LD_LIBRARY_PATH}:${PG_DIR_PREFIX}/lib
${PG_DIR_PREFIX}/bin/psql -d postgres
In the psql prompt, run the following command to get the PID of the backend process:
SELECT pg_backend_pid();
Note down the PID (e.g., 444662). If you run the following command in another terminal without closing the psql session, you will see that the process exists. In the next step, we will debug this process using GDB.
ps -ef | grep postgres | grep 444662
yuyash    444662  444569  0 22:20 ?        00:00:00 postgres: yuyash postgres [local] idle
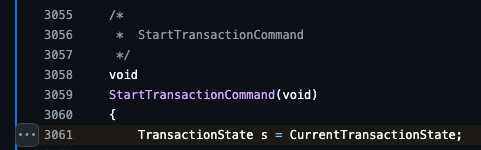
Step 9: Set a breakpoint
Set a breakpoint in the xact.c file at the first line of StartTransactionCommand function.
Step 10: Attach to the process
Attach to the backend process using the launch configuration we created earlier. In the Run view, select the "(gdb) Attach" configuration and click on the "Start Debugging" button. VS Code will attach GDB to the process.
Next, go back to the psql prompt and execute BEGIN; as shown below. This will create a transaction on the PostgreSQL side and go through the code path where you set the breakpoint above.
postgres=# BEGIN;
VS Code's GDB stop at the breakpoint we set earlier. We can now step through the code, inspect variables, and debug PostgreSQL as needed.
That's it! With these steps, you should be able to debug PostgreSQL using Visual Studio Code.

Top comments (0)